
Followed to my previous article about useful office 365 cmdlets in SharePoint Online, in this article I’ll be showing you some more useful PowerShell cmdlets to generate SharePoint Online reports /SharePoint Online site administration. I see a lot of misconception with my fellow SharePoint workers on understanding the difference between SharePoint on-premises cmdlets and Office 365(SharePoint Online) cmdlets, please note that they all don’t have the same functionality even though they almost look similar. There is a lot of difference in what they exactly do, so please pay close attention while utilizing them.

So let’s get into the real meats and potatoes now…
- To create a new SPO Site collection:
Syntax: New-SPOSite -Url https://vigx.sharepoint.com/sites/Vignesh -Title “Vignesh” -Owner “vigganesan89@vigx.onmicrosoft.com” -Template “STS#0” -TimeZoneId 10 -StorageQuota 200

Note: In the above mentioned command you need to specify the URL of your new site collection, Title Name, Template ID, Time Zone and Storage quota size. Please check my previous article on SharePoint Online command to get to know about SharePoint Online Template ID’s
Running this command will create a new site collection in SPO and you can verify this in your SPO admin center as shown below.

2.To list the groups, and all the group memberships, for all of your SharePoint Online sites.
Syntax:
$x = Get-SPOSite
foreach ($y in $x)
{
Write-Host $y.Url -ForegroundColor “Yellow”
$z = Get-SPOSiteGroup -Site $y.Url
foreach ($a in $z)
{
$b = Get-SPOSiteGroup -Site $y.Url -Group $a.Title
Write-Host $b.Title -ForegroundColor “Cyan”
$b | Select-Object -ExpandProperty Users
Write-Host
}
}
Running the above mentioned command will display the results as shown below,

3.To list the groups, and all the group memberships, for a single site collection:
Syntax:
First let me assign the $siteURL variable to the site collection in question.
$siteURL = “https://vigx.sharepoint.com/teams/test”–> Site in question.
$siteURL = “https://vigx.sharepoint.com/teams/test”
$x = Get-SPOSiteGroup -Site $siteURL
foreach ($y in $x)
{
Write-Host $y.Title -ForegroundColor “Yellow”
Get-SPOSiteGroup -Site $siteURL -Group $y.Title | Select-Object -ExpandProperty Users
Write-Host
}
Running this command will display the results as shown below .

4.To lock a SharePoint Online site:
Syntax: Set-SPOSite -Identity $site -Lockstate NoAccess
Specify the $site variable to the site which you want to lock.

Running this command will lock the site and when you try to access it you will get a 403 Forbidden error.
5.To unlock as SharePoint Online site:
Syntax: Set-SPOSite -Identity $site -Lockstate Unlock

This will unlock the site that we just locked in the previous command.
6.To disable external sharing for a SharePoint Online site collection:
Syntax:
$siteURL = “https://vigx.sharepoint.com/teams/test”–> Site in question
Set-SPOSite -Identity $siteURL -SharingCapability Disabled

You can verify this in your SharePoint Online admin center as shown in the image below. The site in question will have external sharing disabled as shown below.

7.To enable external user and guest sharing:
Syntax:
Set-SPOSite -Identity $siteURL -SharingCapability ExternalUserandGuestSharing

Running this command will enable external user and guest sharing in a SPO site collection and you can verify that in the screenshot below.
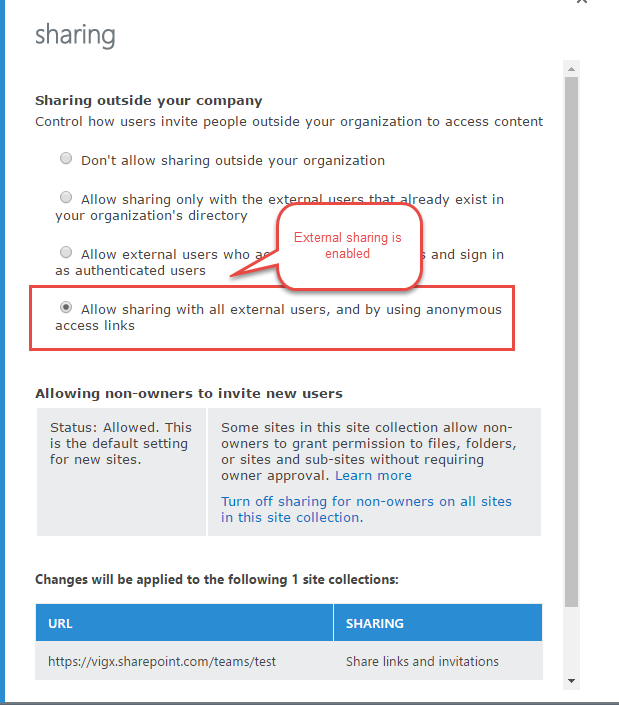
Note: By default, this feature will be disabled for SPO sites and this has to be enabled if required.
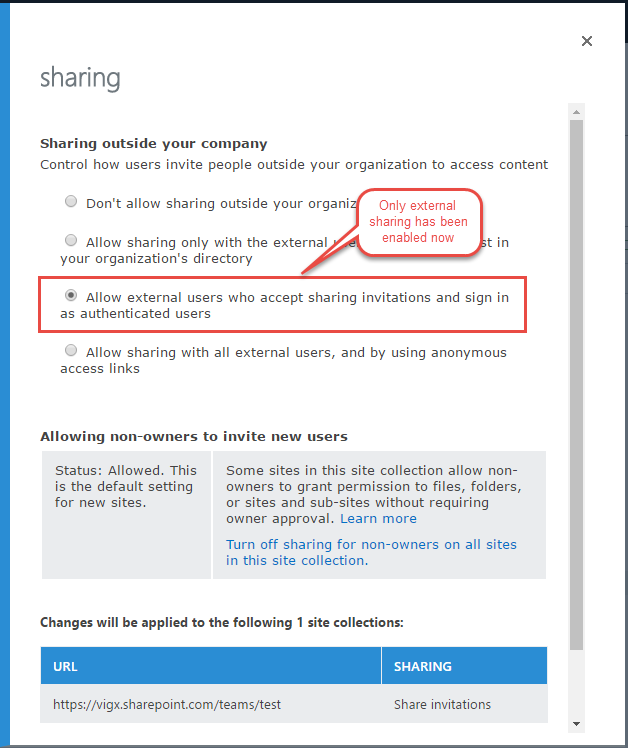
8.To enable only external user sharing:
Syntax: Set-SPOSite -Identity $siteURL -SharingCapability ExternalUserSharingOnly

Running this command will only enable external user sharing in a SPO site collection and you can verify that in the screenshot below.
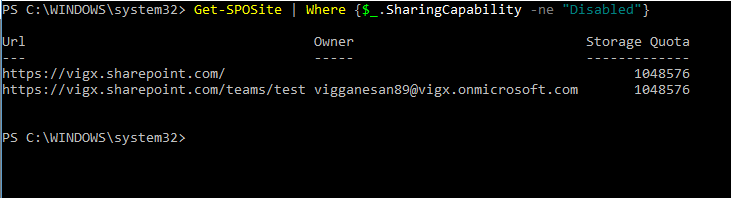
9.To get the list of sites where sharing capability has been enabled:
Syntax: Get-SPOSite | Where {$_.SharingCapability -ne “Disabled”}
- To get the list of sites where sharing capability is disabled:
Syntax: Get-SPOSite | Where {$_. SharingCapability -eq “Disabled”}

11.To change the owner of site:
Syntax:
First let me assign the $siteURL variable to the site collection in question.
$siteURL = “https://vigx.sharepoint.com/teams/test”–> Site in question
Set-SPOSite -Identity $siteURL -Owner “pritham@vigx.onmicrosoft.com”

12.To change the storage and resource quota of a site:
Syntax:
Set-SPOSite -Identity $siteURL -StorgaeQuota 1000 -ResourceQuota 500
13.To change the Title of the site:
Syntax:
Set-SPOSite $siteURL -Title “New Title”

This will change the title of the site in question. You can verify this below.

Thanks for reading this article. This is all I have for this post and I’ll be back with Part 3 of this article very soon.
Happy SharePointing !!!

Thanks Vignesh, Amazing article. I want to let you know that recently MS add a new sharing capability called “ExistingExternalUserSharingOnly”. So you can include that as one of the options in your post.
LikeLike
Thanks for letting me know Eshan Hakimi . I’ll definitely add that to the post
LikeLike
HI Vignesh, Is there any script for finding user access in all site collections in a tenant in SPO
LikeLike
Yes , I do have one .I’ll share it in my blog site shorlty
LikeLike