MinRole – I hope everyone would agree with me when I say that “MinRole” has become a buzz word among many SharePoint folks ever since Microsoft released SharePoint Server 2016. I myself have personally read many articles/blogs and viewed some videos on it to understand in detail about MinRole and how to make use of it. However, there has been times where I couldn’t really understand it completely and I had to work with many SharePoint experts in the industry to understand in detail about what MinRole is and how it works. But still I can sense a lot of uncertainty among few SharePoint folks in understanding MinRole and how to make use of it. Hence, in this article I’ll be explaining in detail about the below mentioned points….
- What is MinRole?
- How to deploy a SharePoint 2016 farm using MinRole topology?
- Different server roles in MinRole
- Different type of MinRole topologies
- MinRole -Before and after Feature Pack 1
- The benefits of using MinRole
- MinRole Administration
- MinRole compliancy
- Opting out of MinRole
- How/where to deploy 3rd party apps while using MinRole?
Alright, so let’s get started …
- What is MinRole?
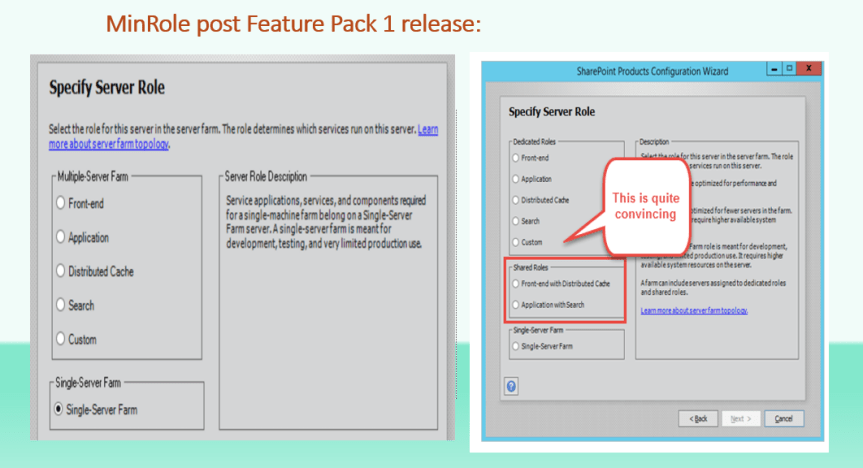
To put it in very simple words, MinRole is a new farm topology based on a set of predefined server roles which got introduced in SharePoint Server 2016. Unlike the old traditional SharePoint farm topologies where you add a server to a farm and then configure it, here you can select the role of a server when you create a new farm or join a server to an existing farm and SharePoint will automatically configure the services on each server based on the server’s role. SharePoint Server 2016 by default has been optimized for the MinRole farm topology.
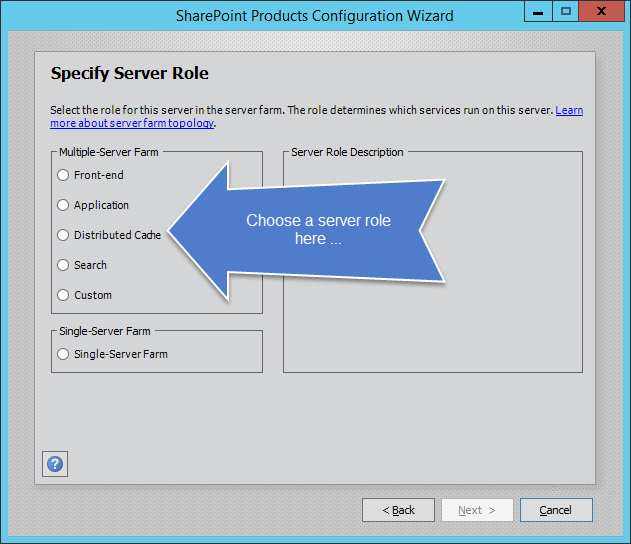
So, the point here to understand is, with MinRole you don’t need to add servers to a SharePoint farm and then configure each server in the farm as WFE, APP, Search etc.… MinRole will do that magic for you. Once you add a new SharePoint 2016 server to a farm and run the configuration wizard you would get a screen as shown below which asks you to choose the appropriate role .Once you select the appropriate role ,SharePoint will automatically turn on and configure the necessary services based on the server’s role.

Now that we have understood about MinRole, let’s understand how to deploy a SharePoint 2016 farm using MinRole topology.
2.How to deploy a SharePoint 2016 farm using MinRole topology?
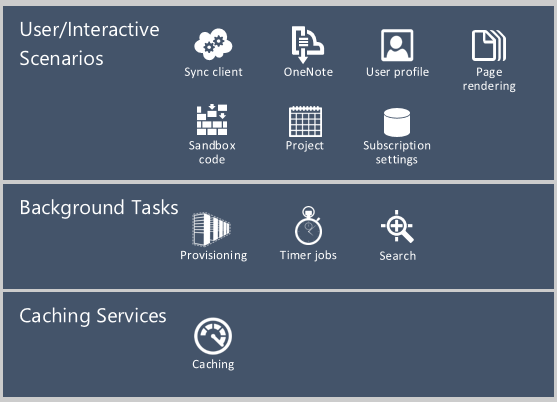
Before I go ahead and discuss about how to deploy a SharePoint 2016 farm using MinRole topology, let’s refresh ourselves by taking a glance at the default SharePoint 2013 streamlined topology which we’re already used to. Let’s look at the image below to understand about the default SharePoint 2013 streamlined topology…
So as shown in the image above, in SharePoint 2013 when you create or add a new server to the farm you have to manually go to the “Manage services on server “section on Central administration site and turn on the required services after which you would be configuring the required service application (Ex: Search Service Application, Managed metadata service application, User Profile service application & Distributed Cache service application etc.…)

However, the good news with SharePoint 2016 you don’t need to spend time on turning on the required services under “Manage services on Server “. You just need to focus on choosing the required role on the “Specify server role “window which I just described above and SharePoint will take care of the rest for you. Hang on, let’s be clear here …. SharePoint will only take care of automatically turning on the required services but the service application has to be configured by you as an admin. I guess while reading this, you must have this question in mind … “Well this is cool, but how does SharePoint manages to do this by itself? “…The answer to this follows, when you create a new farm or join a machine to an existing farm, SharePoint starts the base set of service instances that are required for the server’s role. It also detects which additional services have been enabled in the farm and starts the matching service instances as appropriate for the server’s role. Finally, it detects which service applications have been created in the farm and which services are necessary to support those service applications. Those service instances will be started as appropriate for the server’s role, as well.
MinRole management of service instances doesn’t happen only when you join a server to a farm. As you enable or disable services in the farm, or as you create and delete service applications in the farm, MinRole starts and stops service instances on the existing servers in the farm. This ensures that each server in your SharePoint farm is running exactly the services it needs.
So, the end result is, you as a SharePoint farm administrator can only focus on what services you want to run in your farm and not worry about where they’re running. The MinRole topology in SharePoint will take care of the rest.
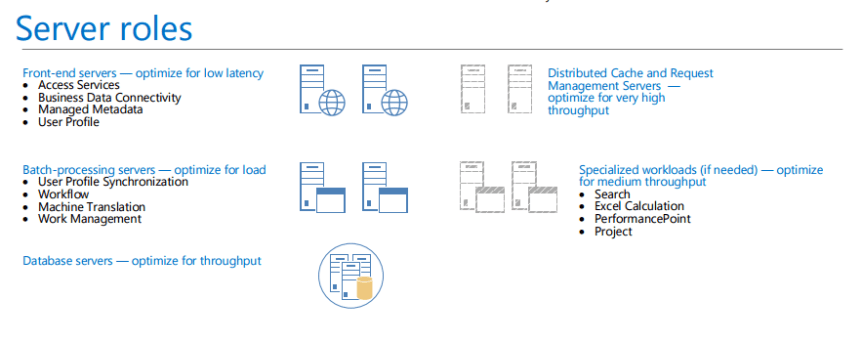
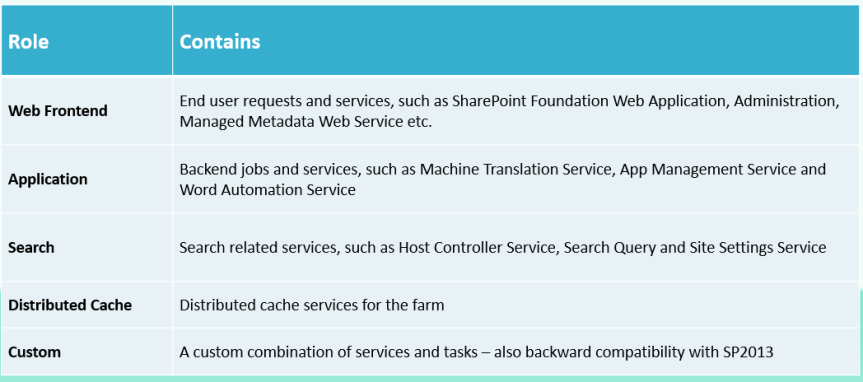
Also, let’s take a look at the image below which illustrates how the SharePoint services are scattered between these different server roles while using MinRole topology.
All the user interactive scenarios would be running on the WFE role, all the background tasks such as Search, UPS etc. would be running on the APP role and finally the caching services would be running on the DC role .
Well, hang on …. I still didn’t tell you how to deploy a SharePoint 2016 farm using MinRole. There’s two variants to do this … 1. Using the SharePoint product configuration wizard 2. Using PowerShell.
- Using the SharePoint Configuration Wizard:
So, you can choose the role of a server while adding it to the farm using the below mentioned screen which you get while running the product configuration wizard.
- Using PowerShell:

Now that we have understood how to deploy a SharePoint 2016 server /farm using MinRole, let’s try to understand the different roles available in MinRole topology.
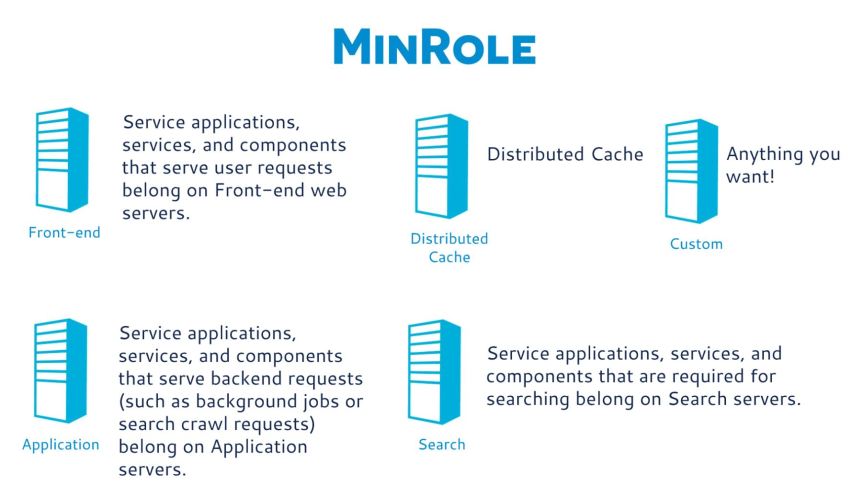
- Different server roles in MinRole:
The below mentioned image from one of my presentations on SharePoint 2016 clearly illustrates the different roles that are available in MinRole.
So, based on your need/architecture planning you can choose the appropriate role. However, this architecture might sound quite costly because with MinRole you can’t add two application roles together like how we used to do in SharePoint 2013 for small farms with 4 to 6 servers, meaning you don’t get to enjoy the privilege of having Search and Managed metadata or may be Search and User Profile service running on the same server. In MinRole if you do so then that particular server would be marked as non-compliant. But Microsoft has listened to its customers about this and has made some changes to the MinRole feature in Feature Pack 1 release for SharePoint 2016 and I’ll be talking in detail about that later on this article.
Note: The concept of Service packs is gone in SharePoint 2016 and is now replaced with Feature packs. You don’t get to see Service packs anymore at least on SharePoint 2016. Also, the Feature packs won’t be as separate packages like your service packs which gets released separately( i.e. once in 12 months as a separate package ). A particular month’s CU/PU would be called as a feature pack where Microsoft would ship all the fixes/new features and that month’s CU would be called as Feature Pack. Till now Microsoft has release Feature Pack 1 (i.e. Nov 2016 CU) and you can find the details about that in this link below . So, a specific month’s CU would be released as a FP hereafter .
https://support.microsoft.com/en-us/help/3127940/november-8,-2016,-update-for-sharepoint-server-2016-kb3127940
Microsoft was quite ahead of their schedule while they released FP1 as the original release date was planned on 2017 .However they managed to release that on Q4 of 2016 itself .
This image below depicts the roadmap for SharePoint Server 2016 :

Alright , let’s jump into the different type of topologies in MinRole .
- Different type of MinRole topologies :
Now that we have seen a lot about MinRole , I guess it really begs the question of how to choose the appropriate SharePoint topology while using MinRole . Well , let’s go and take a look at it . Shall we ?
A typical SharePoint 2013 Topology :
This is how a typical SharePoint 2013 Topology would look like . Please check the image below .

In this case the SharePoint Administrators manually configure services on each server to fit these roles and in addition that as features and services are added, administrators have to determine where these components should run based on best practices, current server load, etc.
But this is not the case with SharePoint 2016 MinRole Topology , since this is a role based architecture you can directly choose the role you want to deploy and MinRole will take care of the rest . Please check the image below which depicts a SharePoint 2016 MinRole topology architecture .
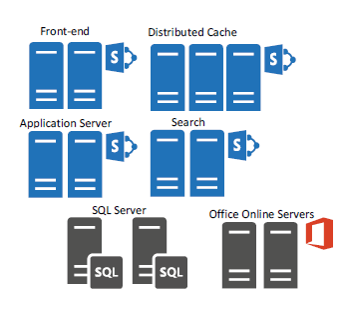
SharePoint 2016 MinRole Topology :
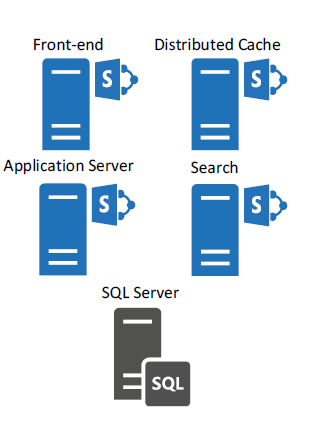
As shown in the image above, you need not less than 4 servers to deploy a SharePoint 2016 farm. If you’re including SQL then in that case you need at least 5 servers for MinRole. Also , Minimum configuration does not have any resiliency.
Let’s see how this works when you want to plan a SharePoint 2016 HA farm with MinRole topology .
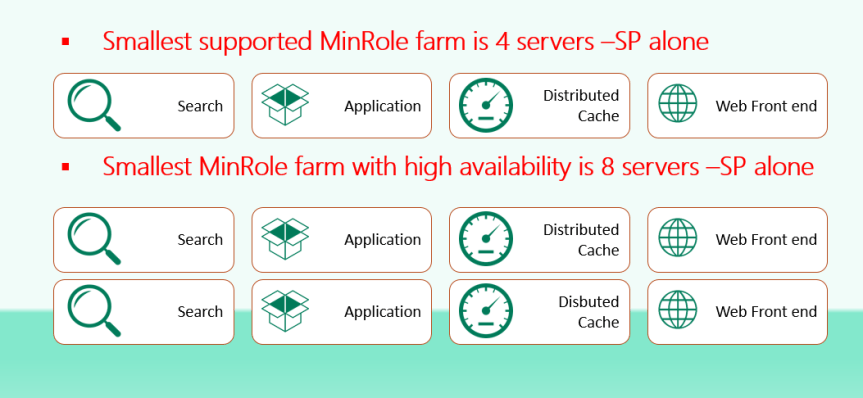
So, as you can see in the image above , two servers are required for each role . When it comes to Distributed cache three servers are required in a cluster quorum . We also need SQL availability groups to achieve HA in the SQL layer. So, in total you might require 13 servers altogether if you’re also adding Office Online server in HA .
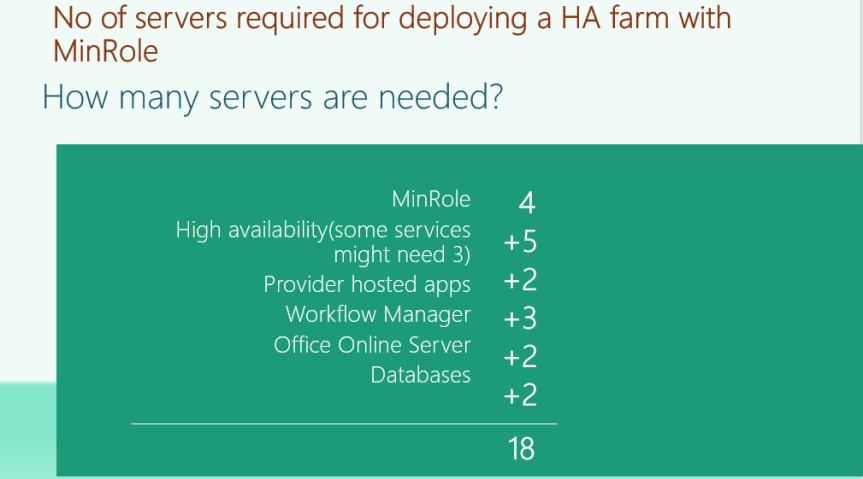
However , this count may vary based on your architecture and planning . Please check the image below where I’ve designed a HA SharePoint 2016 farm with proper planning .In this case the total number of servers required is 18 .So the point to note here , based on your business needs you can scale out the total number of servers for HA .
Custom 3 Tier MinRole Topology:
This is how a custom 3 tier MinRole topology looks like. The front-end servers are benefited from MinRole. The custom server role is used to configure custom servers to run majority of SharePoint service applications and reduce the number of servers. Unlike MinRole, the services have to be manually configured on the custom server role. It’s the job of the SharePoint Administrators to configure the required services on the custom server.

Custom HA Topology with Search:
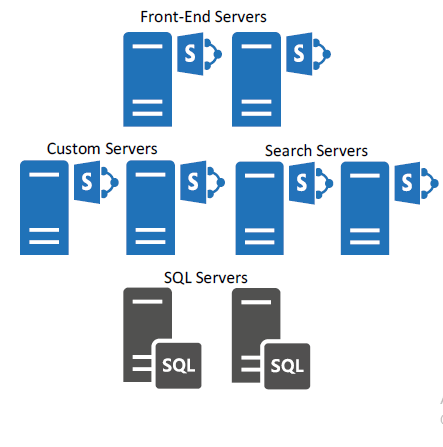
This is how this architecture has been planned,
- Two load balanced servers with Front-end role.
- Two custom servers running distributed cache, User Profile Sync, Secure Store.
- Two servers with Search server role.
- SQL servers configured with always on availability groups.
5.MinRole -Before and after Feature Pack 1:
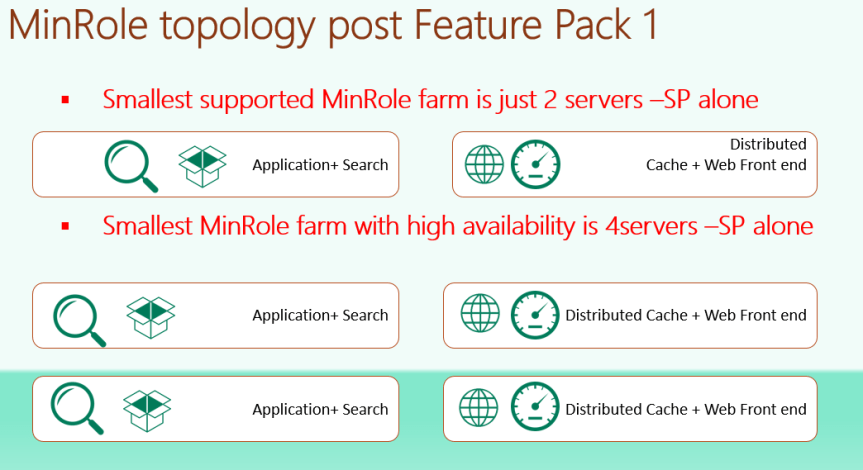
Now, if you see the complete overview of MinRole you might understand that you need high budget to implement this due to the total number of servers required. Unlike SharePoint 2013, you don’t get to add the roles together in a single server (i.e. Custom Role) while using MinRole topology and this might increase the budget and many customers have reported the same concern to Microsoft. As always, Microsoft listened to their customer’s feedback and they’ve made some changes to this in Feature pack 1. Let’s look at that in the image below.
I guess the image above gives a detailed explanation about the changes to MinRole topology post FP1 . So, post FP1 you can add two roles together which will reduce the total number of servers required to build a SharePoint 2016 farm using MinRole.
If you’re interested in knowing more about the new features that was introduced in Feature Pack 1, please take a look at the link below.
https://blogs.office.com/2016/09/26/announcing-feature-pack-1-for-sharepoint-server-2016-cloud-born-and-future-proof/
- The benefits of using MinRole:
Listed below are the benefits of using MinRole.
- Simpler Deployments
- Improved Performance and Reliability
- Simpler Capacity Planning and Farm Scalability.
Simpler Deployments:
- SharePoint Administrators no longer need to worry about which services have been enabled on which servers.
- Administrators can reduce the risk of slight misconfigurations during installation by leveraging a template-type deployment.
- Administrators can focus on what functionality to enable in the farm and let SharePoint take care of the rest.
Improved Performance and Reliability:
- Microsoft has been operating SharePoint online since 2011 and has analyzed key performance characteristics of operating SharePoint at an internet scale such as CPU, Memory, disk I/O and network latency.
- SharePoint has been optimized for MinRole topology based on all that analysis /learning which Microsoft learned from operating SharePoint Online in their own datacenters for years.
- Improved service application load balancer services requests from local service instances instead of going across the farm to another server.
Simpler Capacity Planning and Farm Scalability:
- In SharePoint 2016, Microsoft bases capacity planning on the MinRole topology.
- Leverage predictable and perspective capacity-planning guidance by deploying a farm based on the MinRole topology.
- As SharePoint needs grow, easily add more servers to the farm and SharePoint will automatically configure the additional servers.
- MinRole Administration:
You can administer MinRole from the Central administration site and also via PowerShell
Using Central Administration site:
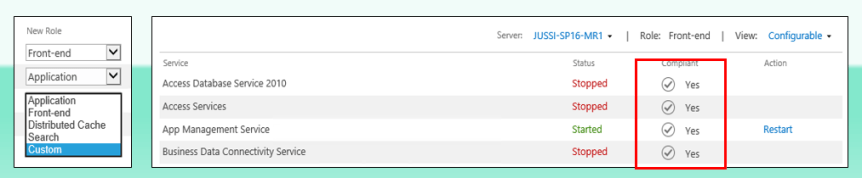
You can change the role of a server after it’s deployed and also check whether the server is complaint from the central administration site itself. The same can be achieved using PowerShell as well. A server in the farm which was acting as WFE today can be made as a APP tomorrow and once you change the role SharePoint will automatically turn on and off the required services .
Using PowerShell:

Note: There’s some bugs that has already been identified and reported to MS while toggling the role of server from the Central Administration site and hence it’s better to use PowerShell to change the role of a server
8.MinRole compliancy:
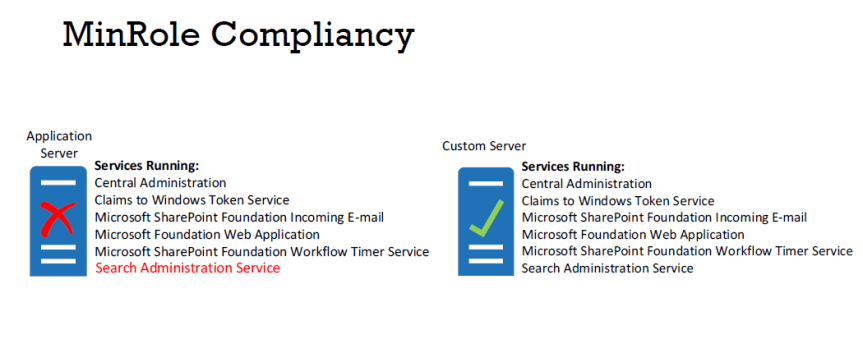
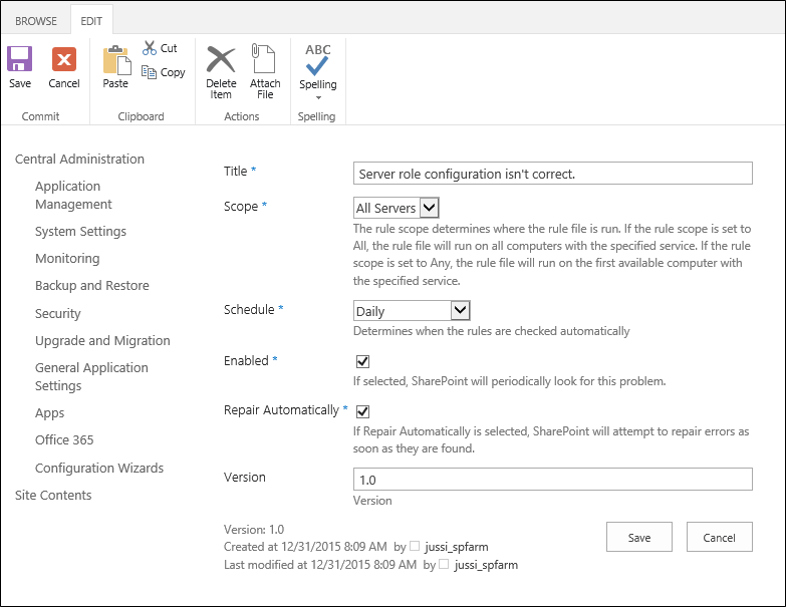
- Once a Server’s role is configured, only those services appropriate for that role can run on that server.
- SharePoint 2016 has a new set of Health Analyzer rules and timer jobs to identify when a server isn’t MinRole complaint.
- If a service is accidently turned on and shouldn’t be running on that server, SharePoint will automatically turn it off.
9.Opting out of MinRole:
As a SharePoint administrator, you can always say no to MinRole if you’re not planning to use it. This can be achieved by assigning some/all the servers in the farm to the custom role and then manually manage service instances on these servers. Also, you need to consider using “ServerRoleOptional” parameter when creating a new SharePoint farm if existing deployments script needs to remain intact.
10.How/where to deploy 3rd party apps while using MinRole?
Well, the answer to this simple. Yes, you guessed it correctly, so it’s the “Custom Role” that you need to choose while deploying any third-party applications such as (Ninetex Workflows, AvePoint etc.). In addition to that, services like PerformancePoint, PowerPivot etc. would best fit in the custom role.
MinRole is truly phenomenal and would definitely reduce the risk and the time taken by a SharePoint administrator to deploy a SharePoint 2016 farm. Microsoft has done an awesome job in introducing MinRole on SharePoint 2016 which would definitely reduce all our burdens as SharePoint administrators. Thanks for reading this post …. Happy SharePointing!!!

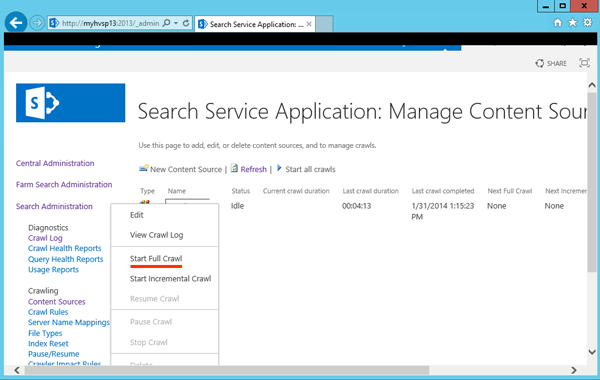
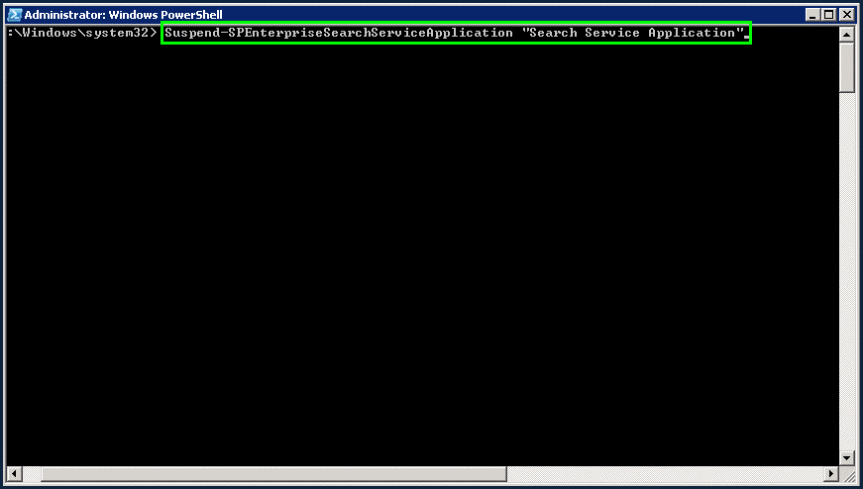
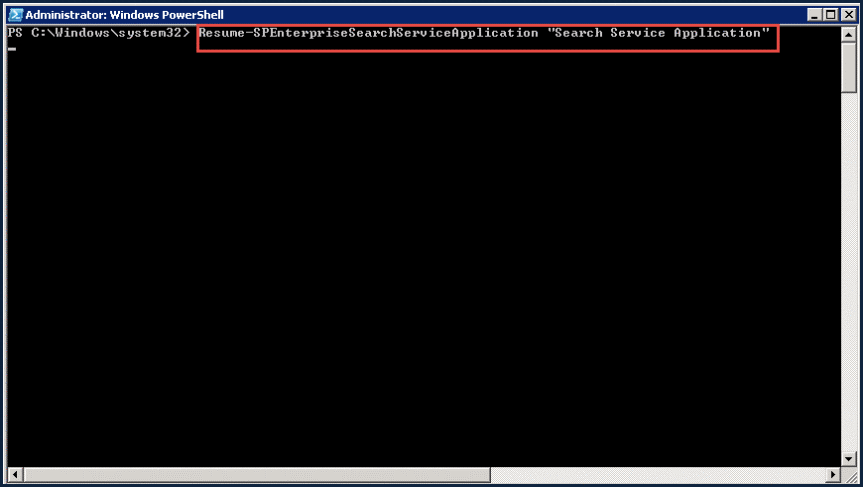
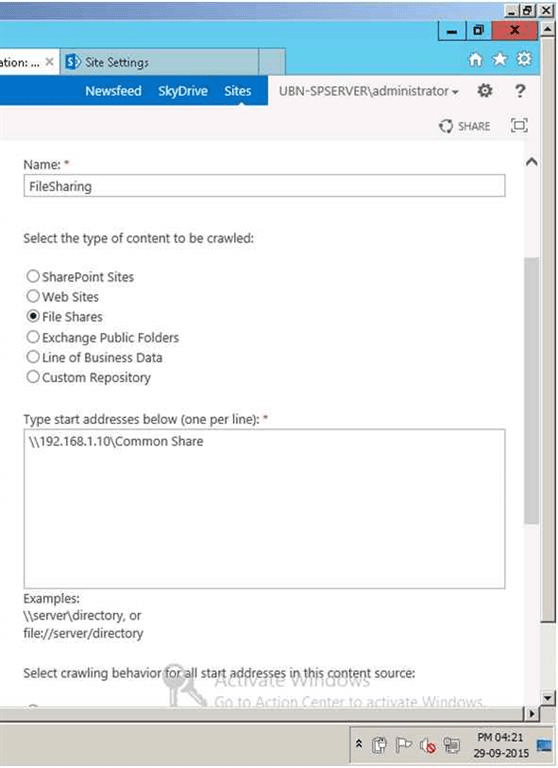
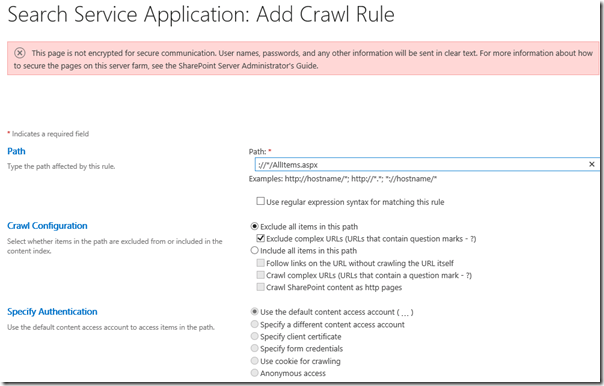
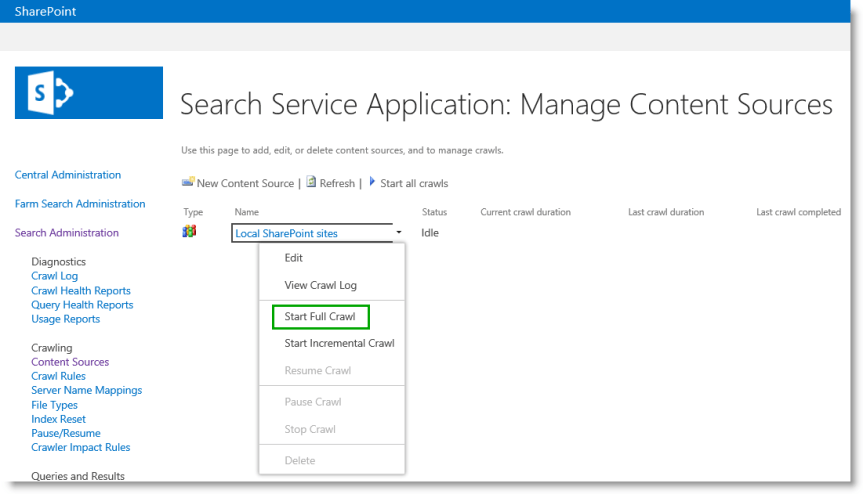 2. You recently added a new content source and it hasn’t been crawled yet (Note: This is applicable for all the types of content sources (i.e. Local SharePoint sites, File shares, Exchange public folders and External line of business data)


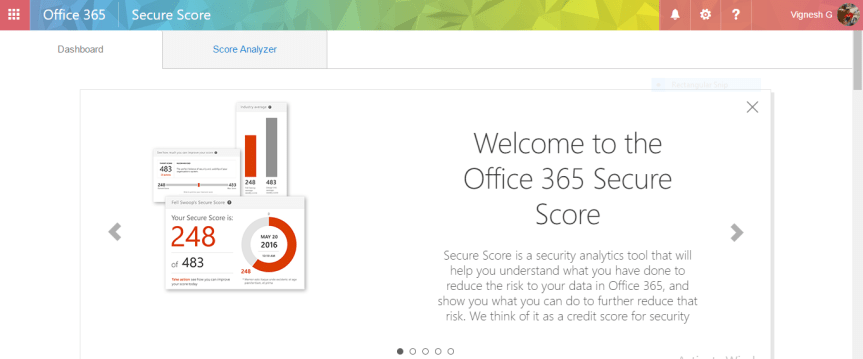
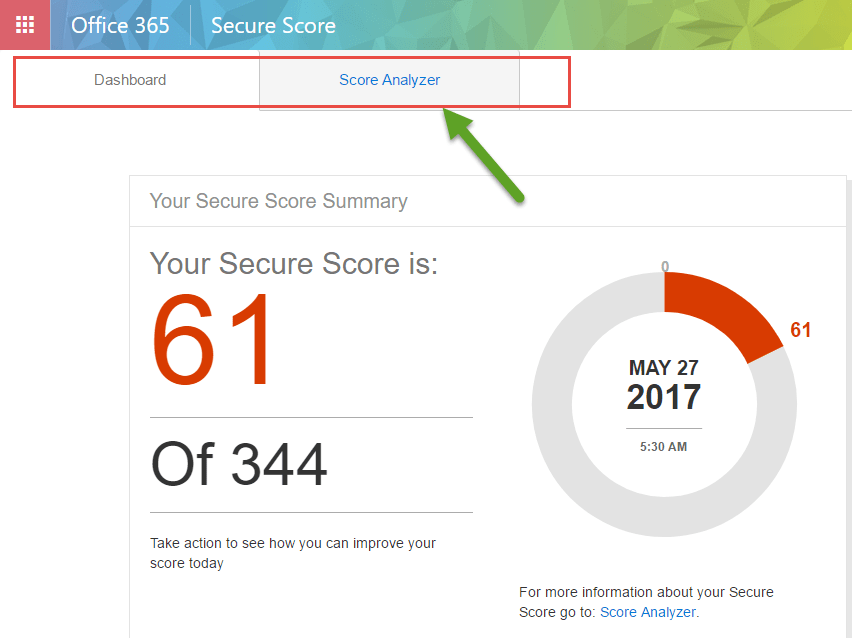
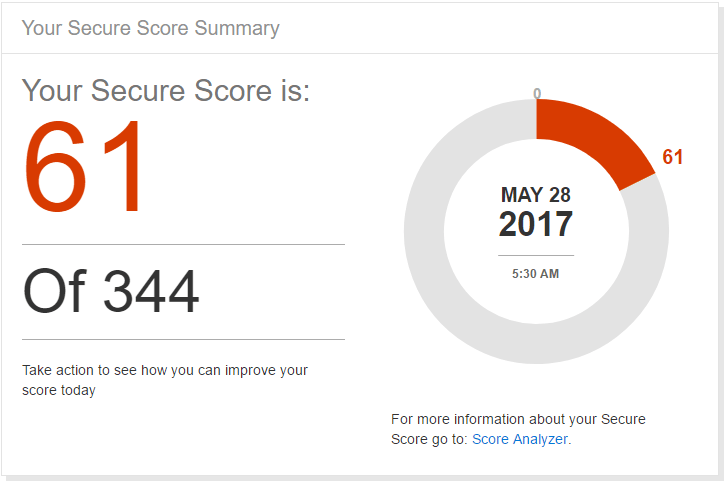
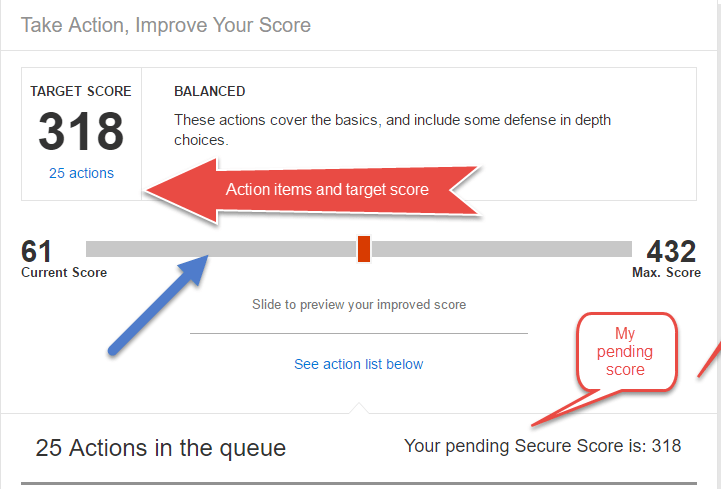
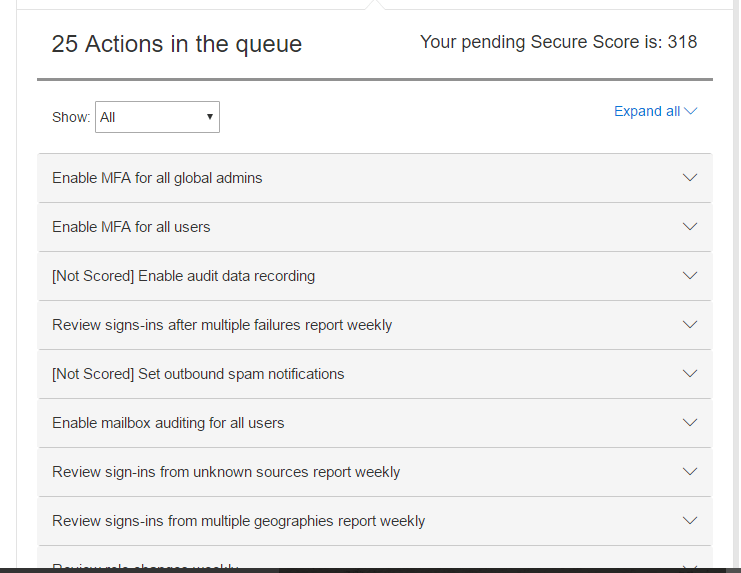
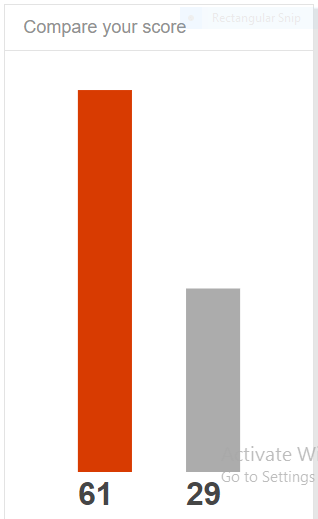
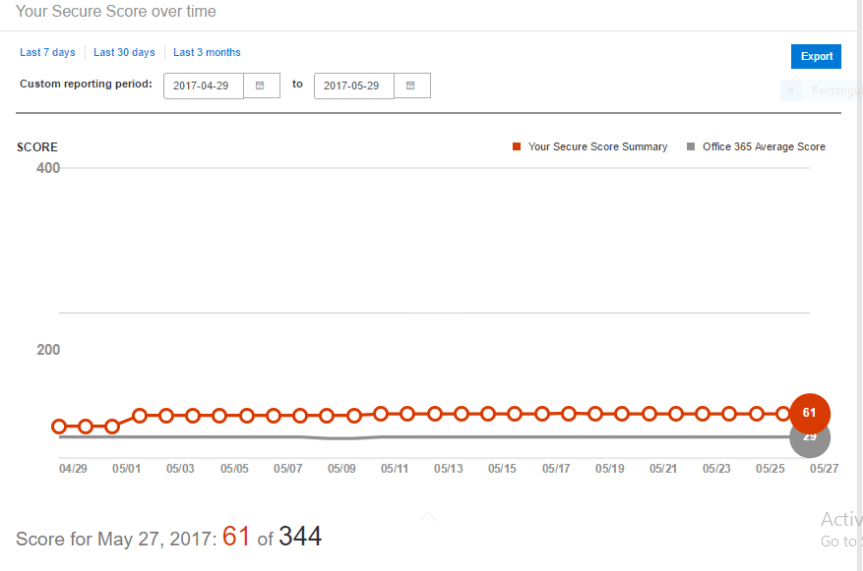
 Compare your score: