Howdy Folks! As promised in previous blog post related to Office groups , I’m back now with some cool PowerShell cmdlets which should ease your work in managing Office 365 groups in your organization . If you’re new to Office 365 groups, I humbly request you to read in detail about Office 365 groups by accessing this link. I’ve tried my best to explain Office 365 groups there. You can read this post on HubFly blog site as well. Alright, let’s get started ….
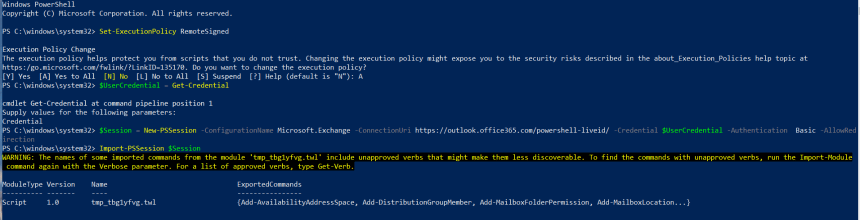
Note : Before you can run all these PowerShell cmdlets below , you need to load the Exchange Online management shell by following this link .I’ve given a screenshot below for your reference .
Listed below are the operations that you can perform by following the PowerShell commands mentioned below
- Get the list of all the Office 365 groups in your tenant
- Remove an existing Office 365 group from the tenant
- To make changes to an existing Office 365 group
- Get the membership and ownership information of an Office 365 group /all the Office 365 groups in your tenant
- Get the list of all the Office 365 groups in descending order
- Get the list of all Private Office 365 groups in your tenant
- Get the list of deleted Office 365 groups in descending order
- Get the list of orphaned Office 365 groups in your tenant
- Retrieve the list of recently created Office 365 groups
- Update the quota of a new group if a team site exists
- Create new Directory Settings for Groups template
- Update the classifications for all the Office 365 groups
- Update the privacy of an Office 365 group based on its classification
- Determine where a group was provisioned (Planner, Yammer, Teams etc.)
- Get the list of Obsolete Office 365 groups in your tenant
So, let’s look into all these operations in detail below….
- To get the list of all the Office 365 groups in your tenant:
Get-UnifiedGroup

- To remove an existing Office 365 group:
This will remove a specific Office 365 group from your tenant.
Remove-UnifiedGroup -Identity “Test Group”
- To make changes to an existing Office 365 group in your tenant:
Set-UnifiedGroup
Ex 1: Set-UnifiedGroup -Identity “HR Team” -AccessType Private
This example changes the Office 365 Group named HR Team from a public group to a private group.
Ex 2: Set-UnifiedGroup -Identity “HR Team” -PrimarySmtpAddress hrteam@o365techy.onmicrosoft.com -RequireSenderAuthenticationEnabled $false
This example makes the following changes to the Office 365 Group named HR Team:
i)The primary email address is changed to hrteam@o365techy.onmicrosoft.com.
ii)The Office 365 Group is allowed to receive mail from unauthenticated (external) senders.
- To get the membership and ownership information of an Office 365 group/all the Office 365 groups in your tenant:
Get-UnifiedGroupLinks
Ex: Get-UnifiedGroupLinks -Identity “Transport Department” -LinkType Members
This example shows the members of the Office 365 Group named Transport Department
Similarly, you can use the script below to get the list of all the members from all the Office 365 groups in you tenant.
Get Office 365 group members
This will run and display the results as shown in the screenshot below.

- To get the list of all the Office 365 groups in descending order:
Get-UnifiedGroup | Select Id, DisplayName, ManagedBy, Alias, AccessType, WhenCreated, @{Expression={([array](Get-UnifiedGroupLinks -Identity $_.Id -LinkType Members)).Count }; Label=’Members’} | Sort-Object whencreated | Format-Table displayname, alias, managedby, Members, accesstype, whencreated

- To get the list of all private Office 365 groups in your tenant:
Get-UnifiedGroup | Where-Object {$_.AccessType -eq ‘Private’} | Sort-Object whencreated | Format-Table displayname, alias, managedby, accesstype, whencreated

- To get list of deleted Office 365 groups in descending order:
Get-AzureADMSDeletedGroup | Sort-Object DeletedDateTime -Descending | Format-Table Id, DisplayName, Description, Visibility, DeletedDateTime
Note: To run this command, you need to do the below mentioned steps, else you would end up getting an error as shown in the image below. If you pay close attention to the cmdlet you would notice that this is related to Azure AD and hence you need to load the Azure AD PowerShell module for this.
I’d suggest performing these tasks in a different PowerShell window for ease of use.
- Uninstall the production module of Azure AD by running, (Uninstall-Module AzureAD) as this cmdlet works with the preview module of Azure AD.
- You cannot have the production module and the preview module running on the same machine as per Microsoft’s documentation mentioned in this link https://docs.microsoft.com/en-us/powershell/azure/active-directory/install-adv2?view=azureadps-2.0
- Once done, please go ahead and install the Preview module by running (Install-module AzureADPreview)
- After that, please connect to Azure AD by running Connect-AzureAD as shown in the image below

5. Once you’re done connecting to Azure AD, please go ahead and run the above-mentioned cmdlet to get the list of deleted Office 365 groups in descending order and you will get the results as shown in the image below. In my case I don’t have any deleted Office 365 group and hence it didn’t return anything.

8.To get the list of orphaned Office 365 groups in your tenant:
$Groups = Get-UnifiedGroup | Where-Object {([array](Get-UnifiedGroupLinks -Identity $_.Id -LinkType Owners)).Count -eq 0} `
| Select Id, DisplayName, ManagedBy, WhenCreated
ForEach ($G in $Groups) {
Write-Host “Warning! The following group has no owner:” $G.DisplayName
}

9.To retrieve the list of recently created Office 365 groups:
# Variables:
# Cutoff date in days
# Storage quota in MB
# Storage quota warning level in MB
#………………………………………………………………………………………………………………………………………
$cutoffdate = ((Get-Date).AddDays(-20))
$quota = 500
$warning = 400
$Groups = Get-UnifiedGroup | Where-Object {$_.WhenCreated -ge $cutoffdate} | Sort-Object whencreated | Select DisplayName, WhenCreated, SharePointSiteUrl

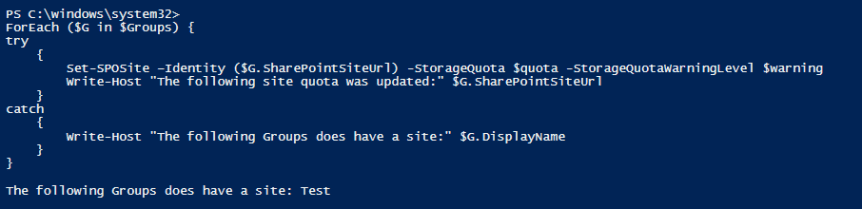
- To update the quota of a new group accordingly if a team site exists:
ForEach ($G in $Groups) {
try
{
Set-SPOSite –Identity ($G.SharePointSiteUrl) -StorageQuota $quota -StorageQuotaWarningLevel $warning
Write-Host “The following site quota was updated:” $G.SharePointSiteUrl
}
catch
{
Write-Host “The following Groups does have a site:” $G.DisplayName
}
}
This will run and update the quota of the site as shown in the screenshot below.
11.To create new Directory Settings for Groups template:
There are multiple templates that are part of your Azure AD tenant. This template can contain a settings object which has a collection of values. By using these values, we can set the parameters below. This needs to be done before you can set any values
| Setting |
Description |
| · EnableGroupCreation
· Type: Boolean
· Default: True |
The flag indicating whether Office 365 group creation is allowed in the directory by non-admin users. This setting does not require an Azure Active Directory Premium P1 license. |
| · GroupCreationAllowedGroupId
· Type: String
· Default: “” |
GUID of the security group for which the members are allowed to create Office 365 groups even when EnableGroupCreation == false. |
| · UsageGuidelinesUrl
· Type: String
· Default: “” |
A link to the Group Usage Guidelines. |
| · ClassificationDescriptions
· Type: String
· Default: “” |
A comma-delimited list of classification descriptions. |
| · DefaultClassification
· Type: String
· Default: “” |
The classification that is to be used as the default classification for a group if none was specified. |
| · PrefixSuffixNamingRequirement
· Type: String
· Default: “” |
String of a maximum length of 64 characters that defines the naming convention configured for Office 365 groups. For more information, see Enforce a naming policy for Office 365 groups (preview). |
| · CustomBlockedWordsList
· Type: String
· Default: “” |
Comma-separated string of phrases that users will not be permitted to use in group names or aliases. For more information, see Enforce a naming policy for Office 365 groups (preview). |
| · EnableMSStandardBlockedWords
· Type: Boolean
· Default: “False” |
Do not use |
| · AllowGuestsToBeGroupOwner
· Type: Boolean
· Default: False |
Boolean indicating whether or not a guest user can be an owner of groups. |
| · AllowGuestsToAccessGroups
· Type: Boolean
· Default: True |
Boolean indicating whether or not a guest user can have access to Office 365 groups content. This setting does not require an Azure Active Directory Premium P1 license. |
| · GuestUsageGuidelinesUrl
· Type: String
· Default: “” |
The URL of a link to the guest usage guidelines. |
| · AllowToAddGuests
· Type: Boolean
· Default: True |
A Boolean indicating whether or not is allowed to add guests to this directory. |
| · ClassificationList
· Type: String
· Default: “” |
A comma-delimited list of valid classification values that can be applied |
Let me walk you through the complete process of creating directory settings here.
- Install the Azure AD PowerShell Module V2 from this link
- Run “Install-Module -Name AzureADPreview” in the PowerShell window
- Once done Connect to Azure AD via PowerShell by running “Connect-AzureAD”
- Once done to review if you have any settings already configured in your tenant, please run the below cmdlet.
Get-AzureADDirectorySetting | ForEach Values
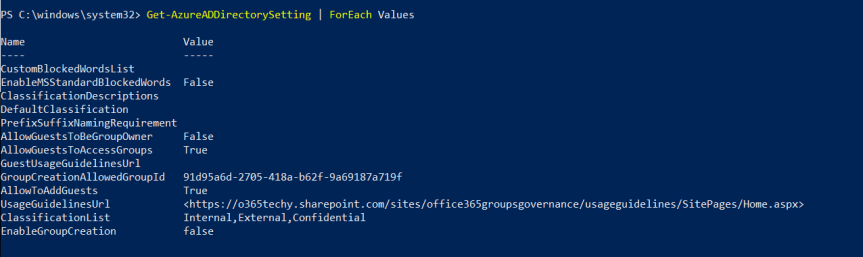
Note: If you check the screenshot above you will notice that I have configured few directory settings such as “Usage Guidelines URL “and “Classification List “and I’ll be showing you how to configure that using PowerShell in the examples below.
5. If you do not have any settings configured the value returned will be blank as show in the screenshot below.

6. Alright, now let’s see some examples to set group settings.
7. All examples below will use the Get-AzureADDirectorySetting cmdlet and store that in a variable and then use the Set-AzureADDirectorySetting cmdlet with the updated settings. The full command to run a setting update is as follows. Also, I’d suggest to use PowerShell ISE for running these cmdlets for ease of usage.
$settings = Get-AzureADDirectorySetting | where-object {$_.displayname -eq “Group.Unified”}
$settings[“SETTING NAME”] = “”
Set-AzureADDirectorySetting -Id $settings.Id -DirectorySetting $settings
 Ok, now let’s look into some scenarios here …
Scenario 1: Restricting Office 365 groups creation for all the users in your organization except for few users who belong to a specific Security group
$group = Get-AzureADGroup -All $True | Where-Object {$_.DisplayName -eq “Office 365 groups creation allowed”}
$settings = Get-AzureADDirectorySetting | where-object {$_.displayname -eq “Group.Unified”}
$settings[“EnableGroupCreation”] = “false”
$settings[“GroupCreationAllowedGroupId”] = $group.ObjectId
Set-AzureADDirectorySetting -Id $settings.Id -DirectorySetting $settings
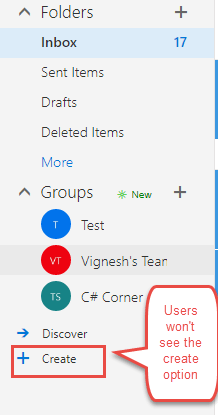
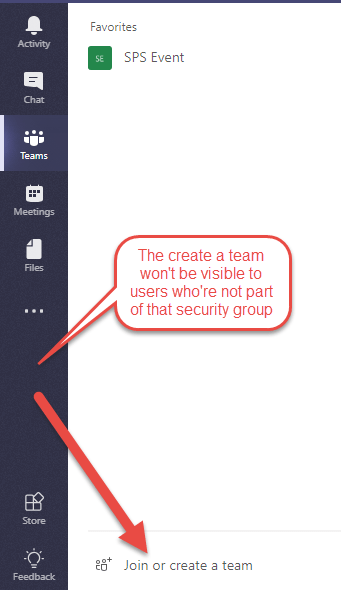
 In this scenario here, I created a security group named “Office 365 groups creation allowed” and I’ve added few members to it. So, by doing this I can grant access only to those members to create Office 365 groups and not to all the users in my organization. Also, an important point to bear in mind here is, if I’m restricting the creation of Office 365 groups then these users won’t be able to create a Team, a Planner, a Yammer group etc. So, the users will be restricted by creating anything which creates an Office 365 group in the backend. So, from an end user perspective, the “create” button which you see in the screenshot below for creating Office 365 groups won’t be visible to them. The same applies for other services also, users won’t get the “Create Planner “or “Create Team” button once this option is enabled. This is one way to have control on Office 365 groups creation in your organization
In Teams, the “Create a Team “button won’t be visible for the users who are not part of that Security group which allows the creation of Office 365 groups.
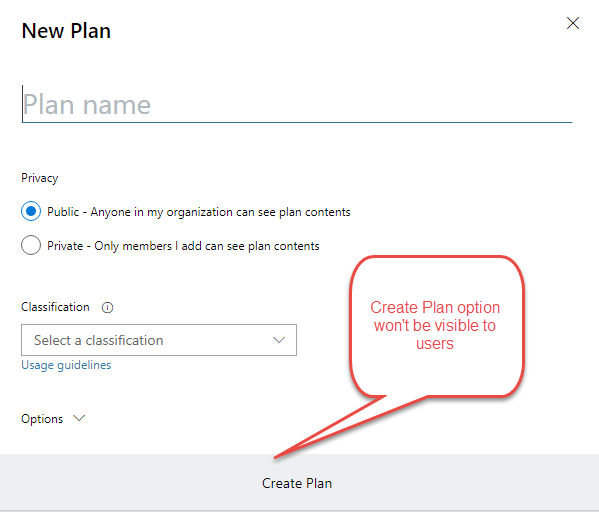
In Planner, the “Create a Plan “button won’t be visible for the users who are not part of that Security group which allows the creation of Office 365 groups.
Similarly , as already explained above other services which creates an Office 365 group on the backend won’t be available for end users . By doing this you can have control over who gets to create an Office 365 groups and other services such as Teams and Planner in your organization .
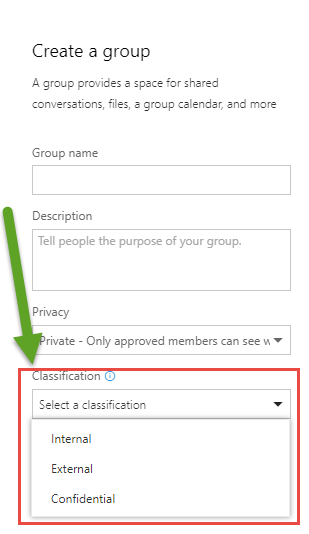
Scenario 2: Setting Office 365 groups classification
$settings = Get-AzureADDirectorySetting | where-object {$_.displayname -eq “Group.Unified”}
$settings[“ClassificationList”] = “Internal,External,Confidential”
Set-AzureADDirectorySetting -Id $settings.Id -DirectorySetting $settings
In this scenario, we’re enabling the classification option so that you can classify your groups accordingly. Once this is done whenever you try to create an Office 365 group from the outlook webmail (provided that you have access to create Office 365 groups) you will get an option to choose the classification for that group also as shown in the image below. This could be useful from a compliance and governance perspective.
Once that’s done you can set the classification for an existing Office 365 by running the below PowerShell command.
Set-UnifiedGroup <TestGroup@o365techy.onmicrosoft.com> -Classification <Internal>
Also, if you want to create a new group with a classification then run the below PowerShell command for that.
New-UnifiedGroup <TestGroup@o365techy.onmicrosoft.com> -Classification <External> -AccessType <Public>
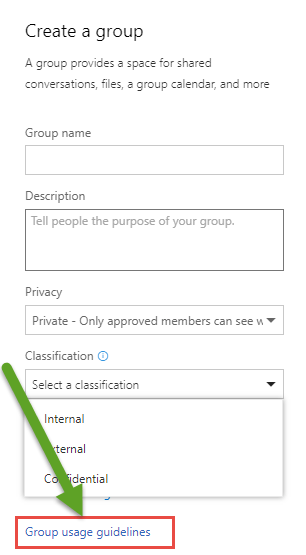
Scenario 3: Setting Usage Guidelines URL
$settings = Get-AzureADDirectorySetting | where-object {$_.displayname -eq “Group.Unified”}
$setting[“UsageGuidelinesUrl”] = “<https://o365techy.sharepoint.com/sites/office365groupsgovernance/usageguidelines/SitePages/Home.aspx>”
Set-AzureADDirectorySetting -Id $settings.Id -DirectorySetting $settings

In this scenario, I’ve created a SharePoint subsite named “Usage Guidelines” which speaks about all the guidelines a user must follow while using Office 365 groups in my organization and the user can refer that while creating / using Office 365 groups. Once this has been enabled this what the end user view would be like. Please check the screenshot below.
Scenario 4: Restrict all access for guest users to Groups including the ones that were already granted access
$settings = Get-AzureADDirectorySetting | where-object {$_.displayname -eq “Group.Unified”}
$settings[“AllowGuestsToAccessGroups”] = “False”
Set-AzureADDirectorySetting -Id $settings.Id -DirectorySetting $settings
 Scenario 5: Restrict the ability to add any new guest users but do not restrict existing guest users
$settings = Get-AzureADDirectorySetting | where-object {$_.displayname -eq “Group.Unified”}
$settings[“AllowToAddGuests”] = “False”
$settings[“AllowGuestsToAccessGroups”] = “True”
Set-AzureADDirectorySetting -Id $settings.Id -DirectorySetting $settings
 Finally, if you want to review all the updated settings then please run the below mentioned PowerShell cmdlet as already described above and it will return the updated settings.
Get-AzureADDirectorySetting | ForEach Values

If you want to remove the group settings that we configured in all the scenarios above then please run the below PowerShell command.
$settings = Get-AzureADDirectorySetting | where-object {$_.displayname -eq “Group.Unified”}
Remove-AzureADDirectorySetting -Id$settings.Id
 12.To update the classifications for all the Office 365 groups:
## Set classifications for all groups
$Groups = Get-UnifiedGroup | Where-Object {$_.Classification -Eq $Null} | Select DisplayName, Classification
ForEach ($G in $Groups) {
If ($G.Classification -Eq $Null)
{
Write-Host $G.DisplayName
Set-UnifiedGroup -Identity $G.DisplayName -Classification “Internal”
}
}
#……………………………..
# Variables:
# Cut off date in days
# Classification
#……………………………..
$cutoffdate = ((Get-Date).AddDays(-10))
$classification = “High”
# Retrieve recently created groups with accesstype set to PUBLIC
$Groups = Get-UnifiedGroup | Where-Object {
$_.WhenCreated -ge $cutoffdate -and $_.AccessType -eq ‘Public’ -and $_.Classification -eq $classification } `
| Sort-Object whencreated | Select DisplayName, WhenCreated, AccessType, Classification, ManagedBy
# For each new group update set accesstype to PRIVATE
ForEach ($G in $Groups) {
Set-UnifiedGroup -Identity $G.DisplayName -AccessType ‘Private’
Write-Host “The following Group privacy setting was updated:” $G.DisplayName
}
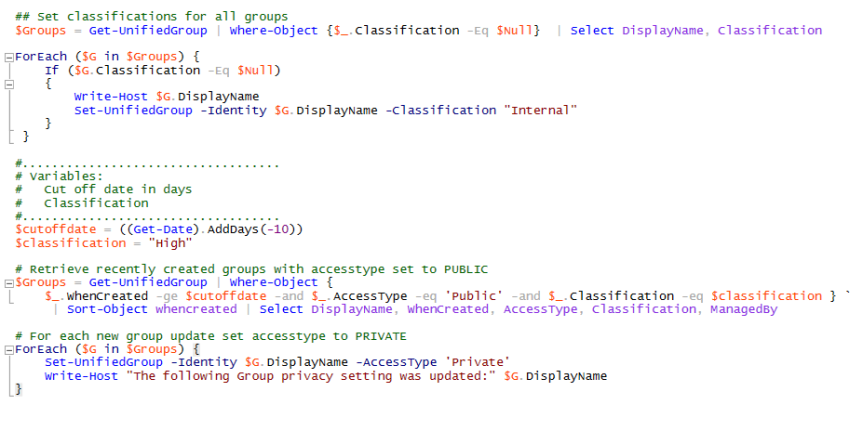 This will run and update the classification for all the Office 365 groups as shown in the image below

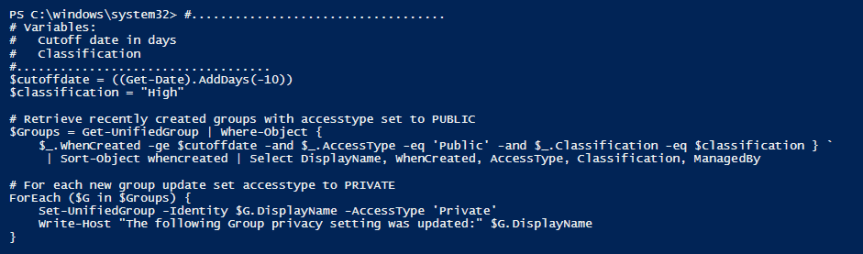
- To update the privacy of an Office 365 group based on its classification:
#……………………………..
# Variables:
# Cutoff date in days
# Classification
#……………………………..
$cutoffdate = ((Get-Date).AddDays(-10))
$classification = “High”
# Retrieve recently created groups with accesstype set to PUBLIC
$Groups = Get-UnifiedGroup | Where-Object {
$_.WhenCreated -ge $cutoffdate -and $_.AccessType -eq ‘Public’ -and $_.Classification -eq $classification } `
| Sort-Object whencreated | Select DisplayName, WhenCreated, AccessType, Classification, ManagedBy
# For each new group update set accesstype to PRIVATE
ForEach ($G in $Groups) {
Set-UnifiedGroup -Identity $G.DisplayName -AccessType ‘Private’
Write-Host “The following Group privacy setting was updated:” $G.DisplayName
}

14.To determine where a group was provisioned (Planner, Yammer, Teams etc.)
To get the list of Yammer integrated Office 365 group list:
Get-UnifiedGroup |Where-Object {$_.ProvisioningOption -eq ‘YammerProvisioning’} |select DisplayName,Alias,ProvisioningOption,GroupSKU,SharePointSiteUrl,SharePointDocumentsUrl,AccessType
To get the list of Teams integrated Office 365 group list:
Get-UnifiedGroup |Where-Object {$_.ProvisioningOption -eq ‘ExchangeProvisioningFlags:481’}|select DisplayName,Alias,ProvisioningOption,GroupSKU,SharePointSiteUrl,SharePointDocumentsUrl,AccessType
Similarly, we expect MSFT to work on for Planner and other services which create an Office 365 on the backend.
15.To get the list of Obsolete Office 365 groups in your tenant:
This is a PowerShell script from Office 365 fame Tony Redmond and the explanation for the script can be found below.
Note : You need to be connected to Exchange Online PowerShell module as well as the SharePoint Online PowerShell module to run this script
Like any object, an Office 365 Group might become unused over time. No current method exists to detect what groups are underused, so here’s a script that does the job for you by checking audit records to establish whether any SharePoint file activity has occurred in the group document library in the last 90 days and whether any conversations have happened in the group mailbox in the last year. Seeing that it’s all done in simple PowerShell, you can tailor the code to your heart’s content. A HTML report file is generated at the end, which contains some statistics like:
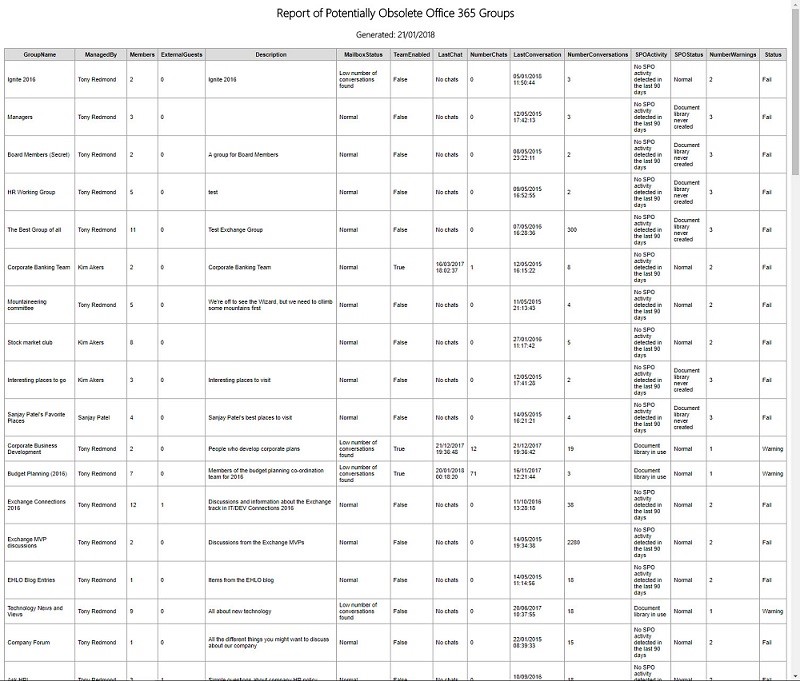
Number of groups scanned: 155
Number of potentially obsolete groups (based on document library activity): 132
Number of potentially obsolete groups (based on conversation activity): 60
Number of Teams-enabled groups: 41
Percentage of Teams-enabled groups: 26.45%
Script:
Check for obsolete Office 365 groups
Thanks for reading this post …. Good luck with Office 365 groups!!!!


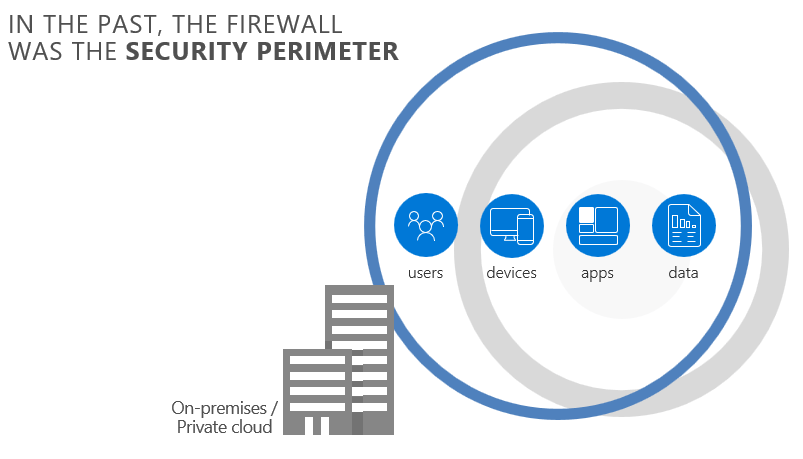


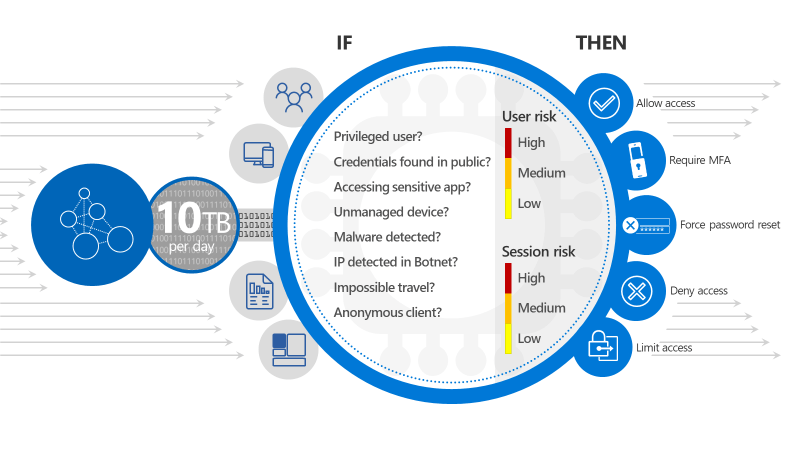 So, based on the conditions given to it such as (privileged user, unmanaged device etc.) it will grant access to the user. This is called as Conditional Access in Office 365 and I’ll discuss about this in later blog post.