Is it worth choosing SharePoint over file server?


1

So this post is on a well-known topic which has been going on for years now as a debate. I’m pretty sure a lot of you would have read many articles/blog posts on this topic .However, in this post I’ll be discussing about my point of view on choosing “SharePoint” over “file server”. So in order to get started, let’s ask this question for ourselves whether SharePoint can be the right alternative solution for a file server? Let’s assume that you’re the IT person in your company and the business comes to you stating that we need to decommission all the File servers and go ahead with SharePoint for storing user’s contents and they want you to do some research on whether SharePoint can be the right alternative for a file server, then the contents that I’ll be discussing on this article should suffice your need. Well I understand that it’s too late for me to come up with an article on this topic considering the fact that SharePoint has been a successful product for years now .However, I still see a lot of companies who are actively working on migrating their contents from a file server to SharePoint and still most of them are doing a lot of research on whether SharePoint is the right platform for file storage & collaboration when compared to a file server and I hope this article will give them some insights.

So let’s get into business now ….

First let’s try to understand what a file server is all about and why any firm would use a file server to store contents.

File server:

In a computing environment a file server is nothing but a heavily configured computer which is connected to a network that has the primary purpose of providing a location for shared disk access, i.e. shared storage of computer files (such as documents, sound files, photographs, movies, images, databases, etc.) that can be accessed by the workstations that are connected to the same computer network.

2.png

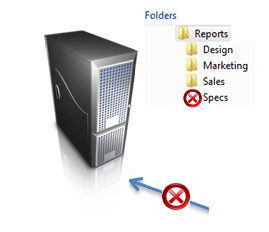
So as said in the above definition , the file server will be connected to the same network where all the end user’s work station has been connected and the users can store the documents from their PC’s file system to the file server so that it’s accessed by all . Let’s consider a scenario where a group of employees are working on a project and they want to store some documents, videos and audio files etc. …about the client and they want to store it in a place which can be made accessible by everyone then a file server would suffice that purpose. Let’s take a look on the features of a file server to understand more about the use of a file server.

3.jpg

Features of a file server:

  1. Has large disk space and RAM size to store a large number of files of any type ( provided that your firm’s IT department has not restricted any specific file type )
  2. It has been given access to all the employees or a specific team (i.e. HR, finance team) in your domain so that they can use it for storing and accessing contents.
  3. It has NTFS file and folder level permissions configured within it so that user’s don’t get to access other team’s content (meaning users have access only to a specific file or folder).
  4. Users can map a folder from the file server to their workstations as network paths so that they can directly dump their files to the file server using few mouse clicks.
  5. It can be used to store software packages, executables and also large multimedia files.

Now once you take a look at the basic features of a file server it’s quite obvious that you would have a question within your mind as …Isn’t SharePoint much cooler than this? The answer is yes but with certain drawbacks and I will discuss about this later on this article.

Let’s take a look at the basic functionalities of SharePoint and see how it’s different from a file server.

SharePoint:

4

To be more specific SharePoint is mainly an enterprise collaboration platform rather than a content storage platform .So what I mean by this is, you can obviously store your contents in SharePoint with certain limitations but SharePoint is brilliant in terms of collaboration when compared to a file server. This would make some sense if we take a look at the features of SharePoint.

Features of SharePoint:

  1. Can be used as a one stop for end users to store their documents and also to collaborate within themselves.
  2. It has some out of the box functionalities such as workflows, two –stage recyclebin and it also maintains document versions which is not feasible in a file server.
  3. SharePoint gives you a web based access to your files from anywhere (work, home, the airport) and from anything (PC, MAC, Tablet, mobile devices, whatever) – in a Web browser or familiar Explorer view.
  4. It can provide you Check-In/Check-Out abilities – when a file is checked out, others that try to edit the file will be informed that you have it, and it will prevent them from overwriting the changes you have made to the document that you’ve been working on.
  5. You can have alerts configured for a document library, list or SharePoint site so that you get mail alerts to our mailbox for all the modifications.
  6. You can access your SharePoint site from anywhere and from any device which is not the case with a file server. All you need is an internet connection and you can access all your files from any device.
  7. You can work on a document offline and sync that with SharePoint once you’ve made all the necessary modifications to the document.
  8. More than anything else the “ search functionality “ in SharePoint is such a cool feature which can help you search for a document in whichever way you require and it makes search very easy for the end user. I hope we’re all aware how painful it is to search for a file in a file server using the windows search box.

So by comparing the functionalities of both SharePoint and file server anybody would obviously say that SharePoint is the right go to platform for content storage and collaboration. But let’s also be aware that SharePoint as a product comes with certain limitations and boundaries and it’s quite hard to break them.

The links below should help you understand about the software boundaries and limitations in each version of SharePoint .It’s quite important that you abide by these boundaries and limits for the optimal performance of your SharePoint farm.

Software boundaries and limitations for SharePoint 2010:_ http://www.jeremytaylor.net/2010/10/03/sharepoint-2010-boundaries-thresholds-and-supported-limits/

Software boundaries and limitations for SharePoint 2013: _ https://technet.microsoft.com/en-IN/library/cc262787.aspx

Software boundaries and limitations for SharePoint online: _ https://support.office.com/en-us/article/SharePoint-Online-software-boundaries-and-limits-8f34ff47-b749-408b-abc0-b605e1f6d498

Once you take a look at this boundaries I believe you may start wondering whether SharePoint is the right candidate for large content storage and that’s exactly the point that I’m trying to make here. There are certain scenarios that I’ve outlined below for which the file server would be the right candidate when compared to SharePoint.

  1. File servers are preferred for large document storage. SharePoint best handles documents in the 50- to 300-MB range and can handle documents up to 2 GB with configuration modifications, but documents over 2 GB must be stored on a file server. (This limits have changed in the later versions of SharePoint. However you can’t have very large files as you do in a file server)
  2. Software distribution points for hot-fixes, updates, and application distribution is handled much well from a file server.
  3. File servers are better suited for My Documents redirection and backups. Many companies use group policies to redirect the location of users’ My Documents so that they can back up their content each night. Creating mapped drives to document libraries and then using policies to redirect users’ My Documents to those libraries is an untested and unsupported scenario in SharePoint. File servers should be used for this purpose and are supported.
  4. Storing databases in a SharePoint list is the same as storing a database within a database and is not recommended. If your data need triggers or stored procedures, you may look at the workflows and events as mechanisms for this process, but creating triggers or stored procedures inside the SharePoint databases is not supported.
  5. Database type files such as .mdf, .pst, and .ost are best stored on a file server rather than a SharePoint server.
  6. Developer source control of emerging assemblies and new code files are better managed in Visual Studio Team Services, which requires a file server.
  7. Archive files that will not change and will not be included in future collaboration are best stored on file servers.

Also from a licensing perspective when we talk about SharePoint we are not just talking about SharePoint alone as an application, we are indeed talking about the Windows server license (i.e. CAL)  which will acts as the underlying Operating system, SharePoint license and also the backend SQL server’s license . Let’s take a look at the different topologies available in SharePoint so that we can understand about how licensing works in SharePoint and also to know more about the logical architecture of SharePoint.

A SharePoint farm can  deployed on one, two, or three tiers, as follows and this can increase based on how you want to scale out your SharePoint farm for optimal performance .

Single-tier deployment:

In a single-tier deployment, SharePoint server and the database server are installed on one computer as shown in the image below.

5.gif

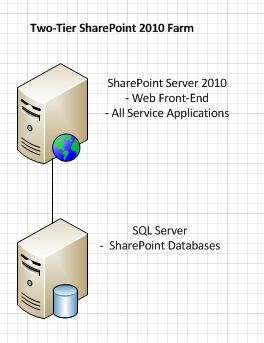
Two-tier deployment:

In a two-tier deployment, SharePoint components and the database are installed on separate servers. This kind of deployment is mostly called as a small farm. The front-end Web servers are on the first tier and the database server is located on the second tier.

6.png

Three-tier or multi-tier deployment:

In a three-tier deployment, the front-end Web servers are on the first tier, the application servers are on the second tier, which is known as the application tier, and the database server is located on the third tier. This is mostly used for medium and large farms.

7.png

I’ve also written a detailed post on how licensing works on SharePoint and you can take a look at that post to know more about SharePoint licensing.

Now that we have seen a lot about licensing and the topology it’s clear that SharePoint is expensive when compared to a file server and you really need make a correct decision on when to choose SharePoint and when not to .The cost of SharePoint farm may increase depending on the size of the farm that you choose to build. Also please note that you need to invest on Network load balancers as well such as F5 for so that user traffic is managed properly .It would also be worthwhile to have clear understanding about the strengths and limitations of SharePoint so that you can choose the right platform for your company.

As far as the strengths are concerned, listed below are the major strengths of SharePoint:

  1. Collaboration & Document Management –>SharePoint is the best tool in the market as far as collaboration is concerned because it’s very useful for users who work on the same document for their day to day work.
  2. Integration–>SharePoint can integrate very well with other Microsoft products such as Exchange server and Skype for business server and in addition to that it can also be integrated with other ERP applications such as SAP and Oracle.
  3. Automate–> One good example for this is the workflow feature which comes OOTB with SharePoint.
  4. Backups–> You can have backups configured for your SQL databases that host the SharePoint data in it so that your data is always safe.
  5. Versioning–> Document versioning is once again a cool feature where you can have multiple versions of the same document and SharePoint does a brilliant job in saving this on the SQL database without consuming much disk space on the SQL server.
  6. Upgradation –>You can always go ahead and upgrade your SharePoint server with latest CU’s so that you get all the latest functionalities and bug fixes released by Microsoft and in addition to that you can also upgrade your SharePoint application from one version to another to meet business needs ( i.e. from SharePoint 2010 to 2013 or from SharePoint 2010 to Office 365 )
  7. Hybrid functionality  –>You can have a server version of SharePoint running on your datacenter and the same can be integrated with the cloud version of SharePoint ( i.e. SharePoint Online –Office 365) and hence leverage the functionalities of SharePoint Online from your on-premises environment itself .
  8. Accessibility –> You can access the files in your SharePoint from anywhere and from any device .All you need is a good internet connection
  9. Right Business Product –>SharePoint is not something which is just used for content storage and collaboration .Its other major purpose is for creating portals and many companies use SharePoint as their Intranet portal.

Now let’s see the limitations in SharePoint:

  1. Storage capacity –>As already discussed above, SharePoint as a product comes with some inbuilt limitations and the storage capacity is one among them. It’s not really a good idea to break these limits.
  2. File sizes –> Once again another issue with SharePoint is the file size .It doesn’t support files that has large size.
  3. File names –>SharePoint has a known limit of 256 characters for a file name (this includes the complete path which includes the site name, document library name as well as the file name for a file.)
  4. File types–>SharePoint doesn’t support all the file types (meaning you can’t go ahead and upload an executable file to a SharePoint document library) .There is list of supported file types in SharePoint.You can check that by clicking here.
  5. Technical skillset –>Working on SharePoint needs some proper skillset .Without having the required skillset it’s not possible for your end users to use SharePoint effectively.

So in order to conclude before choosing SharePoint over file serve to store contents for collaboration it’s always better to reconsider the exact need of the business and ask yourself whether SharePoint will support them. If not then you’re probably wasting your time and money in implementing SharePoint .Of course SharePoint is a great platform but it can be great only when it’s used for the right purpose.

To put it in simple words if the business need is to have a platform to suffice the below mentioned needs then SharePoint is the right go to platform.

  1. To store Customer related information
  2. To work on documents related to a specific Projects
  3. To schedule some Tasks
  4. To store documents which speaks about Processes and Procedures
  5. You need ability to have versioning, auditing or retention policies
  6. Provide search extensibility on documents for easier finding or navigation
  7. Your end users are looking for some automation.
  8. Your end users are aware of how to use SharePoint and they have the technical skillset to access SharePoint and they know where to go to get what they want.

On the other hand if the business is looking for a platform just to store documents , store contents with large file size, store executable file and is also looking for some cost cutting then it’s better to choose a file server .

On my years of experience till now, I’ve seen a lot of successful SharePoint implementations and I’ve seen some failed one too. So it’s always good to have a proper knowledge on both the platforms and choose the one that best suits your needs.

Thanks for reading this post …..Happy SharePointing!!!


Advertisement

Uninstallation of ADDS Role in Windows server 2016 Technical preview 4:

tp4-1024x512

Followed to my previous post on ADDS installation on Windows Server 2016 Technical Preview 4, I’ll be discussing on how to uninstall ADDS on this post. Ideally uninstalling the ADDS role means that you’re demoting your domain controller to be a normal server. Now, let’s take a look on the steps involved in demoting a domain controller.

  1. Open server manager and click on the “Manage” button and choose “Remove Roles and Features “as shown in the image below.

1.PNG

2. On the next screen, click “Next “.

2.PNG

3. On select the destination server pane, select the server from which you want to remove the ADDS role as shown in the image below.

3.PNG

4. Choose the server and click next, in this scenario I have only one server in the server pool and this is the one that’s running the ADDS role. Click next and it will list you the list of roles.

5.PNG

5. Choose “Active Directory Domain Services “role as shown above and click next. This will give you a window asking you to remove the dependent features for ADDS. Please go ahead and click on “Remove features “as shown in the image below.

6.PNG

6. You will get a window as shown below. Please go ahead and click on “Demote this domain controller “

7.PNG

7. This will take you to a screen as shown below, please go ahead and click on next. You need to choose the appropriate option.

8.PNG

8. I’m choosing the first option which says, “Force the removal of this domain controller “and then click on next.

9.PNG

9. On the next screen please validate all the roles running on the domain controller and click on the checkbox which says, “Proceed with removal “and click next.

10.PNG

11.PNG

10. The next screen will be prompting for a new password .Please go ahead and specify the new password and click next.

Note: This password will be different from the normal domain administrator password.

12.PNG

11. The next screen will ask you to review the changes made and once you’re done validating it please go ahead and click on the “demote” button to demote this server as shown in the image below.

Note: Clicking on the view script button will generate the script that ran on the background when this activity was performed .You can use this script for future purpose also if you want to perform a ADDS uninstallation on any other domain controller .

13.PNG

14.PNG

12. Finally once this is done your server will be restarted and then you will notice that this server is no longer a domain controller. You can confirm this on the logon screen itself where you would just see the logon username and not the domain name prefixed to it. In my case below I’m logging in as the administrator and you won’t see the domain name prefixed before.

15.PNG

13. Before uninstalling the ADDS role, this is how the logon screen looked. Check the logon screen below. You can see my domain name “VIGNESH” prefixed before the logon name.

16.png

Active Directory Domain Services Installation on Windows Server 2016 Technical Preview 4:

Alright, to all the system administrators out there, this post would be on how to promote your Windows server 2016 to become a domain controller by installing the “Active Directory domain services” role on it. The installation is no different from what we have been doing on the previous versions of Windows server and almost all the steps are the same.

With that being said, let’s get started with the installation steps now,

  1. Open server manager as shown in the screenshot below and click on “Manage”

1.PNG

2. Once you click on “Manage” you will see an option which says ” Add roles and features “ , choose that and click  next .You can also click on ” Add roles and features” which you see on the server manager pane above to add the necessary roles and features.

2.PNG

3. Choose “Role based or feature-based installation “option and click “Next “as shown in the screen below.

3

Note:

  • Role-based or feature-based installation: This installation type installs or removes the various roles and features included with Windows 8 Server operating system editions.
  • Remote Desktop Services scenario-based installation: This new installation type enables the installation and configuration of Remote Desktop Services.

4. On the next screen which says “Select destination server “, choose the appropriate server on which you need to install the ADDS role. In this scenario you can see the server being highlighted below on which I would be installing the ADDS role.

Note:

  • Select a server from the server pool: Use this option to select a server from the server pool on the local computer. Confirm the destination by verifying the destination server in the upper right hand corner of the wizard.
  • Select a virtual hard disk: Use this option to select a local or remote Windows 8 Server virtual hard disk file. Only virtual hard disks that contain a Windows 8 Server operating system are valid destinations. Blank virtual hard disks or hard disks that contain an operating system other than Windows 8 Server will fail.

4.PNG

5. Now since we have selected the destination server, it’s time to go ahead and install the ADDS role on it, for that please check the screenshot below. On the sever roles pane, please check the checkbox for “ Active Directory Domain Services” and click “Next” as shown in the screenshot below .

5

6. Once done you will get a window which asks you to add the necessary features for “Active Directory Domain services” role , please go ahead and click on “ Add features” button so that it will add all the necessary features for ADDS.

6

Note:  The checkbox which says “Include management tools (if applicable) “option has to be chosen only when you need to include management tools as a part of adding the features.

7. Once you’re done with adding the necessary features the next screen would ask you to add some other features if required, please go ahead and click “Next” as we have already added the necessary features in the previous screen.

7.PNG

8. The next screen would give you an explanation on what ADDS is all about, please review it if interested and click “Next”.

8.PNG

9. On the next screen, check the checkbox which says “Restart the destination server automatically if required “and click on “Install”.

9.PNG

10. You can notice the Installation getting started on the next screen.

10.PNG

11. You can also notice the Installation progressing eventually as shown in the screen below.

11.PNG

12. Finally you will get the screen which says the installation is succeeded as shown in the screenshot below.

12.PNG

Note : You can click on “Export Configuration settings” option to export the settings to a notepad .The same configuration settings can be used for feature installations also .

13. Once this is done, please click on close and then open server manager .You will see an option which says “Promote this server to a domain controller “on the top right corner of the screen. Please click on that.

15.PNG

14. Now on the next screen where it asks you specify the “root domain name” , please go ahead and entire your domain name .

17.PNG

Things to note while entering the domain name: Make sure you’re entering the domain name which you own, if it’s a lab environment and you’re connected to the internet you need to specify unique domain names which is not being used by others. You can’t enter a domain name which is owned by someone or by any company. So please make sure you abide to these things while entering the domain name.

The error which you see in the above screen is because I didn’t enter the root domain name correctly .The root domain name should be entered in this format (i.e. “domain name”.COM) and by any chance if you don’t do that correctly you will end up noticing that error message.

15. So please ensure that you’re entering the domain name correctly in the correct format and click on next, this will take you to the next screen which asks you to specify the domain controller options.

18

Now, on the above screen you will see an option which says “forest functional level” and “domain functional level”.  Now it’s very important that you choose these options very carefully or else you will end up in a scenario where you may not be able to add additional domain controllers to the server.

So let me try explaining what is a forest functional level and domain functional level, Functional levels determine the available Active Directory Domain Services (AD DS) domain or forest capabilities. They also determine which Windows Server operating systems you can run on domain controllers in the domain or forest. However, functional levels do not affect which operating systems you can run on workstations and member servers that are joined to the domain or forest.

When you deploy AD DS, set the domain and forest functional levels to the highest value that your environment can support. This way, you can use as many AD DS features as possible. For example, if you are sure that you will never add domain controllers that run Windows Server 2003 to the domain or forest, select the Windows Server 2008 functional level during the deployment process. However, if you might retain or add domain controllers that run Windows Server 2003, select the Windows Server 2003 functional level.

When you deploy a new forest, you are prompted to set the forest functional level and then set the domain functional level. You cannot set the domain functional level to a value that is lower than the forest functional level. For example, if you set the forest functional level to Windows Server 2008, you can set the domain functional level only to Windows Server 2008. In this case, the Windows 2000 native and Windows Server 2003 domain functional level values are not available. In addition, all domains that you subsequently add to that forest have the Windows Server 2008 domain functional level by default.

You can set the domain functional level to a value that is higher than the forest functional level. For example, if the forest functional level is Windows Server 2003, you can set the domain functional level to Windows Server 2003or higher.

16. So with that being said , I’m choosing the option as “ Windows server 2016 technical preview “ under forest function level and the same for domain functional level too and I’m clicking next. Also make sure you’re specifying the “Directory services restore mode “password also .This password has to be used for safe mode boot option in Windows servers which are acting as domain controllers. Using this password you can repair/recover and restore an Active Directory database.

19.PNG

17. On the next screen check the appropriate DNS options and click next.

20.PNG

18. Enter the “NetBIOS” name in the next screen and click next.

21.PNG

19. On the next screen, you will be asked to specify the AD database path where the “ NTDS.dit” file resides . Also you need to specify the log files path and the path for SYSVOL folder. Ideally the best practice is to keep this as it is .However, you can change the path as per your requirement.

22

20. Finally, you will get a screen where you can review the settings you made before clicking next.

23.PNG

21. You can click on the “View script “option, to view the script for the settings that you have configured. You can use that script for future configurations also if required. This is the screen you will get if you click on the “ View script “ option which displays the PowerShell command for the settings that we have configured .

24

22. Once you’ve verified that and clicked next, you will get a screen as shown below which will run the prerequisites check.

25.PNG

23. Once the prerequisite check is done, you will get a screen as shown below confirming that all the prerequisite checks have passed successfully.

26.PNG

24. Once you have verified that the prerequisites check is completed, go ahead and click on the install button, this will start installing ADDS.

27.PNG

25. Please be patient for few minutes as the installation will take some time .Once the installation is completed you server will be restarted.

28.PNG

26. Finally, you can verify the ADDS installation in your server by opening the Active directory console.

30.PNG

27. You can see the screen below where I’m logging into the server using the domain credentials.

29.PNG

So this concluded the ADDS installation steps in Windows Server 2016 Technical Preview 4 .Thanks for reading this post .Have a good one .


Setting up Windows Server 2016 Technical Preview 4 in Hyper-V:

Setting up Windows Server 2016 Technical Preview 4 in Hyper-V:

This article will give you a step-by-step explanation on how to set up Windows server 2016 Technical Preview 4 on Windows 10 Hyper-V:

  1. Open the Hyper-V manager console as shown in the screenshot below.

Note: If you’re not able to find Hyper-V on windows search, then that’s probably because you haven’t turned that on under “Turn Windows feature on or off” in Control Panel. So please make sure that is turned on

1

2. Click on “New” and choose “New Virtual machine “option as shown in the screenshot below.

2.png

3. Click “ Next”

3.png

4. In the next screen you need to specify the “Name” of the virtual machine and also the “location” to save it. Check screenshot below.

4.png

5. In the next screen you need to specify which “generation” you’re planning to go with. Now choosing the correct generation depends on certain criteria’s and please check this link for reference. Here, in this scenario I’m planning to go with “Generation 1” as this serves my purpose.

5.png

6. Specify the “RAM” configuration in the next screen, I’m planning to assign 4000 MB for this Virtual machine .However, if you check the “Dynamic memory” check box, then the Hyper-V will automatically re size the RAM configuration based on the application it hosts/runs.

6.png

NoteStarting in Windows 10/Windows Server Technical Preview, Hyper-V allows you to resize virtual machine memory without shutting down the virtual machine. To know how to do this, please check the screenshot below.

You can notice the “ Startup RAM”  being enabled for you , which means you’re allowed to change the “Startup RAM “ settings even when the Virtual machine is running .This was not the case in the previous version of Windows server and client Operating systems . This functionality got newly added in Windows 10/Windows server technical preview.

7. In the next screen, you need to specify the “Network” settings for creating the connection. This is something which has to be done prior hand itself before creating the “Virtual machine “ .You don’t need to worry if you didn’t configure this before creating the virtual machine as this can be done even after creating the “Virtual Machine” .

7.png

8. Now, if you need to identify which “Virtual switch” to use for your Hyper-V manager, then please check the options below. You need to choose the appropriate one based on your need.

8.png

a. External Switch will link a physical NIC of the Hyper-V host with a virtual one and then give your VMs access outside of the host, meaning your physical network and internet (if your physical network is connected to internet).

b. Internal switch should be used for building an independent virtual network when you need to connect VMs to each other and to a hypervisor as well.

c. Private switch will create a virtual network where all connected VMs will see each other, but not the Hyper-V host. This will completely isolate the VMs in that sandbox.

9.png

9. In the next screen you need to specify the “storage” size. I’m specifying “40GB” as the storage size here.

10.png


10. Please specify the “installation media” on the next screen. I’m choosing the “Image file” option as shown in the screenshot below as I’ve already saved the image file for Windows Server 2016 Technical Preview (i.e. ISO file) on my hard drive. Browse to the location where you have saved the Image file and add it.

11.png

11. The next screen will give you a summary of all the specifications you made.

12.png

12. Finally once that’s done please click on the “Finish” button and that will start the Virtual machine configuration. You can also see the new Virtual machine you’ve created on the “Virtual machine” console as shown in the screenshot below. You can see “Win2K16” below ….

13.png

13. Now, it’s time to go ahead and install the “Windows Server 2016 Technical Preview 4 “Operating system as we are done with the Virtual machine configuration. For that, please click on “Connect” as shown below and this will turn on the “Virtual machine “.

14.png

14. Post this step , just follow the traditional Windows OS installation steps which we have been doing for years till now. Hence, to get started, please click on “Install Now “as shown in the screen below.

16


15. The setup is starting now as shown in the screenshot below.

17.png


16. Now on the next screen , please choose the appropriate option that suits your need .The first one is server core installation which doesn’t give you a GUI and the next one is the normal ( Desktop experience ) installation which gives you the GUI option .

Server Core option:

18.png

GUI (desktop experience) based installation:

19.png

17. Choose Custom installation method.

20.png

18. Choose the drive to perform the installation on the next screen as shown below.

21.png

19. Click next and this will start the installation, the entire process would take about 20 minutes max, so please be patient until it’s complete.

22.png

20. Once the installation is done, it will prompt for the administrator password, please go ahead and specify that.

23.png

21. On the next screen, press “Ctrl+Alt+Delete” to unlock and key in the Administrator password.

24.png

22. You should be all set by now with the installation and now you can see Windows Server Technical 2016 preview 4 spinning on your new Virtual machine.

25.png