Get to know Stellar Phoenix – A Windows Data Recovery Tool .

In computing, Data recovery is a process of getting your data back, which has lost due to any reason such as formatting the drive, accidental data deletion, drive damaged physically, etc. Data recovery is required when user unable to access their data in normal way.

Below Read Some Cases Where Data Recovery Need to Take Place;

  • Intentionally or unknowingly data deletion from the hard drive
  • Drive become inaccessible and its data too
  • Drive got damaged physically
  • Unauthorised or Illegal software vanished all the drive data

A perfect data recovery solution which works in all the above data loss scenario is Stellar Phoenix Windows data recovery – Home software. The tool, which can recover, deleted or lost files from the external as well as internal hard disks. I have personally tested this tool and found it fine utility for both technical and non-technical users.

Key Features of Stellar Phoenix Windows data recovery – Home

Allows to Recover Deleted or Lost Files from the Storage Devices – This undelete software allows to recover different types of deleted files from the hard drive. It gives the option to choose the file type you want to recover.

Recovers Multimedia Files – This tool not only allows to recover the deleted official documents but gives the option to choose separate module for recovering the lost memorable pictures, videos, audio files, etc.

Give Search File Option – The Stellar Phoenix Windows Data Recovery – Home allows to search the specific file by typing the name of the file on the search box. It supports the hundreds of file types; you may also search your file by typing the file extension on the search box.

Supports Almost all type of storage devices –  If you have accidentally deleted your photos or any other data type from phone memory card, external pen drive, computers internal storage device, flash drive or any other type of storage device then this tool perfect for you. It supports almost all types of storage devices and recovers the deleted from them.

Download Stellar Phoenix Windows Data Recovery Software

Minimum System Requirement;

Processor: Pentium Class

RAM: 1 GB minimum

Hard Disk: 50 MB

Operating Systems: Windows 10 / 8.1 / 8 / 7 / Vista / XP

It Works Flawlessly to Recover Deleted Data from the Drives

Install the Stellar Phoenix Windows data recovery software on System and Start the recovery process. From software, interface choose the data type you want to recover and click on “Next” button.

Stellar 1

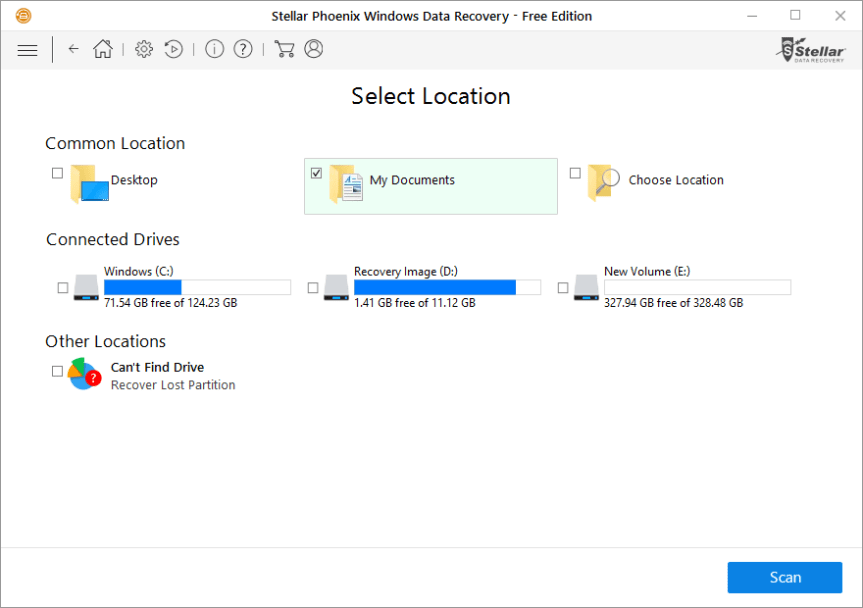
Now, you will move to next Windows where you will get the option to choose the desired location to recover the data in the specific area. Just choose the location and click on “Scan” button

Stellar 2.png

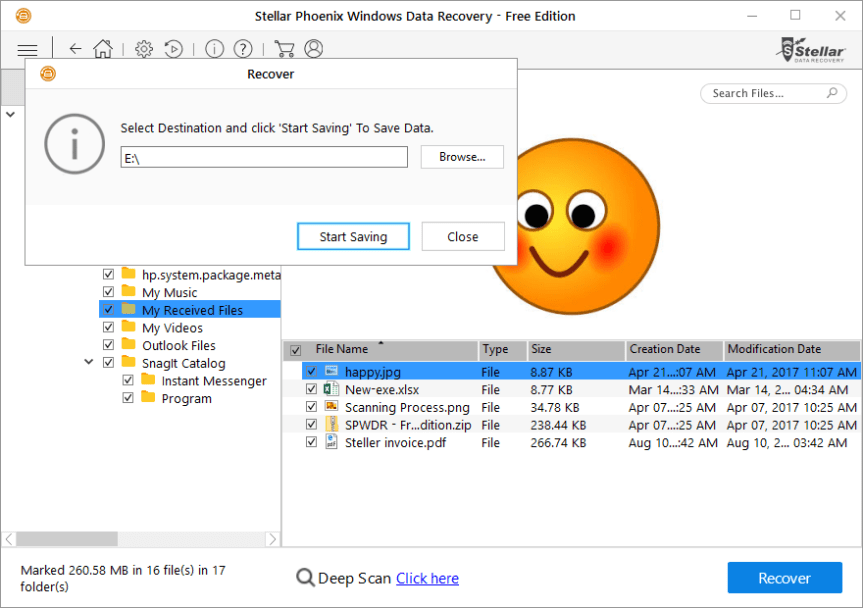
The Software will complete the drive scanning process and gave your preview of all the recoverable files. Now user only needs to choose the files and folders that they want to recover and click on recover button. After clicking on recovery button software will ask to choose the desired location to save your data. Just define the path and click on “Start Saving” button.

Stellar 3.png

Conclusion :

The Stellar Phoenix Windows data recovery – Home is a powerful utility with lots of advance features in it. I have tested this software and found it so helpful in recovering the lost or deleted files efficiently.

Good luck with Stellar Phoenix Windows Data Recovery Tool!!!


Recording of my Webinar Session on SharePoint 2016 Overview

webinar pic.PNG

For those who missed my session on SharePoint 2016 overview, please find the link to the video recording below.

Part 1-Webinar on SharePoint 2016 Overview

Part 2- Webinar on SharePoint 2016 Overview

Thanks once again for attending my session and will see you all soon on a different webinar shortly.

Happy SharePointing!!!

Uninstallation of ADDS Role in Windows server 2016 Technical preview 4:

tp4-1024x512

Followed to my previous post on ADDS installation on Windows Server 2016 Technical Preview 4, I’ll be discussing on how to uninstall ADDS on this post. Ideally uninstalling the ADDS role means that you’re demoting your domain controller to be a normal server. Now, let’s take a look on the steps involved in demoting a domain controller.

  1. Open server manager and click on the “Manage” button and choose “Remove Roles and Features “as shown in the image below.

1.PNG

2. On the next screen, click “Next “.

2.PNG

3. On select the destination server pane, select the server from which you want to remove the ADDS role as shown in the image below.

3.PNG

4. Choose the server and click next, in this scenario I have only one server in the server pool and this is the one that’s running the ADDS role. Click next and it will list you the list of roles.

5.PNG

5. Choose “Active Directory Domain Services “role as shown above and click next. This will give you a window asking you to remove the dependent features for ADDS. Please go ahead and click on “Remove features “as shown in the image below.

6.PNG

6. You will get a window as shown below. Please go ahead and click on “Demote this domain controller “

7.PNG

7. This will take you to a screen as shown below, please go ahead and click on next. You need to choose the appropriate option.

8.PNG

8. I’m choosing the first option which says, “Force the removal of this domain controller “and then click on next.

9.PNG

9. On the next screen please validate all the roles running on the domain controller and click on the checkbox which says, “Proceed with removal “and click next.

10.PNG

11.PNG

10. The next screen will be prompting for a new password .Please go ahead and specify the new password and click next.

Note: This password will be different from the normal domain administrator password.

12.PNG

11. The next screen will ask you to review the changes made and once you’re done validating it please go ahead and click on the “demote” button to demote this server as shown in the image below.

Note: Clicking on the view script button will generate the script that ran on the background when this activity was performed .You can use this script for future purpose also if you want to perform a ADDS uninstallation on any other domain controller .

13.PNG

14.PNG

12. Finally once this is done your server will be restarted and then you will notice that this server is no longer a domain controller. You can confirm this on the logon screen itself where you would just see the logon username and not the domain name prefixed to it. In my case below I’m logging in as the administrator and you won’t see the domain name prefixed before.

15.PNG

13. Before uninstalling the ADDS role, this is how the logon screen looked. Check the logon screen below. You can see my domain name “VIGNESH” prefixed before the logon name.

16.png

DNS Records

An “A” record, which stands for “address” is the most basic type of syntax used in DNS records, indicating the actual IP address of the domain. The “AAAA” record is an IPV6 address record that maps a hostname to a 128-bit Ipv6 address.  Regular DNS addresses are mapped for 32-bit IPv4 addresses.

The “CNAME” record stands for “canonical name” and serves to make one domain an alias of another domain. CNAME is often used to associate new subdomains with an existing domain’s DNS records.

The “MX” record stands for “mail exchange” and is basically a list of mail exchange servers that are to be used for the domain.

The “PTR” record stands for “pointer record” and maps an Ipv4 address to the CNAME on the host.

The “NS” record stands for “name server” and indicates which Name Server is authoritative for the domain.

An “SOA” record stands for “State of Authority” and is easily one of the most essential DNS records because it stores important information like when the domain was last updated and much more.

An “SRV” record stands for “service” and is used to define a TCP service on which the domain operates.

A “TXT” record lets the administrator insert any text they’d like into the DNS record, and it is often used for denoting facts about the domain.