I’ll be talking at Microsoft Ignite Tour Mumbai…

Hi Folks ,

ext.jpg

If you’re planning to attend the Microsoft Ignite Tour at Mumbai , then I’d definitely urge you folks to stop by for my session on  “Live events and employee engagement with Yammer , Stream & SharePoint “ and also for a workshop on Microsoft Teams administration ,i.e. ” A day in the life of a Teams admin “ to improve your MS Teams administration skills .

In addition to that I’ll be on the teams booth for the rest of the day . So please meet me there for some cool demoes on MS Teams and also to get your queries sorted on MS Teams . See you folks there !!! It’s gonna be loads of learning and fun . MSIgniteTheTour

Live events

Teams Admin workshop

My session details :_ https://sessioncatalog.myignitetour.techcommunity.microsoft.com/mumbai?fbclid=IwAR2LPM1RhD40Va0y690DwQzU-tmDL9mb8Tkx2aR2UKHFv_lnWPr7DxrE_Os

Advertisement

Office 365 groups -What you need to know?

Office 365 groups lets you choose a set of people that you wish to collaborate with and easily set up a collection of resources for those people to share. Resources such as a shared Outlook inbox, shared calendar, shared document library, Planner and a site for collaborating on files are a part of an Office 365 group.

The best part of Office 365 groups is such that you don’t have to worry about manually assigning permissions to all those resources because adding members to the group automatically gives them the permissions they need to the tools your group provides. Additionally, groups are the new and improved experience for what we used to use distribution lists or shared mailboxes to do.

1

Although, Office 365 groups helps in addressing many gaps from a collaboration stand point it has become a huge challenge for IT/Office 365 administrators to manage them. So, in this article I’ll be explaining in detail about what Office 365 groups is all about, how you can create it and what are the different sources from which we can create an Office group. So, let’s get into the details …

  1. What are Office 365 groups?

2

Well, to put it in very simple words, Office 365 groups is nothing but a cross-application membership service in Office 365. It’s an object created in Azure Active Directory with a list of members in it and also has some inbuilt workloads associated with it such as a SharePoint Team site, Yammer Group, Shared Exchange mailbox, Planner, Power BI and OneNote. You can add or remove people to the Group just as you would add any other group-based security object in Active Directory.

So, what does this mean to me? Well, it simply means that you don’t need to go to different places in your Office 365 eco-system to collaborate with your team members or to find a document that’s stored in a SharePoint document library in a SharePoint site. You have a single console now called as Office 365 groups which can help in bringing all the required workloads into one single hub so that it’s easy for you to collaborate within your team members while you’re working on a project.

Alright, I think I’m just talking all technical stuff till now, but I haven’t really talked or even showed you folks about how this can add value as an end user or as a project manager/ team lead. So, let’s get into the fun stuff now ….

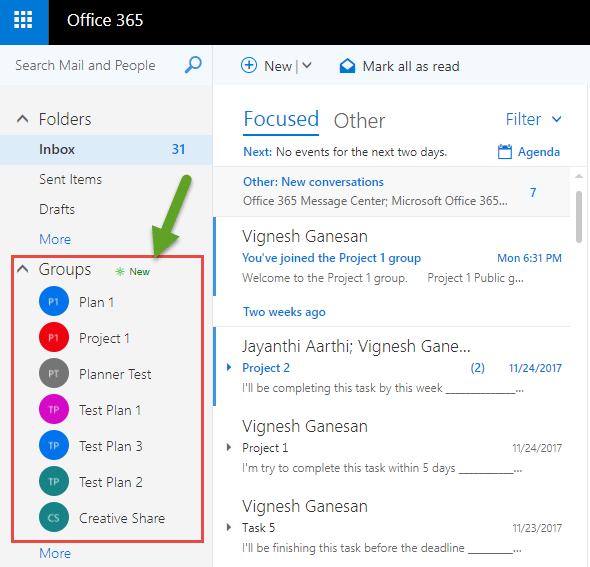
Every time I create an Office 365 group this is what it looks like …

3


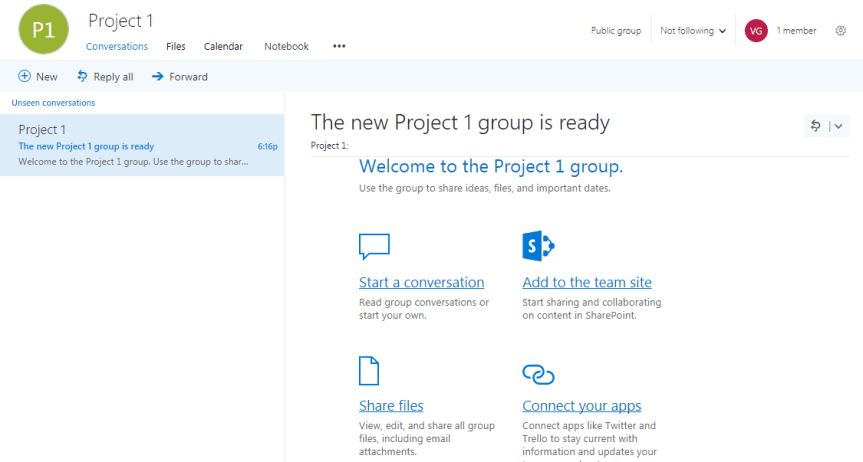
I would get a welcome email in my mailbox stating that the group is ready and the members whom I’ve added to the group would receive a similar email notification stating that they’re a part of that group now. If you’re using Outlook 2016 or Office 365 Pro Plus, then the group would automatically get mapped as a folder in your outlook client as shown in the image below.

4

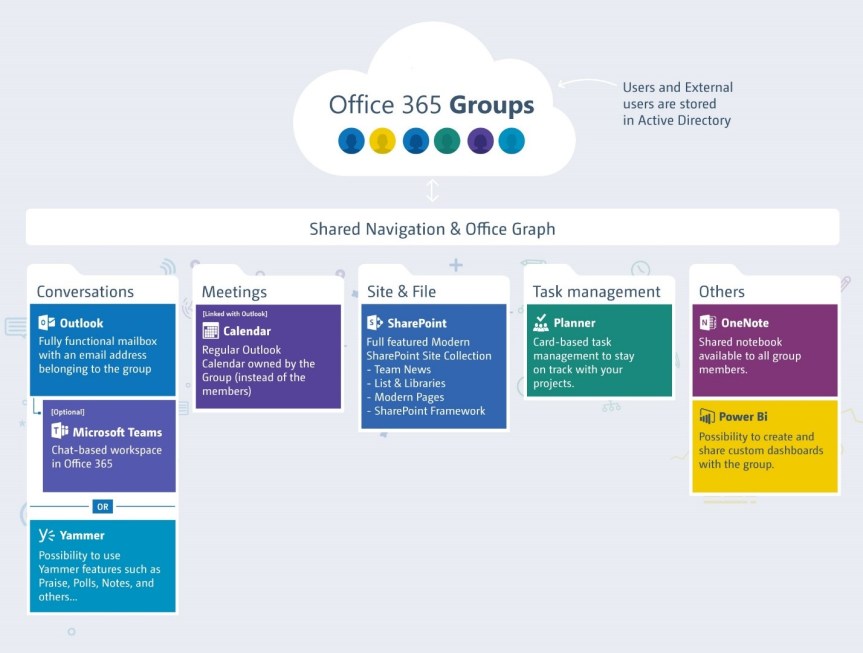
In addition to that, once you have created a group you would get the below mentioned workloads by default along with the Office 365 group.

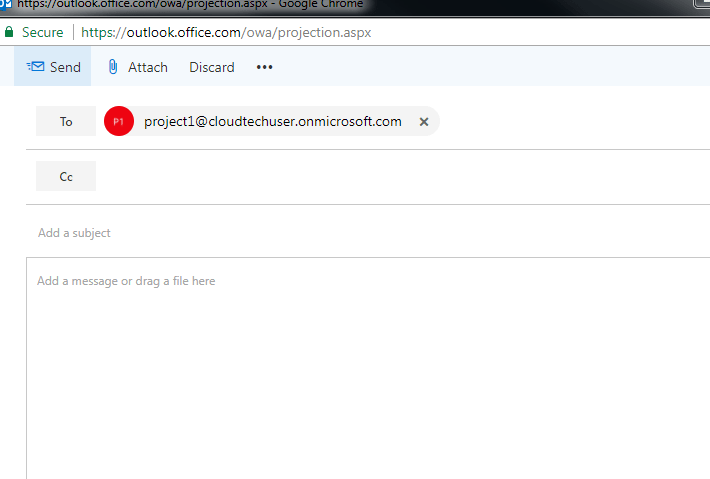
a) Conversations -This helps you to have email conversations within the group by sending an email to the group’s email address as shown in the image below. Any conversation which happens within the group can be viewed by all the members of the group.

5

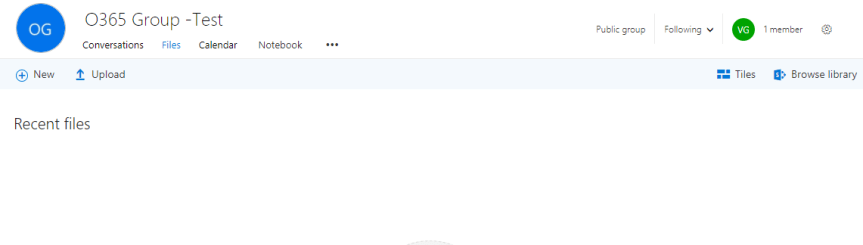
b) Files -You can upload all the files related to your project /team in this Tab and once it’s uploaded here it will be available to all the team members as shown in the image below.

6

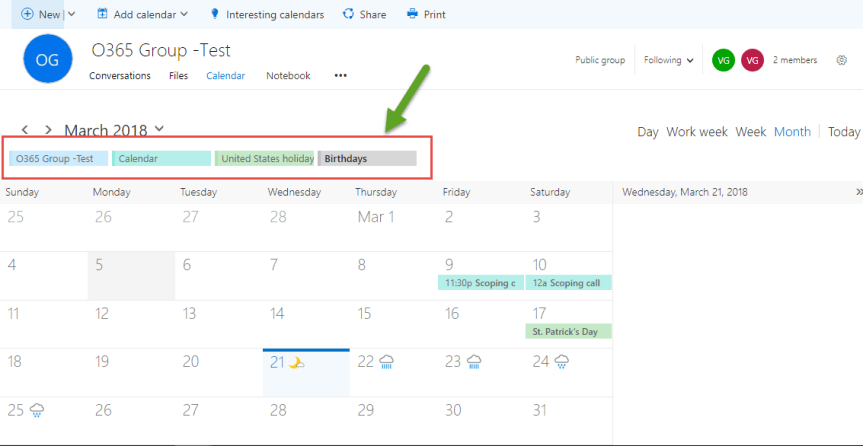
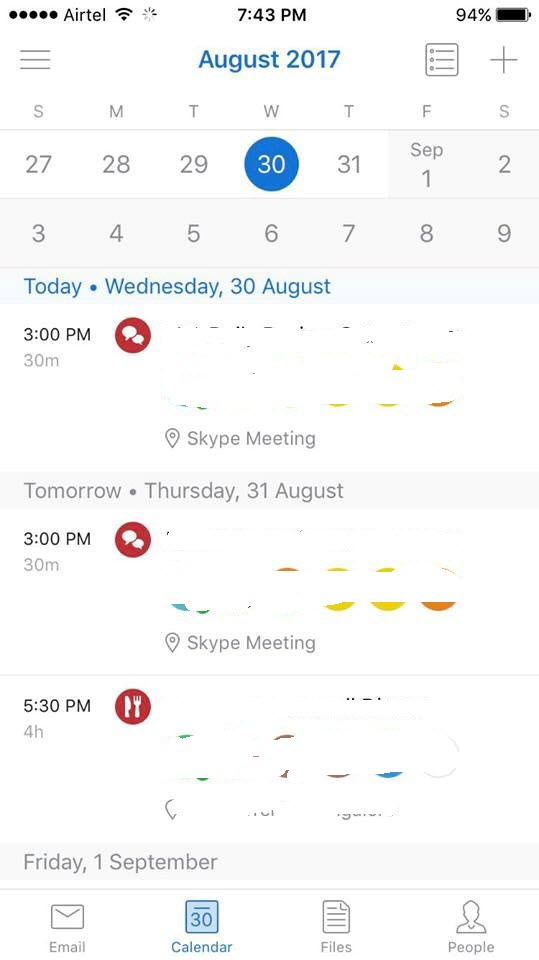
c) Calendar (you can schedule or view the meeting on the group if you’re a member of the group). In addition to this you can view your own calendar as well in the same Tab.

7

d) Notebook (Notebook which is used to share updates with the entire team in the group or you can create new section which is password protected). This can be used for capturing meeting points or something of that sort.

8

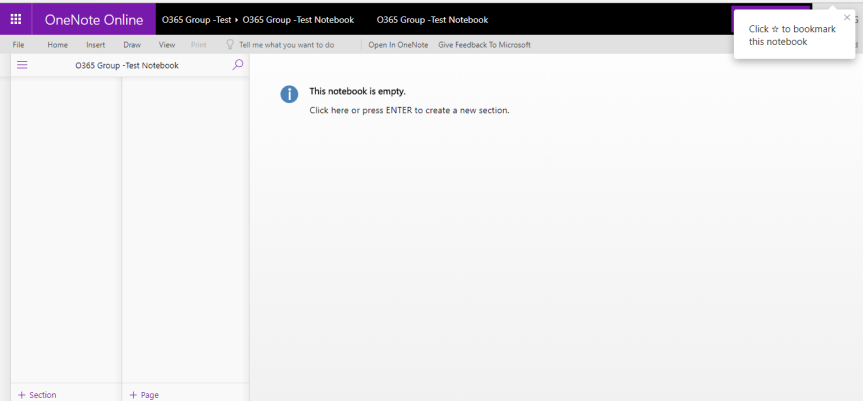
In addition to all these tabs, you would notice an ellipsis button towards your right side next to the “Notebook” Tab as shown in the image below. Clicking on that ellipsis would give you two options as shown in the image below. 1.  Planner & 2. Site

9

Now, let’s look into these two options.

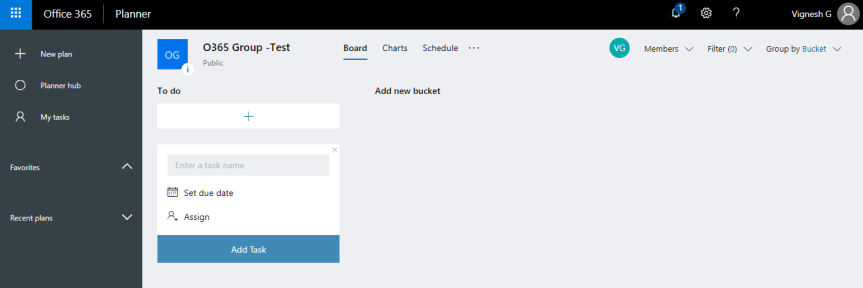
e) Planner (You can create tasks and plan them using planner). Any tasks that you need to plan as a part of your project can be added to the Planner with appropriate deadlines. You would also get email reminders for tasks that are nearing the deadlines.

10

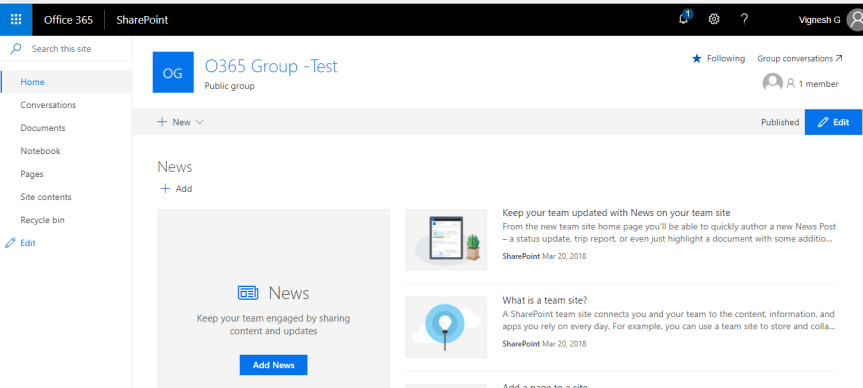
f) Site (SharePoint group site, which can upload documents or create new pages, web part, InfoPath form, etc.). So, when you click on site it would take you to a SharePoint Site which has the Modern experience and you use this for document collaboration and other SharePoint related stuff.

11.png

Note: The “Files” tab which I was talking about earlier is nothing but a document library which is a part of this SharePoint site. So please don’t get confused that it’s a different document library altogether. I see many people getting confused about these two workloads in an Office 365 group where they think that these are two different pieces altogether. So please bear in mind that these are both the same. The reason why Microsoft has given this as two pieces is, using the “Files “tab you can directly upload the files/documents to the document library instead of navigating to the “Site” tab and uploading it to the document library from there.

Listed below are the features that you get in the Modern SharePoint site …

  1. Responsive Pages to provide Team News
  2. Group Classification and Privacy always on display, an indicator for external users will also show up here
  3. Jump to the Outlook Conversations or manage Group members right here
  4. Create something new: Document Libraries, Lists, Pages, etc.

Now, that I have given an overview of Office 365 groups and the workloads in it and its functionality let’s try to understand how to create an Office 365 group. Well, when I think about it, it really excites me and scares me at the same time and I’ll explain the reason for that below.

The below mentioned image depicts the different ways of creating an Office 365 group in Office 365 (meaning, the different places from which an end user can create an Office 365 group)

12.png

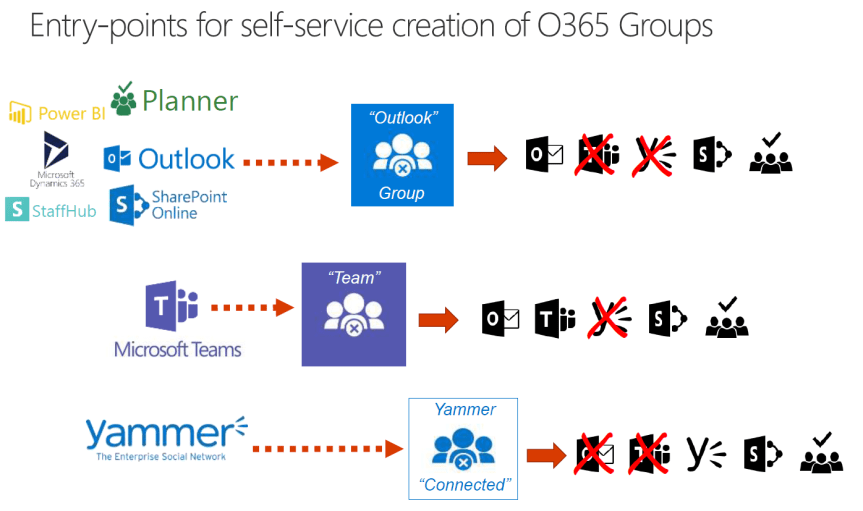
Note: As shown in the image above, an Office 365 group can be created from all these different sources and this may or may not change in the mere future (meaning, Microsoft can add few more sources from which you can create an Office 365 group, or they might even remove the creation of an Office 365 group from a specific source).

As of today, any end user who has access/license assigned to all these applications can create an Office 365 group. Of course, this is really exciting to me from an end user perspective as I don’t need to go to a specific location in Office 365 to create an Office 365 group and it can be created from within SharePoint, Outlook, Planner, Power BI, Teams, Yammer, Microsoft Dynamics 365 & StaffHub.

But when I think about this from an IT admin/ Office 365 admin perspective it really scares me because this would just open the door for all the users to create an Office 365 group either knowingly and unknowingly (meaning, may be the users intent was just to create a Yammer group or a Planner but, in the backend, it creates an Office 365 group and the user wouldn’t know about this).

However, there’s a catch here. If you pay attention to the image above you would notice that the behavior or the features of the Office 365 group is not the same when its created from a different source (meaning, when a group is created by the creation of a Team in Microsoft Teams you would only get outlook, Teams, SharePoint & Planner and not Yammer. On the other hand, when an Office 365 group is created as a result of the creation of a Yammer group you would only get Yammer, SharePoint & Planner). So, the point here, there’s going to be difference in the features/workloads you get in an Office 365 group based on what’s the source. The reason behind this is, Office 365 acts as a building block for all these groups created in Yammer, Teams and so on.

Now, if you’re interested in knowing more about the functionalities of all these groups and how they differ based from which source they get created then please go through the links below.

  1. Creating a Planner in Office 365 (this would create an Office 365 group in the backend) :_ https://support.office.com/en-us/article/create-a-plan-in-microsoft-planner-93e65b03-6fac-4661-a502-e3161475ab93
  2. Creating a group in Outlook :_ https://support.office.com/en-us/article/create-a-group-in-outlook-04d0c9cf-6864-423c-a380-4fa858f27102
  3. Creating a group in Yammer :_ https://support.office.com/en-us/article/create-a-group-in-yammer-b407af4f-9a58-4b12-b43e-afbb1b07c889
  4. Creating a group in StaffHub :_ https://support.office.com/en-us/article/add-employees-or-groups-in-microsoft-staffhub-f56ba0bb-8ca2-4583-8c0e-e10be3fc8985
  5. Creating a group in Power BI: _ https://docs.microsoft.com/en-us/power-bi/guided-learning/publishingandsharing#step-6
  6. Creating group in Microsoft Dynamics 365: _ https://docs.microsoft.com/en-us/dynamics365/customer-engagement/admin/deploy-office-365-groups
  7. Creating a team in Microsoft Teams( this would create an Office 365 group in the backend) :_ https://support.office.com/en-us/article/create-a-team-for-staff-in-microsoft-teams-314ac9d5-36a9-408e-8ae4-7ef20e9f1ddf
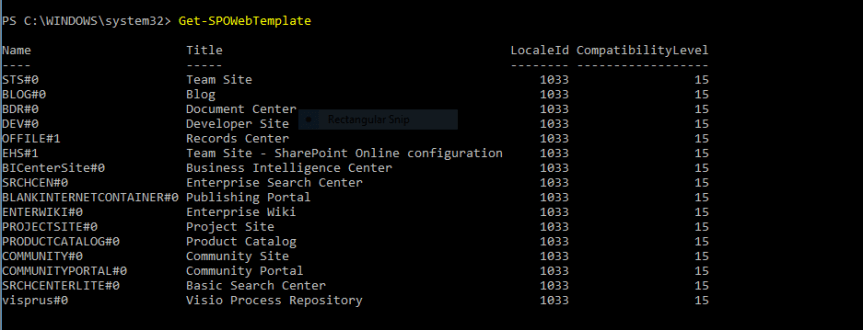
  8. Creating a modern team site in SharePoint Online (this would create an Office 365 group in the backend):_ https://support.office.com/en-us/article/create-a-team-site-in-sharepoint-online-ef10c1e7-15f3-42a3-98aa-b5972711777d

So, I believe by now you would have understood the beauty of an Office 365 group and how to create it and what are the different sources from which you can create an Office 365 group.

Now, let me get into the flip side of this….I believe by now you folks would have understood  that Office 365 groups is the basic building block for all the groups that gets created from different sources and let me also tell you that it’s also possible to create a group in Yammer or create a Team in Microsoft Teams from an existing Office 365 group ( meaning , when you create a new group in Yammer or while creating a Team in Microsoft Teams it creates an Office 365 group and that’s something which I already explained before .In addition to this I can create a Yammer group or a Team in Microsoft Teams from an existing Office 365 group ) as shown in the image below .

13

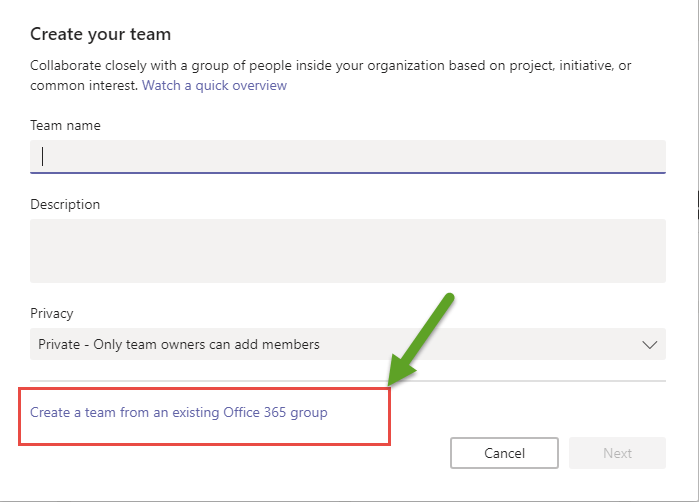
Note: In the image above, you can see that I’m trying to create a Team in Microsoft Teams and it gives me an option to choose an existing Office 365 group that already exists in Azure AD.

Behavior of an Office 365 group when it’s connected to Microsoft Teams:

  1. When a Group is created through Teams, the privacy of the Office 365 Group is automatically set to private and cannot be changed.
  2. You can add a Teams chat to an existing Office 365 Group if it’s set to private and has fewer than 600 members in the group. Note that this may change in the future.
  3. Teams cannot be added if the Office 365 Group uses Yammer for conversations instead of Outlook, as mentioned above


Behavior of an Office 365 group when it’s connected to a Yammer group:

Outlook Conversations are for emails; Microsoft Teams are to live chat and Yammer is for forum-like threaded conversations. Yammer conversations are a little different, as they are not always available with Office 365 Groups. To get an Office 365 Group with Yammer Conversations, you must create it from within Yammer and Yammer only.

If you decide to create a Yammer connected group, it’s exclusive. You will not be able to use the Outlook Conversations, Microsoft Teams, or the Calendar.

14

The behavior of an Office 365 groups varies based on which service it’s connected to and you can test if for yourself by creating it from different sources.

Alright. That’s all I have for this blog post and I’ll come back to you folks soon on different topics in Office 365 groups such as 1. How to restrict the creation of Office 365 groups to all the users? 2. Best practices for Office 365 groups administration 3. PowerShell for Office 365 groups etc.

Please stay tuned until then and good luck with Office 365 groups!!!


User guide to enroll your iOS Device with Microsoft Intune and to configure your Outlook mobile app

31.png

If your company or school uses Microsoft Intune for Mobile Device Management and Mobile application management, you can enroll your iOS device to get access to company email, files, and other resources. When you enroll your devices, your IT department can manage the resources, keep them secure, and give you the freedom to use your preferred device to get your work done.

The steps mentioned below should be followed by all users who hold an Apple device to enroll their iPhone/iPad with Microsoft Intune so that your device can be managed by Microsoft Intune.

Note:

  • Please make sure that your device has a good Wi-Fi connectivity or a good 3G/4G connection before doing the below mentioned steps.
  • Please ensure that your iOS version is not less than 8.0

Detailed steps:

  1. Open the App Store and search for Microsoft Intune company portal app as shown in the image below.

1

  1. Download and install the Microsoft Intune Company Portal app. Once done you should be able to see it in your Apple device home screen as shown in the image below.

2.jpg

3. Open the Intune company portal app and sign in with your Office 365 UPN address as shown in the image below.

3

  1. Enter your Office 365 UPN password as well as shown in the image below.

4

5. Once done you would be redirected to the Company Access setup page as shown in the image below.

5

6. Click on Begin on the top right corner of the screen and this will start preparing your portal as shown in the image below.

6

7. You would be taken to a screen which describes why you need to enroll your device , you can go through the guidelines if required and click on continue as shown in the image below.

7

8.The next screen will tell you what can be viewed by your IT Admin once the device has been enrolled with Intune and what cannot be viewed by the IT Admin. You can go through all the details if you’re concerned about your privacy and click on continue.

8

9. Now the next screen will ask you to click on “Enroll” to enroll your device with Intune, please go ahead and click on Enroll.

9.jpg

  1. Once done the next screen will prompt your for Multi-Factor Authentication which is nothing but an extra layer of security just to ensure that your connection is legitimate.

10.jpg

11. Based on which option you chose above you would either get a text message or a phone call with a passcode, please go ahead and enter the code correctly and click on next as shown in the image below.

11.jpg

12. Once done the device enrollment process will start and you would see the below mentioned screen.

12.jpg

13. After that would get the below mentioned screen asking you to install the profile for Mobile Device management, please go ahead and click on install as shown in the image below .

13.jpg

14. You would also get the installation prompt in the next few screens, please go ahead and click on install on the next screens. Once done if you already have a passcode for your device it would prompt for that, please key-in that passcode as shown in the image below .

30.jpg

15. On the next screen you would be asked if you trust this profile for Mobile device management, please go ahead and click on Trust as shown in the image below.

14

16. You would be taken to the certificate enrollment process in the next screen as shown in the image below.

15.jpg

17. Once done you would be taken to the below mentioned screen asking you to open the Company portal app as shown in the image below. Please go ahead and click on open.

16

18. After that’s completed you would get the below screen where you can notice that the portal is getting prepared.

17

19. You would get the below mentioned screen post that, please go ahead and click on install as shown in the image below.

18.jpg

20. The next screen will ask you to choose your device category, please go ahead and choose the correct option. In my case I’ve chosen “personal-owned device “ as I’m enrolling my personal iPhone with Intune .

19

21. Once done you would be prompted to change your passcode as shown in the image below, please go ahead and change it and confirm it once again as shown in the image below.


Note: Please make sure that you don’t forgot your passcode

20.jpg

22. After confirming the passcode, you would be taken to the below mentioned screen which confirms that your device has been successfully enrolled with Intune.

21.jpg

22.jpg

23.  Now go back to home screen in your iPhone and open the Intune company portal app .You can check the list of apps which are available for download from company portal app as shown in the image below.

23

24. Now you can search for the “Outlook” mobile app in the portal and install it as shown in the image below.

Note: If you’re IT admin has configured a policy in Intune such that you should only be using the Outlook mobile app that’s available in the Intune Company portal to configure your emails, then you won’t be able to download and use the Outlook mobile app that’s available in the App store. This is part of Mobile application management in Intune. In addition to that you won’t be able to do the below mentioned things based on the policies which your IT admin has enforced.

  1. A user tries to copy the content from his Office 365 mailbox and tries to paste it in his personal email account (i.e. Gmail, Hotmail etc..) and Intune restricts it.
  2. ii) A user tries to download an attachment from his Office 365 mailbox and tries to save it to his Drop box or personal OneDrive and Intune restricts it.

Please go through the link below to know more about the MAM policies in Intune :_ https://docs.microsoft.com/en-us/intune-classic/deploy-use/configure-and-deploy-mobile-application-management-policies-in-the-microsoft-intune-console

24.jpg

25. Once you’re done installing the “Outlook” mobile app from the Intune company portal, please go back to the home screen and open the “Outlook” app as shown in the image below.

25.jpg

26. Open the Outlook mobile app, you would be prompted to choose the email account which you want to setup. In my case it prompts to either add both my Office 365 email account as well as my Hotmail account. I’ve chosen to configure Office 365 email account only as shown in the image below. In your case you might only see your Office 365 email account.

Note: Even if you have added your Hotmail account , Intune will take care of only your Office 365 mail address and not your Hotmail account .

26.jpg

  1. Once you’ve chosen your Office 365 email account, please give it some time and your mailbox will start downloading all the emails, contacts and meetings etc. as shown in the image below.

28.jpg

28. You can also use some cool features like @mentions and focused inbox in Office 365 as shown in the image below.

29.jpg

29. In addition to this you can also remotely manage your mobile device from your laptop or PC once it’s enrolled with Intune by accessing the Intune Company portal site. In order to do that, please login to the below mentioned URL using your Office 365 UPN address and password.

https://portal.manage.microsoft.com/

30 .Once done you should be able to see your Apple device which has been enrolled with Intune as shown in the image below.

30.png

31. You can rename, remove, reset the passcode as well as remotely lock your device from your laptop/PC from here. So if you ever encounter a scenario where your device has been lost/stolen you can remotely wipe if from here.

Thanks for reading this post!!!  Good luck with Intune.


Get to know Microsoft 365:

e1.pngYep you read it correctly, it’s not Microsoft Office 365 and its Microsoft 365. Well by saying so I didn’t mean that Microsoft Office 365 is going away or it’s getting renamed as Microsoft 365. This is a new service which was introduced by Satya Nadella 2 days back on
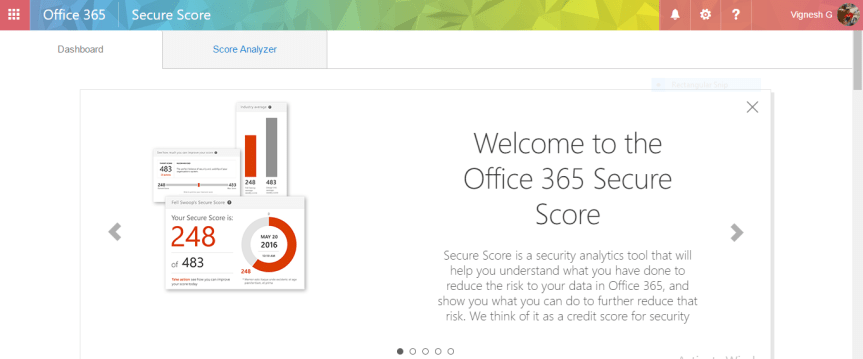
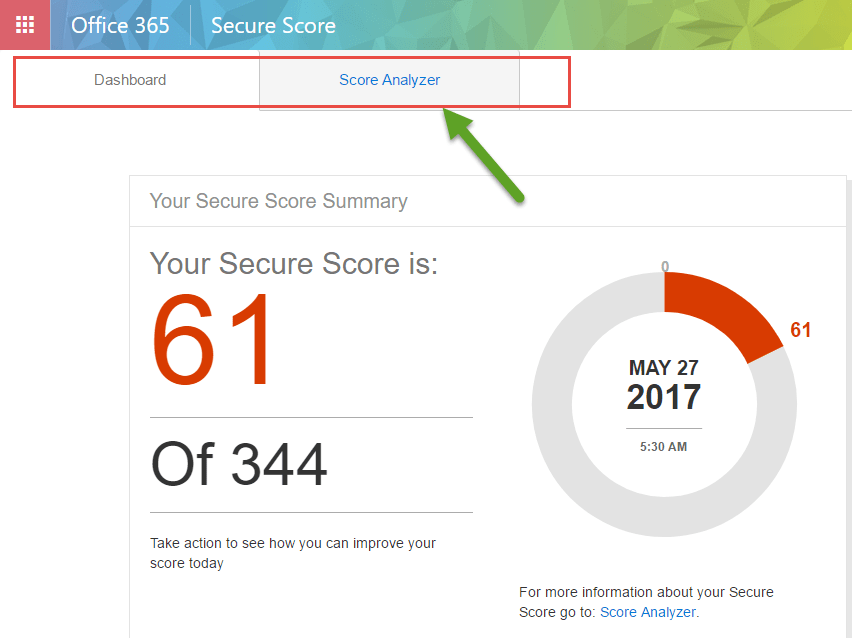
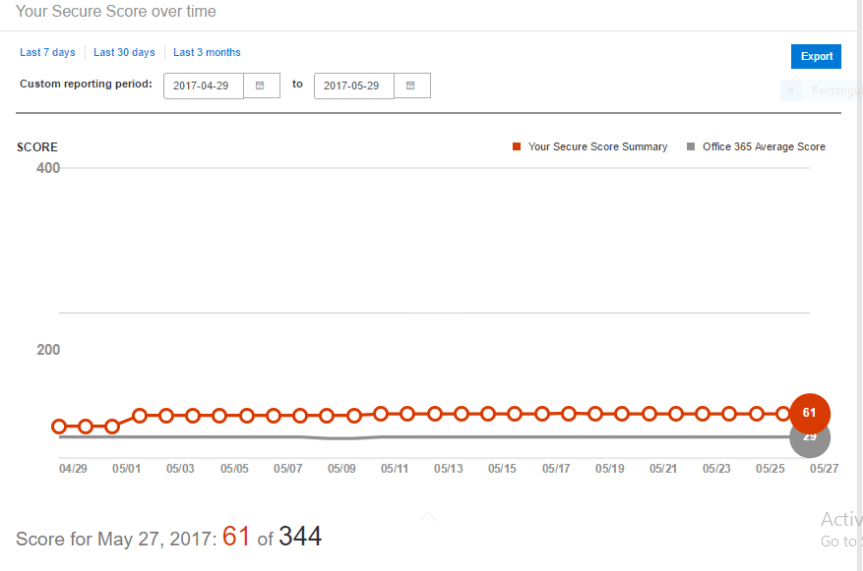
 Microsoft Inspire which brings together Office 365, Windows 10 and Enterprise Mobility + Security, delivering a complete, intelligent and secure solution to empower employees. I’m sure most of you would have already read about this today and if not please take a moment in reading this article where I’ve explained in detail about Microsoft 365 and what are the services it delivers and how it can enhance your business.

  1. What is Microsoft 365?

Well as I already mentioned above this is a new service which was introduced by Microsoft two days back which brings together Office 365, Windows 10 and Enterprise Mobility + Security.

  1. Is this something new or was this service already present?

To be very precise, this isn’t something new and in fact this is the successor of the most successful service , “Secure Productive Enterprise” which was introduced by Microsoft on October 2016 .

e2.png

  1. What happens to Secure Productive Service now?

Moving further, Secure Productive Service would be replaced by Microsoft 365.

  1. Do we have different flavors in Microsoft 365 as well like Secure Productive Enterprise?

Yes, we have two flavors in Microsoft 365, 1. Microsoft 365 Business which is meant for small organizations and 2. Microsoft 365 Enterprise which is meant for large organizations

  1. What are these two flavors meant for and how can they enhance my business?

Microsoft 365 Enterprise:

  1. Unlocks creativity by enabling people to work naturally with ink, voice and touch, all backed by tools that utilize AI and machine learning.
  2. Provides the broadest and deepest set of apps and services with a universal toolkit for teamwork, giving people flexibility and choice in how they connect, share and communicate.
  3. Simplifies IT by unifying management across users, devices, apps and services.
  4. Helps safeguard customer data, company data and intellectual property with built-in, intelligent security.

Microsoft 365 Business:

  1. Helps companies achieve more together by better connecting employees, customers and suppliers.
  2. Empowers employees to get work done from anywhere, on any device.
  3. Protects company data across devices with always-on security.
  4. Simplifies the set-up and management of employee devices and services with a single IT console.
  5. How about the plans for Microsoft 365?

Microsoft 365 Enterprise is available in two plans, E3 and E5

  1. When would Microsoft 365 be made available for the public?

Microsoft 365 Enterprise will be available for purchase from August 1st, 2017 onwards. You get to purchase both the plans (E3 & E5)

Microsoft 365 Business will be available in public preview on August 2nd, 2017. It will become generally available on a worldwide basis in the fall of 2017, priced at US $20 per user, per month.

  1. How do I get to know more about the services and features available in both the flavors of Microsoft 365 ?

        Please go through the links below to know more about the features and services available in both the flavors.

For Business: _ https://www.microsoft.com/en-us/microsoft-365/business

For Enterprise: _ https://www.microsoft.com/en-us/microsoft-365/enterprise

Thanks for reading the post. Good luck with Microsoft 365.


What is Secure Score in Office 365?

Secure-Keyboard-Hero

This post is on a new service which was introduced by Microsoft couple of months back called as “Office 365 Secure Score “. If you’ve ever wondered how secure your Office 365 tenant really is, then it’s time about time now to stop wondering because we have “Secure Score “now to take care of that. So, what’s this new service called as Office 365 secure score? What does it do? How do I make use of it? …. Well, I’m going to answer all those questions that you have in your mind about Office 365 secure score in this article and you will also learn about how to make use of this service to enhance your business with Office 365. Alright, let’s get started …. Shall we?

What is Office 365 secure score?

This is how Microsoft defines Office 365 secure score … “The Secure Score is a security analytics tool that will help you understand what you have done to reduce the risk to your data in Office 365, and show you what you can do to further reduce that risk “. To put it in very simple words, it’s a tool that runs on the background and checks the security standards of all the service used by you as an organization (i.e. SharePoint Online, Exchange Online, Skype for Business Online, Azure AD etc. …) and assigns a credit score.

What’ the idea behind Office 365 secure score?

The approach by Microsoft to this experience was very simple. First, they created a full inventory of all the security configurations and behaviors that customers can do to mitigate risks to their data in Office 365 (there are about 77 such things in total). Then, they evaluated the extent to which each of those controls mitigated a specific set of risks and awarded the control some points. More points means a more effective control for that risk. Lastly, they measured the extent to which the service has adopted the recommended controls, add up the points, and present it as a single score.

How to use Office 365 secure score?  

  1. The first thing you would notice once you login to the secure score portal is the welcome screen (check the screenshot below) which gives you a small definition about Office 365 secure score. In the below mentioned screenshot I’ve logged into the secure score portal of my Office 365 tenant by accessing this URL (i.e. https://securescore.office.com/ ) and I get this screen which gives me a welcome message about Office 365 secure score.

1.PNG

Note: If you already logged into your tenant you can directly access the Secure Score URL which I mentioned above and it will allow you inside the portal without prompting for your credentials once again.

2. Once you read all the welcome messages about Secure score you will get two different tabs as shown in the image below.

                    i)Dashboard.

                   ii )Score Analyzer.

2

3. The first tab which says “Dashboard” is where you get to see the secure score summary. This panel gives you your current Secure Score, and the total number of points that are available to you, given your subscription level, the date that your score was measured, as well as a simple pie chart of your score. The denominator of your score is not intended to be a goal number to achieve. The full set of controls includes several that are very aggressive and will potentially have an adverse impact on your users’ productivity. Your goal should be to optimize your action to take every possible risk mitigating action while preserving your users’ productivity. The below mentioned screenshot depicts the secure score summary of my Office 365 tenant where I’ve scored 61 out of 344 as on May 27, 2017.

14.PNG

4. The next section on the “Dashboard” tab after the “Secure score summary” section would be the section which tells how to improve your score. It gives you the targeted score that you can achieve for your tenant and lists out the action items to improve your score. You can make use of the slider to preview your improved score as shown in the image below.

15.PNG

5. The next section will list out all the pending action items that I’m supposed to complete to achieve the maximum score.

4

6. Now, let’s look at few pending action items to see what it means and how it would impact my Secure score in Office 365.

i) Designate less than 5 global admins:

16.PNG

This one says that I should designate less than 5 global administrators for Office 365 tenant and in my case, I’ve breached it by making it as 6. Hence, it’ asking me to correct it and it also gives me an overview about the score I would get by doing so.

ii) Enable MFA for all global admins:

17.PNG

This one says that I have to enable Multi factor authentication for all my 6 global admin accounts as none of accounts have that enabled and this is considered to be a security breach. It also tells me that I can achieve a score of 50 by doing so.

7) The next section under the “Dashboard” tab is the “Risk Assessment “section which gives me an overview about the top threats in my tenant. It is very important that Office 365 global administrators should read this and understand the risks they are mitigating every time they take an action.

18.PNG

Let’s look at the “Account breach” scenario here and see the details about the risk.

19Compare your score:

The Office 365 Average Secure Score is calculated from every Office 365 customer’s Secure Score. You can use this section to understand how your score stacks up against the average score.

Note: The Average Secure Score only includes the numerator of the score, not the denominator. So, the average points may be higher than you can achieve because there are points in controls associated with services that you have not purchased (meaning , you might be using a different plan such as E3 whereas other customers might be using E5 or other plans) .

5


Alright, now let’s look at the “Score Analyzer” tab in the Secure Score portal.

Score Analyzer:

As of now, it’s only the global administrators who have access to the “Secure Score “portal and in the future, it would be made available to other administrators as well such as SharePoint Online administrator, Exchange Online administrator & Skype for Business administrator. However, in the interim you can use the “Score Analyzer “tab to export the secure score results and share it with your executives or stakeholders or other administrators (i.e. SharePoint Online, Exchange Online etc.)  so that they’re aware of the progress that’s made on risk mitigation in Office 365. The Score Analyzer experience allows you to review a line graph of your score over time, to export the audit of your control measurements for the selected day to either a PDF or a CSV, and to review what controls you have earned points for, and which ones you could act on.

  1. The below mentioned image depicts the “Score Analyzer” tab of my secure score portal.

6.PNG

2. I can make use of the “Export “button on the top right corner to export these results in PDF & CSV format.

7.PNG

3. It also gives you an overview of all the “Complete “and “Incomplete” actions and the scores associated to those action items as shown in the image below.

10.PNG

4 .The “Complete “and “Incomplete” actions are classified based on three different categories as you see below (i.e. Account, Data & Device)

20.PNG

5. Finally, I can make use of the “Export “button which I mentioned above to export the results to a PDF/CSV Please check the image below to see a sample report.

8.PNG

So finally, to conclude, the Secure Score is indeed a great tool to keep your Office 365 tenant as secure as possible and at the same time you need to be aware that the Secure Score does not express an absolute measure of how likely you are to get breached. It expresses the extent to which you have adopted controls which can offset the risk of being breached. No service can guarantee that you will not be breached, and the Secure Score should not be interpreted as a guarantee in any way.

Resources to know in detail about Secure Score in Office 365:

Microsoft Mechanics video on Office 365 Secure Score: https://youtu.be/h__nxWlm5Nc

Office 365 Secure Score API:  https://blogs.technet.microsoft.com/office365security/using-the-office-365-secure-score-api/

You can also check my Webinar recording on Office 365 where I’ve shown a small demo on Office 365 secure score. Here’s the link to that: https://youtu.be/HYcfXWN30O0

Thanks for reading this post …. Good luck with Secure Score in Office 365!!!


Webcast of SharePoint Virtual Summit:

sharepoint-virtual-summit-2017.jpg

For those who missed to attend the SharePoint Virtual Summit session which was held on May 16th , please make use of the link below to watch the webcast on demand

https://event.microsoft.com/events/2017/1705/SharepointSummit/

Watch the webcast to learn how to create a connected workplace in Office 365 with OneDrive and SharePoint, integrated with Yammer, Microsoft Teams, Windows, PowerApps and Microsoft Flow.

In this webcast , Microsoft has unveiled the latest innovations and roadmap, and you’ll learn how industry-leading customers are leveraging these technologies as part of their digital transformation. Discover how Office 365, connected with Windows and Azure, is reinventing productivity for you, your teams and your organization.

Happy SharePointing !!!

Terminologies one must be aware of in Office 365:

Listed below are the few important topologies one must be aware of while working on Office 365.Office 365

  1. Active Directory Federated Services (AD FS):

On-premises security token service (STS) that provides simplified, secure identity federation and Web single sign-on (SSO) capabilities for users who want to access applications within an AD FS-secured enterprise, in federation partner organizations, or in the cloud. Federated identities with Modern Authentication-enabled clients interoperate with EvoSTS, which is the Azure AD STS.

AD FS indirectly supports CA scenarios, as it offers a set of controls known as client access filtering that allow the creation of perimeter network-based policies for IP range filtering, accessed workload, or client type (browser vs rich client).

  1. Multi-Factor Authentication (MFA):

Protects access to data and applications by requiring a second form of authentication. Strong authentication is available through a range of verification options.

  1. Azure Active Directory Premium:

All CA scenarios that leverage Azure AD require Azure AD Premium. Azure AD Premium adds feature-rich enterprise-level identity management capabilities and enables hybrid users to seamlessly access on-premises and cloud capabilities. It includes everything you need for information worker and identity administrators in hybrid environments across application access, self-service identity and access management, identity protection and security in the cloud.

  1. Azure Rights Management Services (RMS):

Uses encryption, identity, and authorization policies to protect files and email. Information protection that is applied by using Azure RMS stays with the files and emails independently of the location, allowing customers to remain in control of their data even when this data is in motion.

  1. Conditional Access (CA):

CA allows customers to selectively allow or disallow access to Office 365 based on attributes such as device enrollment, network location, group membership, etc.

  1. Device-based CA restricts access to devices that are managed by the organization and are in a healthy state. Device-based CA is a feature of Intune. Users must enroll their devices in Intune and validate that the device meets the organization’s access rules regarding device health and security.
  2. There are other CA scenarios that do not require device enrollment, such as restrict access only from specific locations. These scenarios do not require Intune and are provided through Azure AD Premium access control features.
  1. Data Loss Prevention (DLP):

Helps identify and monitor sensitive information, such as private identification numbers, credit card numbers, or standard forms used in your organization. DLP Policies enable you to notify users that they are sending sensitive information and to block the transmission of sensitive information.

  1. Microsoft Enterprise Mobility + Security (EMS):

Provides identity and access management, MDM, MAM and Azure RMS. Intune is a part of EMS.

  1. Microsoft Intune (Intune):

Intune is a cloud-based service that helps you manage Windows PCs, and iOS, Android, and Windows mobile devices. Intune also helps protect corporate applications and data. You can use Intune alone or you can integrate it with Microsoft System Center Configuration Manager 2012 R2 to extend your management capabilities.

  1. Mobile Application Management (MAM):

Controls how corporate-managed applications work and interact with other managed applications and unmanaged applications (e.g., provides the ability to restrict user actions such as copy, paste, download, etc.). Available through Intune.

  1. Mobile Device Management (MDM):

Provides the ability to configure mobile device policies, such as enforcing complex PINs or passwords, blocking devices that have been jail broken or rooted from syncing email, disabling Bluetooth, etc. Available through Office 365 MDM and Intune.

  1. Modern Authentication:

Provides OAuth-based authentication for Office clients against Office 365 using Active Directory Authentication Library (ADAL). Replaces the Microsoft Office Sign-In Assistant. Allows for CA policies, so administrators can define granular applications and device-based controls for corporate resources.

Thanks for reading this post ….Good luck with Office 365 !!!


Great opportunity for Office 365 folks:

office 365.png

Microsoft has  planned and set up 8 different Office 365 Labs webcasts that will be delivered during September and these are the topics that will be discussed in the webcast.

1. Office 365 Labs – Using PowerShell to automate tasks
2. Office 365 Labs – Mastering Azure AD Connect
3. Office 365 Labs – Mail flow
4. Office 365 Labs – Getting the best out of Outlook and Exchange Online
5. Office 365 Labs – OneDrive Synchronization 101
6. Office 365 Labs – Sharing and collaboration with internal and external users in SharePoint Online
7. Office 365 Labs – AD FS and multi-factor authentication explained
8. Office 365 Labs – Exchange Online compliance features (In-Place Archive, In-Place Hold, eDiscovery)

Please use this link below to enroll yourself for these sessions

Office 365 Labs webcasts coming in September

Part 2: Useful Office 365 cmdlets to generate SharePoint Online reports and also for SharePoint Online site administration:

Followed to my previous article about useful office 365 cmdlets in SharePoint Online, in this article I’ll be showing you some more useful PowerShell cmdlets to generate SharePoint Online reports /SharePoint Online site administration. I see a lot of misconception with my fellow SharePoint workers on understanding the difference between SharePoint on-premises cmdlets and Office 365(SharePoint Online) cmdlets, please note that they all don’t have the same functionality even though they almost look similar. There is a lot of difference in what they exactly do, so please pay close attention while utilizing them.

1

So let’s get into the real meats and potatoes now…

  1. To create a new SPO Site collection:

SyntaxNew-SPOSite -Url https://vigx.sharepoint.com/sites/Vignesh -Title “Vignesh” -Owner “vigganesan89@vigx.onmicrosoft.com” -Template “STS#0” -TimeZoneId 10 -StorageQuota 200

2

Note: In the above mentioned command you need to specify the URL of your new site collection, Title Name, Template ID, Time Zone and Storage quota size. Please check my previous article on SharePoint Online command to get to know about SharePoint Online Template ID’s

Running this command will create a new site collection in SPO and you can verify this in your SPO admin center as shown below.

3

2.To list the groups, and all the group memberships, for all of your SharePoint Online sites.

Syntax:

$x = Get-SPOSite


foreach ($y in $x)

    {

        Write-Host $y.Url -ForegroundColor “Yellow”

        $z = Get-SPOSiteGroup -Site $y.Url

        foreach ($a in $z)

            {

                 $b = Get-SPOSiteGroup -Site $y.Url -Group $a.Title

                 Write-Host $b.Title -ForegroundColor “Cyan”

                 $b | Select-Object -ExpandProperty Users

                 Write-Host

            }

    }

Running the above mentioned command will display the results as shown below,

4.png

3.To list the groups, and all the group memberships, for a single site collection:

Syntax:

First let me assign the $siteURL variable to the site collection in question.

$siteURL = “https://vigx.sharepoint.com/teams/test”–> Site in question.

$siteURL = “https://vigx.sharepoint.com/teams/test”

$x = Get-SPOSiteGroup -Site $siteURL

foreach ($y in $x)

    {

        Write-Host $y.Title -ForegroundColor “Yellow”

        Get-SPOSiteGroup -Site $siteURL -Group $y.Title | Select-Object -ExpandProperty Users

        Write-Host

    }

Running this command will display the results as shown below .

5

 4.To lock a SharePoint Online site:

SyntaxSet-SPOSite -Identity $site -Lockstate NoAccess

Specify the $site variable to the site which you want to lock.

6

Running this command will lock the site and when you try to access it you will get a 403 Forbidden error.

5.To unlock as SharePoint Online site:

Syntax:  Set-SPOSite -Identity $site -Lockstate Unlock

7.png

This will unlock the site that we just locked in the previous command.

6.To disable external sharing for a SharePoint Online site collection:

Syntax:

$siteURL = “https://vigx.sharepoint.com/teams/test”–> Site in question

Set-SPOSite -Identity $siteURL -SharingCapability Disabled

8.png

You can verify this in your SharePoint Online admin center as shown in the image below. The site in question will have external sharing disabled as shown below.

9

7.To enable external user and guest sharing:

Syntax:

Set-SPOSite -Identity $siteURL -SharingCapability ExternalUserandGuestSharing

10.png

Running this command will enable external user and guest sharing in a SPO site collection and you can verify that in the screenshot below.

11.png

Note: By default, this feature will be disabled for SPO sites and this has to be enabled if required.

8.To enable only external user sharing:

Syntax:  Set-SPOSite -Identity $siteURL -SharingCapability ExternalUserSharingOnly

12.png

 Running this command will only enable external user sharing in a SPO site collection and you can verify that in the screenshot below.

15.png

9.To get the list of sites where sharing capability has been enabled:

Syntax:    Get-SPOSite | Where {$_.SharingCapability -ne “Disabled”}

13

  1. To get the list of sites where sharing capability is disabled:

Syntax:  Get-SPOSite | Where {$_. SharingCapability -eq “Disabled”}

14.png

 11.To change the owner of site:

Syntax:

First let me assign the $siteURL variable to the site collection in question.

$siteURL = “https://vigx.sharepoint.com/teams/test”–> Site in question

Set-SPOSite -Identity $siteURL -Owner “pritham@vigx.onmicrosoft.com”

16

12.To change the storage and resource quota of a site:

Syntax:

Set-SPOSite -Identity $siteURL -StorgaeQuota 1000 -ResourceQuota 500

13.To change the Title of the site:

Syntax:

Set-SPOSite $siteURL -Title “New Title”

17.png

This will change the title of the site in question. You can verify this below.

18.png

Thanks for reading this article. This is all I have for this post and I’ll be back with Part 3 of this article very soon.

Happy SharePointing !!!

Part 1: Useful Office 365 cmdlets to generate SharePoint Online reports and also for SharePoint Online site administration:

Presentation1.png

In this post I’ll be showing you how to use Office 365 PowerShell cmdlets to generate useful SharePoint Online reports from your SharePoint Online tenant and also I’ll be discussing on certain useful cmdlets that can be used for SharePoint Online site administration. Let’s get started.

Note: Before we get started, please ensure that you’ve configured your PC to run SharePoint Online (Office 365) cmdlets. If not, please take a look on this article which I’ve already written about how to configure that. Also make sure that you’re a member of the SharePoint Online administration role in Office 365.

  1. Get-SPOSite -Detailed

This command will give a detailed list of all the site collections in your SharePoint Online tenant as shown in the screenshot below.

1.png

2. To get a list of SharePoint groups in your tenant.

Syntax:   Get-SPOSite | ForEach-Object {Get-SPOSiteGroup -Site $_.Url} |Format-Table 

Running this command will generate the results as shown in the image below. Also please note that this command will display the default SharePoint groups as well as the custom SharePoint groups that was created manually.

2.png

3.png

3. Adding a user to the Site collection administrators group.

Before I go ahead and show the syntax for this, let me go ahead specify the variables here so that it will be easy for us to use that in the command.

$tenant =  “https://vigx-admin.sharepoint.com “–>This would be my tenant URL

$site = “https://vigx.sharepoint.com/teams/test” –>This will be the SharePoint site collection URL

$user =” kamaleshg@vigx.onmicrosoft.com” –> This will be the UPN for the user who will be added as the SCA.

Since we have already specified all the variables, let’s go ahead and run the syntax.

SyntaxSet-SPOUser -Site $site -LoginName kamaleshg@vigx.onmicrosoft.com -IsSiteCollectionAdmin $true

Check the screenshot below for reference:

4.png

5.png

So this will add the user to the SCA group of  a site collection.

4. To get the list of users in my SharePoint Online Tenant:

Syntax:  Get-SPOSite | ForEach-Object {Get-SPOUser -Site $_.Url} 

Running this command will display the results as shown in the screenshot below.

replace.PNG


5.To get a report of the user’s in a site, their display names, permission levels and other properties:

Before I go ahead and execute the command for this, let me specify the $site variable for the site in question.

$site = “https://vigx.sharepoint.com/teams/test” –>This will be the SharePoint site URL

Note: It’s not necessary that you need to keep specifying the variables every time in a command unless you’re planning to use a different value apart to the one specified for that variable. PowerShell will automatically store it for you till the session is live.

Syntax:  Get-SPOUser -Site $site | select * | Format-table -Wrap -AutoSize | Out-File G:\UsersReport.txt -Force -Width 360 -Append

8.png

Running this command will generate a report as shown in the screenshot below.

9.png
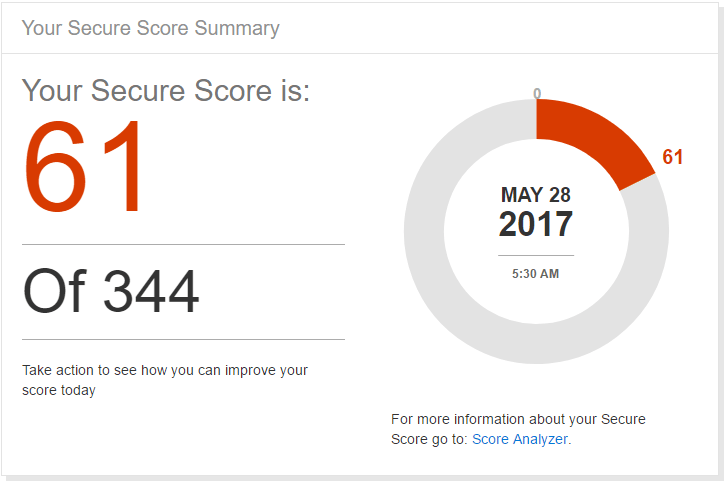
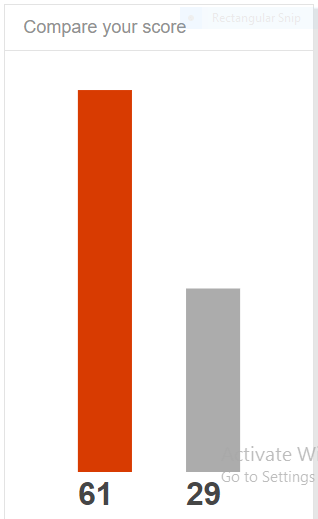
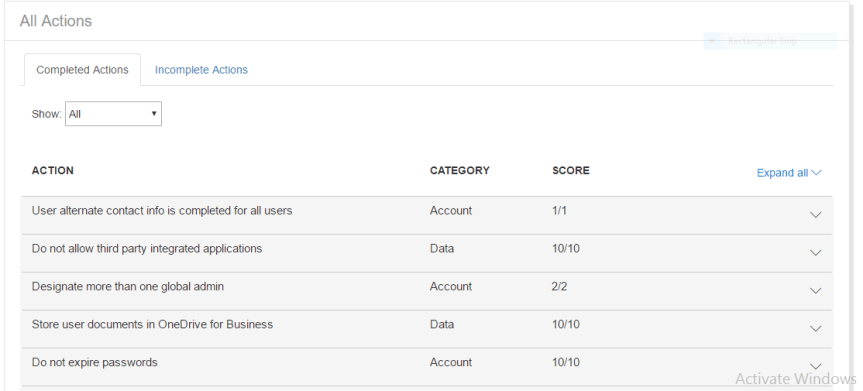
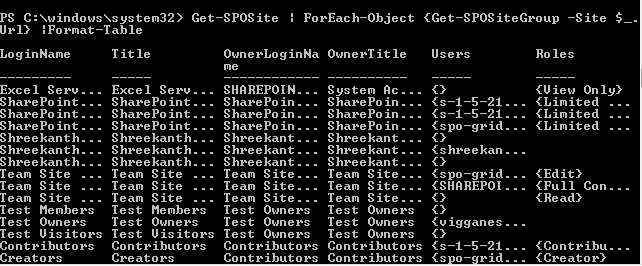
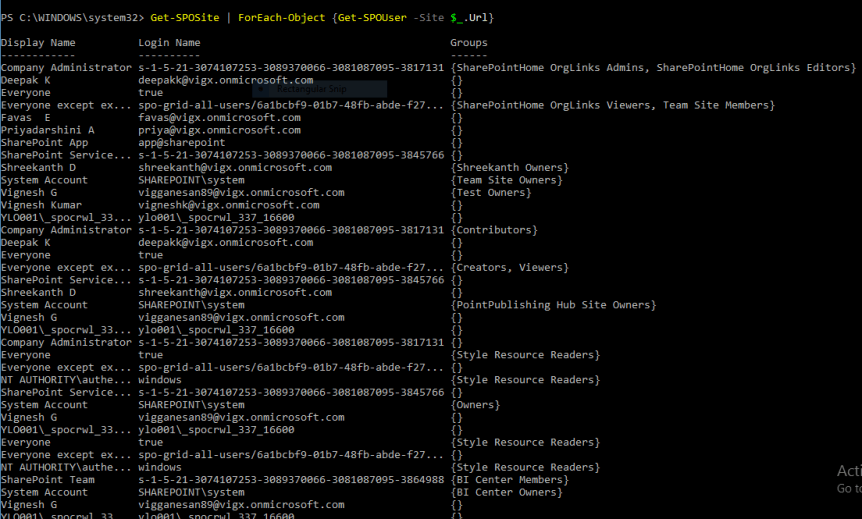
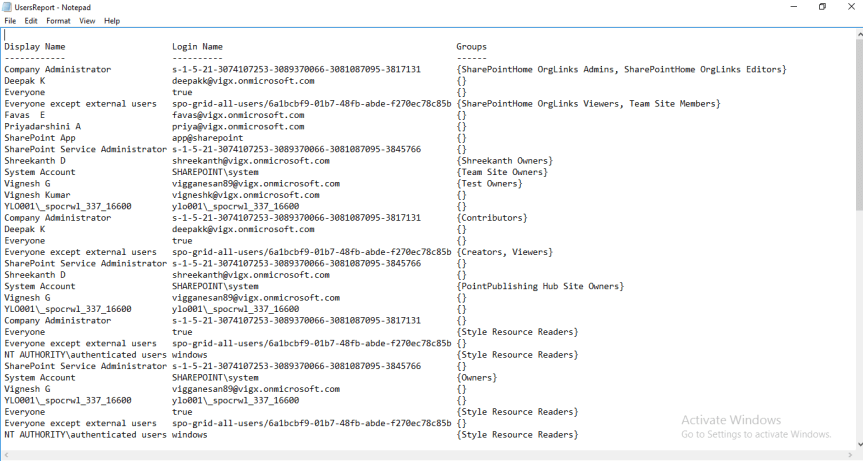
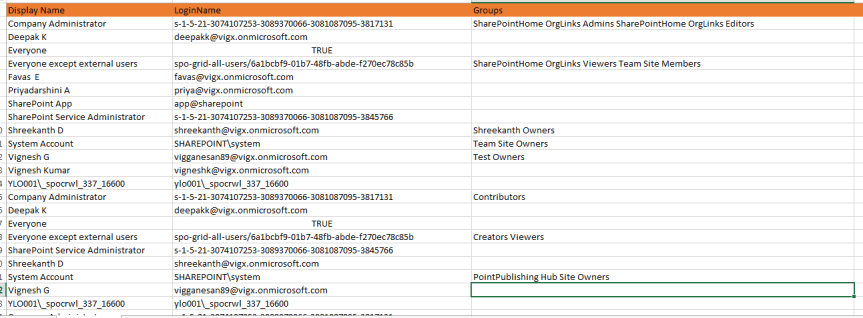
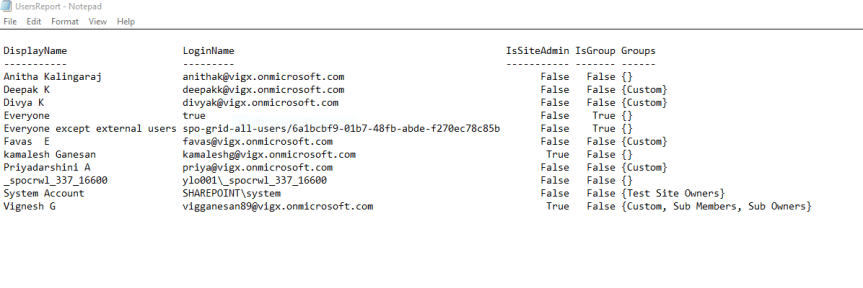
6. To get a report of the all user’s in your SharePoint Online Tenant, their display names, permission levels and other properties

$tenant =  “https://vigx-admin.sharepoint.com “–> This would be my tenant URL

Syntax:

Get-SPOSite | ForEach-Object {Get-SPOUser -Site $_.Url} | Format-Table -Wrap -AutoSize | Out-File G:\UsersReport.txt -Force -Width 360 -Append

10.png

Note: PowerShell might throw you some errors while running this command but that can be safely ignored.

Running this command will generate a report as shown below.

11.png

If you want to export the result to a CSV file, try running the below mentioned command.

Command 1 : For setting the headers in the CSV file

“Display Name`tLoginName`tGroups” | Out-File C:\UsersReport.csv

 12.png

Command 2: Once you’re done executing the first line, run the below syntax to get the report in the form a CSV file.

Syntax:

Get-SPOSite | ForEach-Object {Get-SPOUser -Site $_.Url -ErrorAction SilentlyContinue | %{ $_.DisplayName + “`t” + $_.LoginName

 + “`t” + $_.Groups | Out-File c:\UsersReport.csv -Force -Append}}

13

This will generate a CSV file as shown in the image below,

14.png

 7. To create a new SharePoint Group in a site collection.

Before I mention the syntax, let’s specify the necessary variables.

$tenant = “https://vigx-admin.sharepoint.com” –>Tenant URL

$site = “https://vigx.sharepoint.com/teams/test “–> Site collection URL

$group = “Test Site Owners2” –>SharePoint Group Name

$level = “Full Control” –> Permission level

Syntax:

New-SPOSiteGroup -Group $group -PermissionLevels $level -Site $site

15.png

Running the above command will create a new SharePoint Group in the targeted site collection and will give the results as shown below.

16.png

8. To create an inventory of all the SharePoint site collections in your Tenant which has the information of the Site Name, URL, Quota, compatibility level and other information etc.… and to export the results to a CSV file:

Syntax:

Get-SPOSite -Limit All | Export-CSV -LiteralPath G:\SiteInventory.csv -NoTypeInformation

17.png

Running this command will generate a CSV file in specified path as shown in the image below.

18.png

 9. To get your SharePoint Online Tenant information

Syntax: Get-SPOTenant

This will give the complete tenant information as shown in the image below.

19.png

  1. To get the list of site templates in your SharePoint Online tenant

Syntax: Get-SPOWebTemplate

Running this command will give the list of site templates in SharePoint Online as shown below

20.png

This concludes part 1 of this article, I’ll be creating part 2 of this article where I’ll be taking you through few more SharePoint Online PowerShell cmdlets that can help us to generate useful reports and also for site administration.

Thanks for reading this post.

Happy SharePointing!!!