PowerShell to on-board list of users to Office 365 and assign them Office 365 licenses:

1.jpgOffice 365 is a SaaS platform which is  being used by many organizations these days and it becomes quite hard for IT administrators to on-board their users to Office 365 manually .Of course , this may not be the case when your user identities gets synced to Azure AD from on-premises AD using AAD connect tool .However, if you’re one of the organizations who totally buried all your IT infrastructure implementation and decided to go with a Cloud implementation completely then possibilities are such that you as an IT administrator should take care of on-boarding your users to Azure AD .As we all know , this is indeed quite a time consuming task if we have to do it manually and then assign the appropriate licenses to all the users . So, to surpass all those manual effort, I’ve put together this PowerShell script which will do the magic for you. Alright, let’s get into the details ….

1.Sign-in to your Office 365 admin center using your global admin account and navigate to the “Active users” section as shown in the image below.

2.png

2.At this moment, you might see only the user account which was used to set-up the Office 365 tenant.

Note: In my case, you might see 3 users as I manually created them using the “Add a user “option.

3.Create a CSV file which has the details of all your users by following the guidelines mentioned in this article. The below mentioned screenshot depicts the CSV file which I’ve prepared which has the list of all my users.

3.png

4. Once done, please login to the PowerShell window and type the below mentioned command as shown in the image below. This will tell you the type of license that your tenant is using and how many licenses have been utilized till now.

4

Note : In my case you can notice that my tenant is on  Office 365 E5 Enterprise E5 plan +EMS  (Enterprise Mobility ) and it also displays how many licenses have been consumed till now .

5. Prior to running the above command, please ensure that you’re connected to your Office 365 tenant via PowerShell, if not please follow the below article to do that first.

https://technet.microsoft.com/library/dn975125.aspx

6. Now, let’s specify the required variables for the PowerShell script.

$UsersToAdd = Import-Csv C:\Users\Vignesh\Documents\Import_User_Sample_en.csv

$LicenseToAdd = “sptech80:ENTERPRISEPREMIUM” à This information can be grabbed from the Get-MsolAccountSKU command which we ran in the above step.

$UsageLocation = “US”

$LicenseOptions = New-MsolLicenseOptions -AccountSkuId $LicenseToAdd

5

7.Once you’re done specifying the required variables, please go ahead and run the below mentioned PowerShell command as shown in the image.

$UsersToAdd | ForEach-Object {

New-MsolUser –UserPrincipalName $_.UserPrincipalName -DisplayName $_.DisplayName

Set-MsolUser -UserPrincipalName $_.UserPrincipalName -UsageLocation $UsageLocation

Set-MsolUserLicense -UserPrincipalName $_.UserPrincipalName -AddLicenses $LicenseToAdd -LicenseOptions $LicenseOptions

}

6.png

8.You may notice that your users are getting created after running the script as shown in the image above and the licensing tab might display the status as “False”. That’s due to the time taken for the script to reflect the licensing details as it first creates the user and then assigns the license to the user’s account. This is quite normal and hence you don’t need to panic about the “isLicensed” column

9. You can verify the status of the users as well as the licenses assigned to them by running the “Get-MsolUser” command. This time it should display the licensing details correctly.

10. Additionally, you can also navigate to the “Active users” section to verify the same.

8.png

Thanks for reading this post ….Good luck with Office 365 !!!

Advertisement

Extending the Retention period of orphaned personal site collections up to a year:

One drive 1.png

Alright , I guess you might have figured out what this post is going to be about by seeing the title .So yes , I’m going to show you how to extend the retention period of the One Drive for business content up to a year even after the user has left the company .

So I guess all the Office 365 folks as well as SharePoint folks out there would be aware of the “My site cleanup policy” that runs in SharePoint once a user’s account has been deleted in AD. If you’re not aware of this yet, please check my article on that. Also to understand how this works on SharePoint Online, you can take a look at the link below. Microsoft has did an awesome job on writing a detailed article about this and hence I’m not going to spend my time writing a detailed article explaining the same stuff once again .

https://support.microsoft.com/en-in/help/3042522/onedrive-for-business-retention-and-deletion

So here in this article I’m going to introduce you to a PowerShell command that will extend the retention period of the contents in the personal site (i.e. One Drive for Business) up to a year so that you have a year’s time to copy the contents from a user’s One Drive for business folder even after he/she has left the company.

I guess scenario’s like this are quite possible when a user has been terminated and his account has been deleted or may be a user left the company and the default retention period was not sufficient for you to copy the important contents from his One Drive for business folder .

So here’s the PowerShell command for that ….

Set-SPOTenant -OrphanedPersonalSitesRetentionPeriod 365

You need to run this as a SharePoint Online command as shown in the image below.

one drive 2.png

Once done it will update the retention policy for all the orphaned One Drive for Business sites in your tenant. The other way to do this is by putting a hold on the user’s One Drive for Business as a part of an eDiscovery case and the site won’t get deleted until the hold is removed. But this command will make your life even easier by making the change for the entire tenant.

Happy SharePointing …..I hope this helps someone. Thanks to Chris Bortlik for showing this to us.


Resolving “Sorry this site hasn’t been shared with you…” SharePoint site error:

Alright .I’ve had a pretty tedious week with SharePoint search were all of sudden the “SharePoint Enterprise search “  site collection started throwing an error stating  “ Sorry this site hasn’t been shared with you “ as shown in the image below .

1.png

Every time any user made an attempt to execute a search query on the search box in the SharePoint site , they got this annoying error stating the “ Sorry this site hasn’t been shared with you “ and it was the same for everyone .I tried  accessing  the Search center using the farm account and it still threw the same error . So in this article I’ll be taking about what this error is all about, what are the troubleshooting steps we did to fix and how we finally managed to fix it.

Initial troubleshooting steps performed to fix this issue:

Since this was on PROD and we had a lot of users who were impacted by this issue and hence we initially decided to create a new search center site collection under a different web application so that for the time being users can live with that .Meaning , we initially had the “SharePoint enterprise search center “ URL  configured and running under web application A and after we encountered this issue we removed that and created a new enterprise search center site collection under web application B so that we can figure out what’s wrong with the previous search center without having any business impact . The image below should help you understand what I’m talking about.

qGosn.png

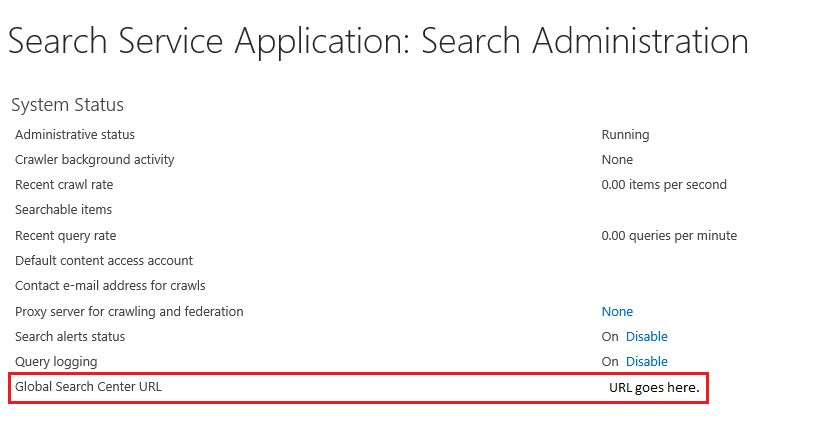
After making the change here, please go ahead and update the new search center URL in site settings as shown in the image below.

272861.jpg

So after doing that we did the below mentioned steps in sequential manner as suggested in some forums to get rid of the issue….

  1. We thought of clearing IE cache: Open a new browser window –> Go to Internet options –>In the general tab, click the Delete button –>Make sure that passwords and temporary Internet files are selected. Try different browser such as Firefox! ( But doing this wouldn’t make sense in our scenario as the issue was only limited to one site collection in the entire farm .However , we tried this but it didn’t help )
  2. If you didn’t run product and configuration wizard after installation/patch, you may get this error even if you are a site collection administrator. Run it once and get rid of this issue. ( Even this was not quite convincing as the issue was just with one site collection( i.e. SharePoint enterprise search ) in the farm )
  3. Stop and Start “Microsoft SharePoint Foundation Web Application” service from Central Admin –>Application Management–> Manage services on server ( We did try this as well bearing the risk of losing all the sites for quite some time but even that didn’t help .For those who are not aware of what this steps does , it stops and recreates the SharePoint web application sites in IIS )
  4. If the SharePoint farm was migrated from SharePoint 2010, or backup-restore/import-exported: If your source site collection is in classic windows authentication mode and target is in claims authentication, you must change classic mode authentication to claims-based authentication. ( This was not applicable in our case as the sites were working perfectly fine for years after the migration )
  5. Try clearing the Distribution Cache. Do the IIS reset (We did this and it didn’t help either).

6. We also verified whether “NT Authority\Authenticated users” group has enough permissions on the search center and it was positive.

7. Of course we also checked the site collection administrators for the “SharePoint Enterprise Search site collection “and it was perfectly fine.

8. We also took a look at all the Search service application in SharePoint 2013 to verify the settings and they were pretty good.

Also, let me tell you that the issue this issue was reported to us the second time within a month .The first time it was with a different site collection on the same web application and this time it was on the SharePoint search center site collection that’s under the same web application. When it was reported the first time we just did an app pool recycle and also checked out and checked in the master page and that fixed it .But this time nothing was accessible in the Search center site collection.

So finally with no much steps left to do we decided to open a Sev A case with Microsoft and started working with them on this issue.

Listed below is what MS did to fix the issue:

  1. I shared the ULS logs as well as fiddler logs with the MS engineer by reproducing the error and after reviewing the logs he was able to identity that the “super user “ and “super reader “ account which takes care of object cache got corrupted in our environment which lead to this outage .

What’s the super user and super reader account?

The below mentioned link should give you a detailed explanation on the super user and super reader account. It’s very important that any SharePoint environment should have these accounts configured properly for optimal performance and it’s mostly utilized by sites which have the publishing feature enabled.

https://technet.microsoft.com/en-us/library/ff758656.aspx

Ideally, the Portal Super User account must be an account that has Full Control access to the web application and the Portal Super Reader account must be an account that has Full Read access to the web application.

Also, you need to make sure that these accounts are discrete and they should never be used to login to the site and also it shouldn’t be used to to login to the SharePoint servers also as mentioned in the TechNet article that I highlighted above.

3.png

But in our scenario it’s exactly that part which was wrong .The “super user” and “super reader” account was the farm administrator service account and we often use that account for accessing the sites .This was configured mistakenly when the farm was initially configured and it eventually got corrupted which lead to this outage .However, we were not able to identify how it got corrupted all of a sudden and how it managed to run safely for all these years( might be one of those SharePoint mysteries ) . So we went ahead and changed that account and updated that for all the web applications in the farm using the below mentioned PowerShell command

$wa = Get-SPWebApplication -Identity “<WebApplication>”

$wa.Properties[“portalsuperuseraccount”] = “<SuperUser>”

$wa.Properties[“portalsuperreaderaccount”] = “<SuperReader>”

$wa.Update()

Lessons learned:

Please ensure that your SharePoint farm has the “super user” and “super reader” configured correctly for optimal performance and do check and ensure that they are discrete and those accounts are not being used to access SharePoint sites . If by any chance you’re facing this issue for a different site collection and not for SharePoint search the steps which I discussed above would still remain the same except for the “SharePoint search” part.

Also once you’re done reading this post, please ensure that you take a closer look at your web application properties and ensure that these accounts are configured correctly so that you don’t end up seeing surprises like me.Adding these accounts will also kick start a search full crawl .

Thanks for reading this post ….I hope this will help you fix this issue if you happen to come across this in your environment.


http://sharepoint.stackexchange.com/questions/110417/sorry-this-site-hasnt-been-shared-with-you-when-trying-to-access-mysite
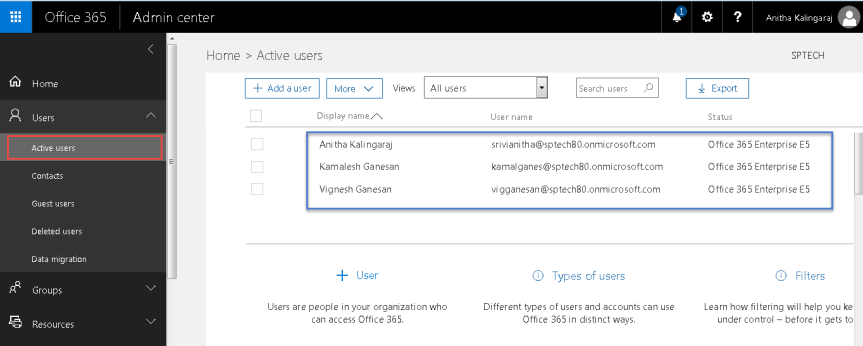
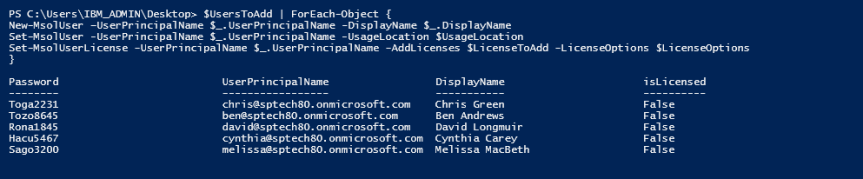
PowerShell script for generating the site collections list with multiple administrators

powershell.png

Running this script will generate a report which displays the list of site collections that has multiple site collection administrators and will also display the total number of users who have access to those site collections.

Add-PSSnapin microsoft.sharepoint.powershell -ErrorAction SilentlyContinue

Add-Content “Sites.csv” -Value “SiteCollection Name,SiteCollection URL, SiteCollection Administrators, Users Count,Usage in MB”

$webApp = Get-SPWebApplication

foreach($webapps in $webapp)

{

foreach ($SiteCollection in $webApps.Sites)

{

$url = $SiteCollection.Url

$webs = Get-SPWeb $URL

[boolean] $WriteToFile = $true

$weburl = $SiteCollection.OpenWeb()

$siteowner = “”

foreach ($siteAdmin in $weburl.SiteAdministrators)

{

$siteowner = $siteAdmin.DisplayName + “|” + $siteowner

}

foreach($web in $webs)

{

#Grab all users in the site collections

$siteUserCnt = $web.AllUsers.Count

$Siteurl = $web.Url

$siteTitle = $web.Title

$site = Get-SPSite  $Siteurl

$siteusage = $site.Usage.Storage/1MB

Add-Content -Path “Sites.csv” -Value “$siteTitle,$Siteurl,$siteowner,$siteUserCnt,$siteusage”

$web.Dispose()

}

}

}

Thanks for using this script …..Happy SharePointing!!!!

Removing an External user from SharePoint Online using SharePoint Online management Shell:

1

This post discusses about the steps that are supposed to be followed to remove an external user from SharePoint Online (Office 365). An external user is one who’s not a part of your domain (meaning his/her user account won’t be present in your on-premises Active Directory which later got synced with Azure AD nor would be present on Azure AD alone). To be more elaborative…An external user is someone outside your organization (i.e. domain) who can access your SharePoint Online sites and documents but does not have a proper license assigned to him to access SharePoint Online or any other Microsoft Office 365 services. These so called “External users” are not employees, contractors, or onsite agents for you or your affiliates.

External users inherit the use rights of the SharePoint Online customer who is inviting them to collaborate. For example, if an organization purchases an E3/E5 Enterprise plan, and builds a site that uses enterprise features, the external user is granted rights to use and/or view the enterprise features within the site they are invited to. While external users can be invited as extended project members to perform a full range of actions on a site, they will not have the exact same capabilities as a full, paid, licensed member within your organization.

So let’s take a look at the steps to remove an external user using SharePoint Online Management Shell…

Note: Before proceeding further, make sure you have installed and configured SharePoint Online management shell in your PC. I’ve created a post on that and please check this link to access that.

  1. Start the SharePoint Online Management Shell.
  2. Type the following cmdlet:

$credential  =  Get-Credential

Once you enter this cmdlet you would get a windows dialog box asking for your Office 365 credentials, please enter your credentials and then validate it by using the $credential cmdlet . This will return the UPN with which you signed in.

2.png

3. Once done, run the below mentioned cmdlet to connect to your SharePoint Online tenant.

Connect-SPOService -Url https://365vignesh-admin.sharepoint.com -Credential (Get-Credential)

3.png

  1. Get the external user’s information (i.e. the one whom you want to remove) by running the below mentioned cmdlet.

 $user = Get-SPOExternalUser -Filter user@domain.no  #Provide the email address of the user

4.png

 5. Now once you have retrieved the external user’s information run the below mentioned cmdlet to remove the user as shown below

 Remove-SPOExternalUser -UniqueIDs @($user.UniqueId)

Click Y to confirm to remove user as shown in the screen-shot below.

5

 6. Once done, in order to remove the user from all the SharePoint Online site collections you need to run the below mentioned cmdlet. Please note that this command has to be ran for all the site collections where the user has been granted access to.

Get-SPOUserSite https://365vignesh.sharepoint.com/teams/no02 -LoginName alan_eric-nolen.no#ext#@365vignesh.onmicrosoft.com

Here the login name is what you get when you search for this user on “Manage user profiles” section in SharePoint admin center.

6

7. Now remove the external user using the below mentioned cmdlet.

Remove-SPOUser -Site https://365vignesh.sharepoint.com/teams/no02  LoginName alan_eric-nolen.no#ext#@365vignesh.onmicrosoft.com

7

8. You can verify whether the user has been removed successfully by running the “Get-SPOUser” that we ran in the previous step and it should return an error stating that the user cannot be found. This confirms that the user has been removed successfully.

9. Now in addition to all the above mentioned steps you need to remove the user from the UserInfo list as well so that the user doesn’t show up in the people picker field when you search for that user. For that go to the site collection URL in question and edit the URL by adding the following string to the end of it.

_layouts/15/people.aspx/membershipGroupId=0

 For example if the site collection name is https://<vignesh&gt;.sharepoint.com then this is how you need to edit the URL by adding the string.

https://.sharepoint.com/_layouts/15/people.aspx/membershipGroupId=0

10. Finally, once the user has been removed from SharePoint Online as well as the site collection in question, the external user’s profile will still show up under “Manage user profiles” section in SharePoint admin center. This is quite normal and please wait for SharePoint Online to remove the user’s profile from the SharePoint admin center. This task will take couple of hours and hence please check the status of that user’s account in SharePoint Online admin center after few hours .You would notice that the user’s profile has been removed successfully.

8.png

11. Once you have confirmed that the user’s account has been removed successfully, you need to clear the browser cache. Please note that SharePoint Online uses browser caching in several scenarios, including the People Picker. Even though a user was fully removed from the system, he or she may still remain in the browser cache. Clearing the browser cache should resolve this issue

Thanks for reading this post ….Happy SharePointing!!!