
I often to stumble around in my early days as a SharePoint administrator while patching a SharePoint farm with the latest Cumulative updates and after putting together some years of experience in SharePoint administration I finally reached a point where I could confidently patch a farm without encountering any issues. So, if you’re a SharePoint guy who takes care of the SharePoint environment in your firm and one fine day you’ve been asked to patch the farm then this is the article that you need to follow.
As always you may not be able to get it right the first time but let’s not forget that practice makes a man perfect . As always try to patch your UAT and TEST environment first and try to validate the farm post the CU installation. Once you confirm that everything looks good then proceed further to the PROD farm .Never ever patch a SharePoint PROD farm directly without testing the patch in other environments, that’s the basic thumb rule to follow as a SharePoint consultant. Now let’s look at the steps in a detailed manner.
ATTENTION:
Be aware that all Updates for SharePoint 2013 require SharePoint Server 2013 SP1 to be installed first.
- Downloading the Cumulative Update package from Microsoft site:
Before beginning, please be advised that SharePoint doesn’t need separate CU’s for foundation version as well as for server version. The CU for server version of the SharePoint application (i.e. SharePoint server 2013 enterprise/standard version) will include the fix for the foundation version as well.
Now let’s get started ….
Please look for the required Cumulative update which you want to install and then download it from the Microsoft website. For instance, if you’re planning to install the October 2016 CU for SharePoint server 2013 in your farm then just search as “October 2016 CU for SharePoint server 2013 “and you will get the link to download the package.
Ex: For October 2016 CU, this is the download link: _ https://support.microsoft.com/en-us/kb/3118366 .
In lieu to the MS site, you can also refer to Todd Klindt’s blog. This blog provides the list of all the CU’s and it provides the link to download the respective update. In addition to that Todd Klindt does an awesome job on reviewing all the CU’s that has been released for SharePoint. The reviews contain information such as the bugfixes involved in the CU, the issues that got newly introduced post installing that CU and what to do to fix the new issues.
Ex: For October 2016 CU, you can refer this link in Todd Klindt’s blog site: _ http://www.toddklindt.com/blog/Regressions/sp2013oct2016cu.aspx

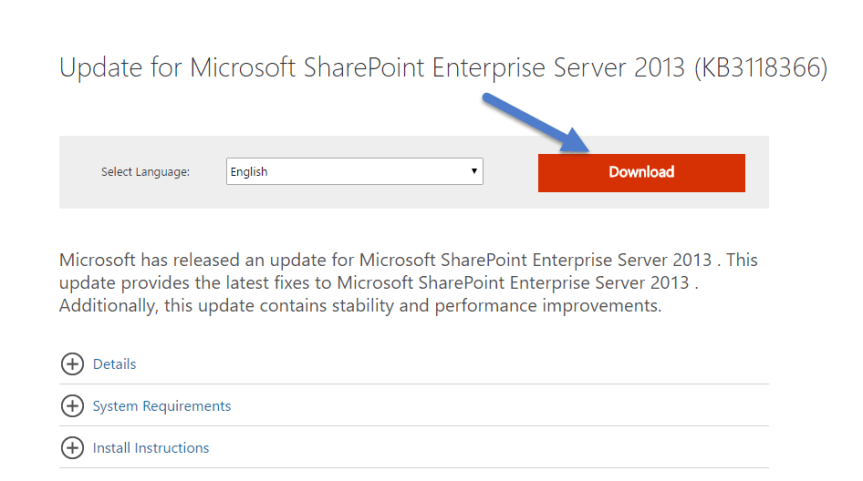
Now to download this CU, please click on the download link and you will be redirected to Microsoft site from where you need to download the CU. Choose the appropriate language and click on the “Download button” as shown in the image below.
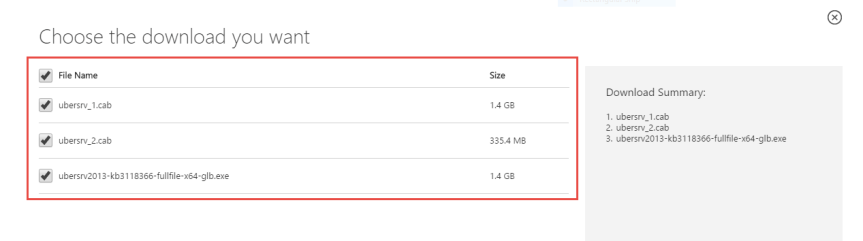
The next page will ask to choose the files you need to download, please check all the three files and make sure that you’re downloading them to the same folder.
 So, till now we looked on how to download the CU packages, now let’s look at the things which has to be backed up prior to patching your farm.
2. Taking necessary backups:
There are certain things which has to be backed up prior to patching your environment and please find the details below.
a) First take a SharePoint farm backup using the backup option in Central Administration site. You can also do this using the below mentioned PowerShell command. Also refer this TechNet link to know in detail about the SharePoint farm backup.
Backup-SPFarm -Directory <BackupFolder> -BackupMethod {Full | Differential} [-Verbose]
b) You can schedule the Farm backup the night prior to CU installation hoping that no changes will be made to SharePoint farm post that . If you’re planning to patch the PROD farm on Saturday morning with appropriate downtime then please schedule a farm backup at midnight on Friday.
c) Take the necessary IIS backups.
d) Also take a backup of the web. config file in IIS. This is the place where all the customizations are saved. Take a look at this link to understand how to back up the web.config file in SharePoint using PowerShell.
https://sharepintblog.com/2011/09/15/backup-sharepoint-web-config-file-with-powershell/
e) Optionally you can also backup all the customizations in the farm if your SharePoint farm is heavily customized. Take a look at the TechNet article link mentioned below to know in detail about backing up the customizations in a SharePoint farm.
https://technet.microsoft.com/en-us/library/ee748642.aspx
f) Also back up all the WSP files that’s deployed in the farm. This is not a mandatory step but if you feel that this is required, you can do this using the below mentioned PowerShell script.
$farm = Get-SPFarm
$file = $farm.Solutions.Item(“solution.wsp”).SolutionFile
$file.SaveAs(“c:\Solution.wsp”)
g) Finally once all the backups have been taken the most important thing to do is to have a Snapshot of all your SharePoint servers and if possible the backend SQL server too. Though you have a complete farm backup in place, please note that it’s not enough to do a complete farm restoration if something goes wrong and in such cases you might need to rely upon the snapshots for restoration. Take a look at this link below to know in detail about SharePoint Snapshots.
https://blogs.msdn.microsoft.com/mossbiz/2013/01/14/sharepoint-vs-snapshots/
3. Pre-Installation Steps:
There are certain pre-requisites that you need to do prior to installing the package and one among them is to run the “Robust Office Inventory Scan” script to find out the status of SharePoint/Office products installed in the server. The script will generate a log by which we can find if there is any patch or chained product missing. If so, you need to fix that issue first. If the log does not mention any errors under “Review items” section, we are good to go. You can also download the script from the below mentioned link
https://gallery.technet.microsoft.com/office/68b80aba-130d-4ad4-aa45-832b1ee49602
Once this is done and you verified that there are no errors reported under “Review items” section in the logs, please go ahead and suspend the “Search service “.
Suspending the Search service is a very important step to do prior to installing the CU and failing to do so might break the search crawl. It may be possible that when you check, there is no crawl running. However, if a crawl is triggered by schedule which occurs during the installation, the search application may crash or lead to inadvertent results. In worst case, you might end up rebuilding the entire search application.
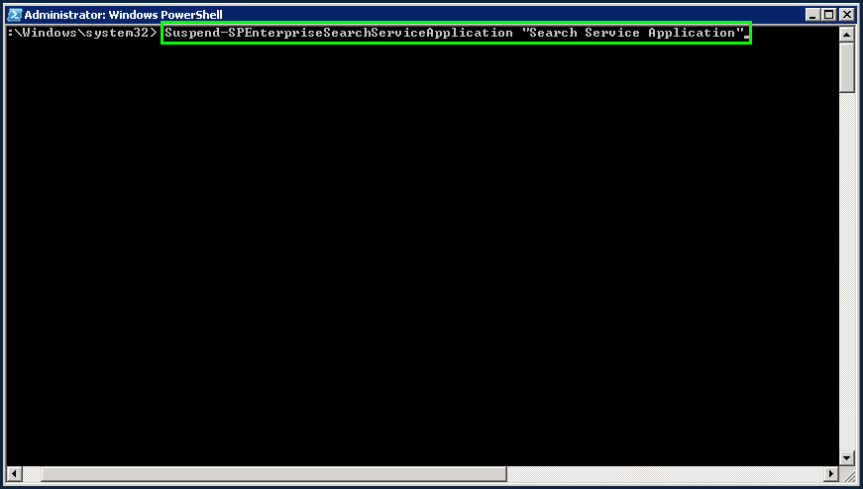
Hence to make sure there is no crawl running currently and no crawl will be triggered during the installation, pause the search application. For this, open “SharePoint 2013 Management Shell” using the farm service account and then execute the below command.
Suspend-SPEnterpriseSearchServiceApplication –Identity “SearchServiceApplicationName”
This command will take a couple of minutes to execute. Once it is executed, navigate to the search service application in CA and verify that its status is showing as “Paused: for external request” as shown in the image below

If you go to Content Sources, you should see the status as “Paused by system”.

4. Installing the Cumulative Update Package:
Once you’ve confirmed that the above mentioned pre-requisites have been taken care, now it’s time to go ahead and install the CU. Please follow the steps mentioned below to install the CU package.
Note: Installing the CU doesn’t require any specific order, you can do it on any server in the farm and then go on by installing it on other servers in the farm (meaning you can do it on the WFE server first and then on the APP server). However, that’s not the case when you would be rebooting the server post the installation or when you would be running the “SharePoint Configuration Wizard”. There’s a specific order to be followed while doing that and I’ll be discussing in detail about that later in this article.
1. Navigate to the folder where you have downloaded the package and double-click on the package to install it. Please note that it’s mandatory to keep all the three executables (package as well as Cabinet files) in the same folder as shown in the screenshot below.

2. On the “End user license agreement page”, select the accept check box and click continue.

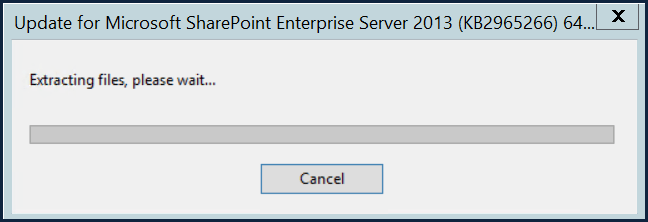
3. Now it will start the installation. Installation will take around 20-30 minutes. It will first start with extracting the files as shown in the screenshot below.
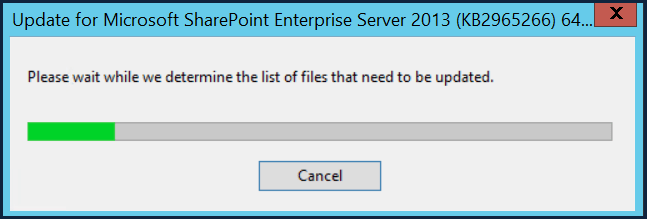
4. On the next screen, it will be loading the files to be updated as shown in the image below.
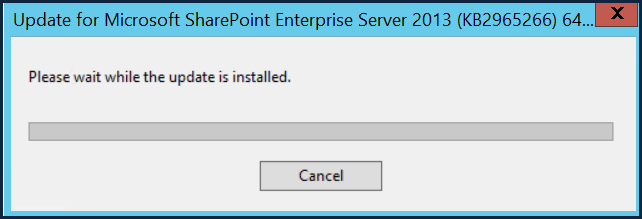
5. In the next screen, it will be installing the package as shown in the image below.
6. Post installation, if it prompts for reboot, click Yes as shown in the image below.

7. Finally, once the installation is complete, go to Control Panel and verify whether the package has been installed correctly as shown in the image below. For some reason if it’s not showing up here you need to troubleshoot and identify what’s causing the trouble.

5. Running the SharePoint Configuration Wizard:
Once you’ve confirmed that the CU package has been installed successfully and it’s showing up correctly under Control Panel now it’s time to go ahead and run the SharePoint Configuration Wizard. However, before doing so I would like to talk a bit about the order to be followed while installing the CU.
As I previously mentioned in this article, it’s ok to go ahead and install the CU in any order on the server. However, based on my experience with installing the CU I would suggest you all to do it on the WFE server first. Ensure that the WFE is taken out of the Load balancer pool so that it’s not serving user traffic and then go ahead and install the CU and reboot the server. Once the server comes back online verify whether all the components have been installed correctly under Control Panel and the Central administration site is accessible. This is just to ensure that the installed CU didn’t do any harm to the server. It’s ok to lose a WFE but not a APP server, I hope you’re getting the idea here .Also by any chance if you’re patching the farm on the business hours (which might ideally not be the case unless it’s a TEST /UAT farm) then make sure that the server on which you’re installing the CU is taken out of the load balancer so that the user traffic doesn’t goes to that server. So, the idea to keep in mind is, do it on the WFE servers first and then on the APP server.
Point to note while running the SharePoint Configuration Wizard:
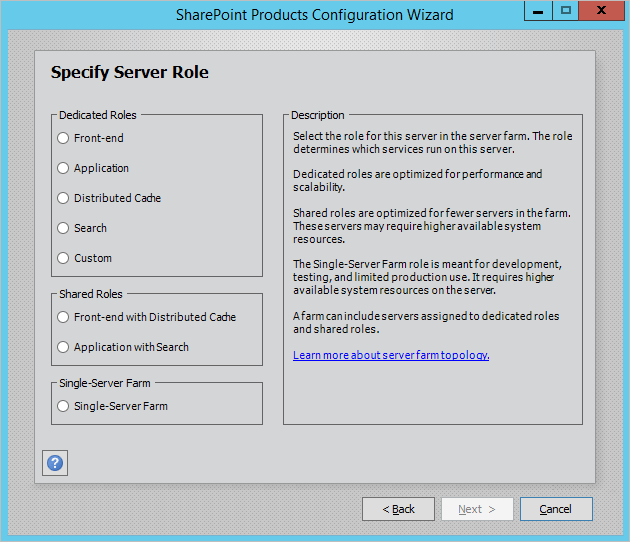
Unlike the CU installation you can’t run the “SharePoint Configuration Wizard” in any order, it must be running on the server which is hosting “Central Administration” site first and then on the WFE and APP servers. It’s a 6-step process which might take an hour at the max (in an ideal scenario) to run and complete. Once it’s completed successfully on the server where CA is hosted, please try opening the CA site and make sure everything looks fine and make sure you’re able to access the SharePoint sites. By any chance if the CA site is not coming up, please stop right there and fix it. Without fixing the CA site issue, please don’t proceed further with running the Configuration wizard on the other servers. This is the basic thumb rule to be followed while patching a SharePoint farm.
Now, let’s look at the steps to run the SharePoint Configuration Wizard….
- Open SharePoint management shell with elevated permissions using the farm service account and run the below mentioned command as shown in the image below.
PSConfig.exe -cmd upgrade -inplace b2b -force -cmd applicationcontent -install -cmd installfeatures

2. It will take few seconds and start the upgrade process.

3. It’s time to go for a coffee now as it will start running a series of 6 steps to finish the configuration. Please check the steps below.

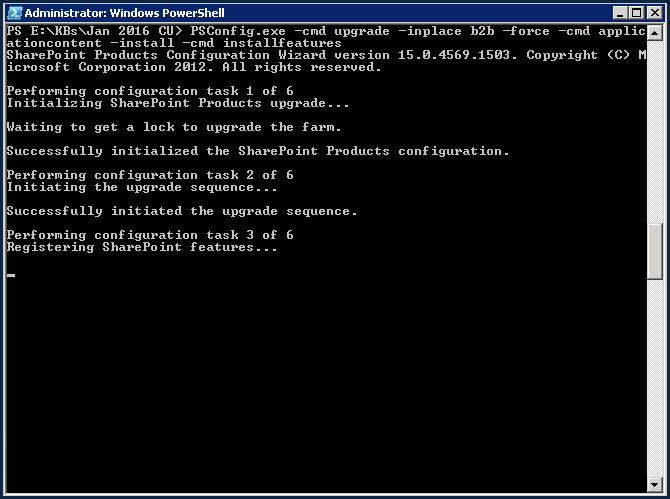

- The configuration wizard will have 6 steps which will be executed one by one. It should complete all 6 steps successfully. If it fails somewhere in the middle, you will need to check the “PSDiagnostics Logs” in the ULS logs folder. Find the issue, fix it first and then run the above command once again. Once all the steps are completed successfully, you are done.
- Repeat the above mentioned 4 steps on all the servers in the farm.
Once the Configuration wizard is successfully done running all the 6-steps it’s time to go ahead and do some post-installation steps ,let’s look at them.
6.Post Installation steps:
- Verify all the SharePoint and IIS services are up and running. If not, start them.
- Go to IIS Manager and verify application pools and sites are in started/running state.
- Open CA and the web applications and make sure they are opening fine
- Go to “Manage servers in the farm” section in CA and check for the version number on Configuration database version and make sure it’s showing the version number correctly. Ex: For January 2016 CU, it should show the version number as 15.0.4787.1000 as shown in the image below.

5. Check “Manage Servers in this Farm” page in Central administration. This page will also tell you if you need to run the SharePoint Products Configuration Wizard on a server to complete the upgrade process. Make sure every server in your SharePoint farm is upgraded and displays the status as “No Action Required” as shown in the image below.

6. You can check the patch status on each and every individual server with “Manage patch status page” (Central Administration >> Upgrade and Migration >> Check product and patch installation status)


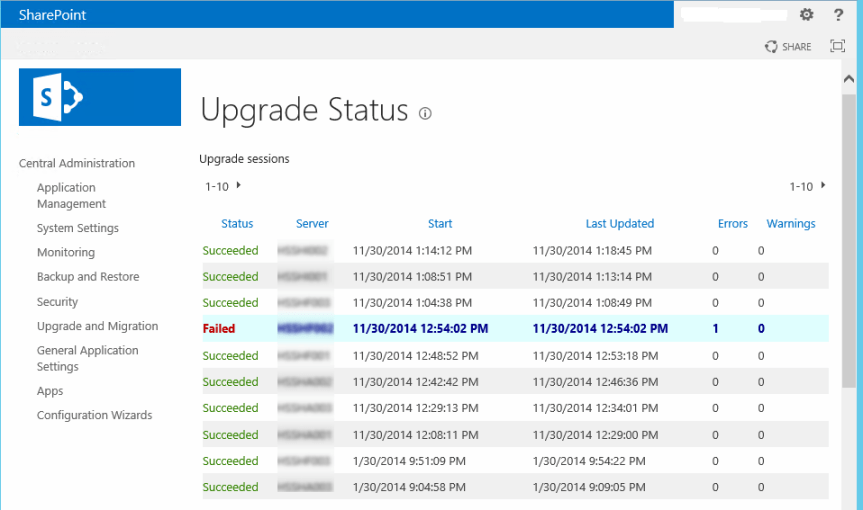
7. Also check the “Check upgrade status” page which will give you the detailed information on upgrade status as shown in the image below.
8. Finally, resume the search service application using the below mentioned PowerShell command
Resume-SPEnterpriseSearchServiceApplication –Identity “SearchServiceApplicationName”
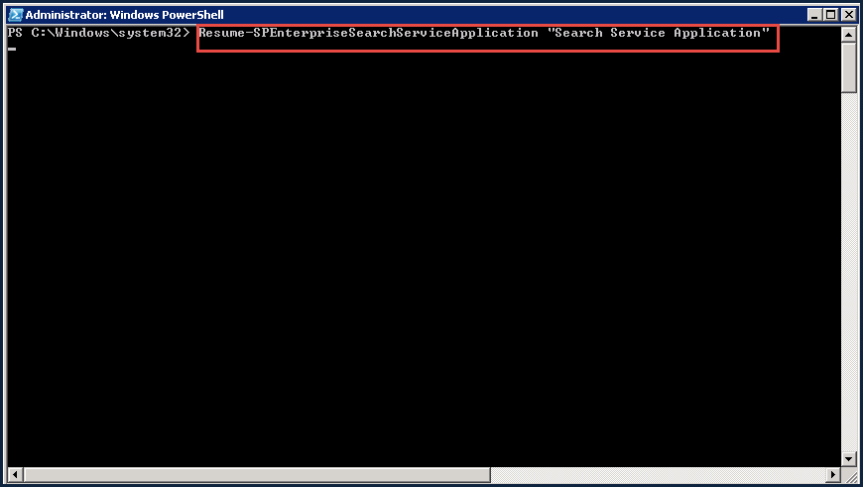
- Verify search service application is not paused and it’s in running state.

10. Also, please go to the content sources section in the Search administration page and kick start a full-crawl.
11. Now add the servers back to the Load balancer pool so that they start serving user traffic and try to load the SharePoint sites from PC’s which belong to different geographical locations and check the time taken to open the site.
12. Also, check the custom functionalities in the site such as third party WSP’s, site features, custom web parts, custom site templates etc. and make sure everything works fine.
13. You could also run the ROIScan tool post the patching and verify the status of all the patches that has been installed and ensure that nothing is showing up under “Review items” section in the logs.
So finally, once you confirm that everything remains fine and the SharePoint farm remains intact post patching then this confirms that you’ve successfully patched the SharePoint farm. As I already mentioned in the beginning, you may encounter some issues as well as some errors while patching the farm and please don’t feel bad or demotivated by that. It takes a lot to successfully patch a SharePoint farm and by experience you can master in that.
If you ever feel that the patching task takes a lot of time and you need to find an alternative solution for that, please take a look at this link to know about the scripted way of patching a SharePoint farm.
https://blogs.msdn.microsoft.com/russmax/2013/04/01/why-sharepoint-2013-cumulative-update-takes-5-hours-to-install/
Thanks for reading this post ……. Happy SharePointing!!!!!!


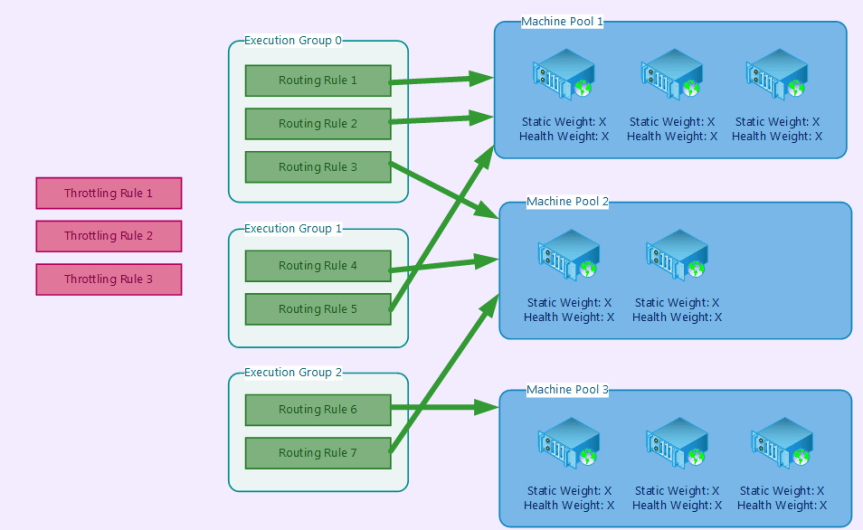
 Integrated Mode:
