
The monthly cumulative updates for SharePoint for December 2015 have been released. I don’t see any security fixes this month, only bug fixes.
https://support.microsoft.com/en-us/kb/3114345
The monthly cumulative updates for SharePoint for December 2015 have been released. I don’t see any security fixes this month, only bug fixes.
https://support.microsoft.com/en-us/kb/3114345

1.New-OfficeWebAppsFarm –> This command is used to create a new Office Web Apps Server farm on the local computer.
The New-OfficeWebAppsFarm cmdlet creates a new Office Web Apps Server farm on the local computer. You have to run this cmdlet on the first server in the Office Web Apps Server farm and then add more servers to the farm by using the New-OfficeWebAppsMachine cmdlet.
Syntax:
New-OfficeWebAppsFarm -InternalUrl “https://server.corp.contoso.com” -ExternalUrl “https://server.external.contoso.com” -EditingEnabled:$true -SSLOffloaded
This example creates an Office Web Apps Server farm on the local server that has editing enabled for Office Web Apps. The farm is configured for load balancing by enablingSSLOffloaded, which automatically enables AllowHttp. If you are not using a load balancer, make sure that you set Certificate Name.
Syntax using the certificate name:
New-OfficeWebAppsFarm -InternalUrl “https://server.corp.contoso.com” –CertificateName “Web OWA” -EditingEnabled
2. New-OfficeWebAppsMachine –> The New-OfficeWebAppsMachine cmdlet adds the current server to an existing Office Web Apps Server farm and optionally sets one or more roles on the new server.
Syntax:
New-OfficeWebAppsMachine -MachineToJoin server1.contoso.com
The “MachineToJoin” switch takes care of adding the new machine to the Office Web apps farm
3. Remove-OfficeWebAppsMachine –> This command removes the current server from the Office Web Apps Server farm. As part of this process, the cmdlet removes the web applications and shuts down the services that are related to Office Web Apps Server. This command can be used during scenarios where you’re planning to patch the current Office web apps server. Do remember that you’re supposed to remove the OWA server which you’re planning to patch from the OWA farm and once you’re done patching you have to add it back.
Note: This is applicable only when you have OWA running as a farm with many servers on it .
4. New-SPWOPIBinding –> This command associates file name extensions or applications to actions on the current SharePoint farm where this cmdlet is run. Each binding allows you to use the WOPI application to view or edit files in your SharePoint library. For example, when a user sees a Word document in a SharePoint document list, the SharePoint list will display the available options to view or edit the document based on the actions that are bound to Word on that SharePoint farm.
Syntax:
New-SPWOPIBinding -ServerName “Server.corp.Contoso.com” : This example creates bindings for all the applications and file name extensions that the WOPI application supports on the current SharePoint farm where this cmdlet is run.
New-SPWOPIBinding -ServerName “Server.corp.Contoso.com” -Application “Excel” : This command associates Excel with all the actions that the WOPI application supports for Excel on the current SharePoint farm where this cmdlet is run.
5. Remove-SPWOPIBinding –> This command is used to remove all the bindings for applications, file name extensions, and their associated actions on the current SharePoint farm where this cmdlet is run
Syntax:
Remove-SPWOPIBinding -All:$true –> This example removes all bindings on the current SharePoint farm where this cmdlet is run.
Remove-SPWOPIBinding -Application “Excel” –> for excel alone.
Get-SPWOPIBinding -Action “MobileView” | Remove-SPWOPIBinding –> This example removes all bindings for Office Mobile Web Apps on the current SharePoint farm where this cmdlet is run.
6. Get-SPWOPIBinding –> This command returns a list of bindings that were created by using New-SPWOPIBinding on the current SharePoint farm where this cmdlet is run
Syntax:
Get-SPWOPIBinding -Server “Server.corp.Contoso.com” : This example returns a list of bindings that were created on the current SharePoint farm where this cmdlet is run for the WOPI application “Server.corp.Contoso.com.” The WOPI application may be the server that runs Office Web Apps Server.
Get-SPWOPIZone | Get-SPWOPIBinding : This example returns a list of bindings that were created on the current SharePoint farm where this cmdlet is run for the zone configured for the WOPI application.
7. Set-SPWOPIBinding — > This command Updates the default click action for an application or file name extension binding. The Set-SPWOPIBinding cmdlet updates the default click action for an application or file name extension binding. For example, you can set the default click action for viewing a Word document in a SharePoint library. To do this, you set the default action to true for the “view”-“Word” bindings
Syntax:
Get-SPWOPIBinding -Action “view” -Application “Word”| Set-SPWOPIBinding -DefaultAction –> This example sets the default click action to view for a Word document in a SharePoint library. You can verify that the default click action is set to view for Word by running the cmdlet Get-SPWOPIBinding –Action “view” –Application “Word”. The IsDefaultAction value is set to “True.”
8. New-SPWOPISuppressionSetting –> This command turns off Office Web Apps for the action, file name extension, or programmatic identifier that you’ve specified on the current SharePoint farm.
Syntax:
New-SPWOPISuppressionSetting -Extension “XLSX” -Action “view” &
New-SPWOPISuppressionSetting -Extension “XLS” -Action “view”
This example turns off the ability of a user to use Office Web Apps to view Excel workbooks that have file name extensions “.xlsx” or “.xls”.
Request Manager in SharePoint Server 2013 can route and throttle incoming requests to help improve performance and availability. Request Manager is functionality in SharePoint Server 2013 that enables administrators to manage incoming requests and determine how SharePoint Server 2013 routes these requests.
Overview:
Request Manager uses configured rules to perform the following tasks when it encounters requests:
Request Management feature in SharePoint 2013 manages incoming requests by evaluating logic rules against the user requests in order to determine what/which action to take, and which machine or machines (Targets) in the farm should handle the requests. SharePoint Foundation Web Application Service of SharePoint 2013 handles and responds to all incoming requests through IIS. Load Balancer is used to distribute incoming traffic across all the web front end servers. It is not necessary that all the web front end servers should be serving the incoming requests. Good example for such scenario would be dedicated Crawl Web Front end server. In such cases, Load balancing features will be leveraged to ensure right requests are redirected to the right machines.
During Medium and Large scale hosting, the need for powerful request management becomes very important. Request Management feature of SharePoint 2013 fulfills this need through advanced routing and Throttling.
Architecture:
Request Management is used as a Service instance although there is no associated Service application. All configurations are performed using Windows PowerShell commands. Request Management is scoped and configured on per web application basis. Request Manager’s task is to decide two things: a SharePoint farm will accept a request, and if the answer is “yes”, to which front-end web server SharePoint Server will send it.
There are three logical components of the request manager:
When a new request is received, Request Manager is the first code that runs in a SharePoint farm. Although Request Manager is installed during setup of SharePoint Server on a front-end web server, the Request Management service is not enabled. You can use the Start-SPServiceInstance and Stop-SPServiceInstance cmdlets to start and stop the Request Management service instance respectively or the Manage services on server page on the SharePoint Central Administration website. You can use theRoutingEnabled or ThrottlingEnabled parametersofthe Set-SPRequestManagementSettings Windows PowerShell cmdlet to change properties of Request Manager.
Request Manager has two supported deployment modes:
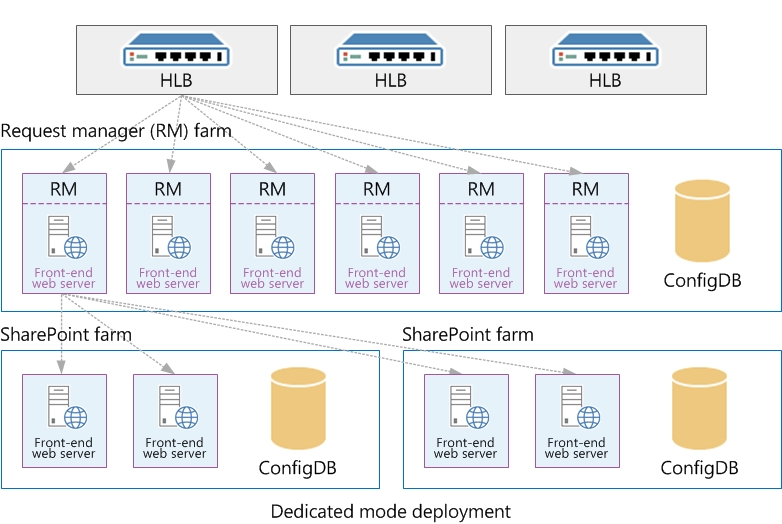
A set of front-end web servers is dedicated to managing requests exclusively. The front-end web servers that are dedicated to Request Manager are in their own farm (i.e. not a part of the SharePoint farm) that is located between the hardware load balancers (HLBs) and the SharePoint farm. The HLBs send all requests to the Request Manager front-end web servers. Request Manager that runs on these front-end web servers decides to which SharePoint front-end web servers it will send the requests and then routes the requests. Depending on the routing and throttling rules, Request Manager might ignore some requests without sending them to another server. The SharePoint front-end web servers do their normal tasks in processing requests and then send responses back through the front-end web servers that run Request Manager and to the clients.
Note that all farms are set up as SharePoint farms. All front-end web servers in Figure 1 are SharePoint front-end web servers, each of which can do the same work as any other. The difference between the farms is that the Request Manager front-end web servers have Request Manager enabled.
Dedicated mode is good for larger-scale deployments when physical computers are readily available. The ability to create a separate farm for Request manager provides two benefits: Request Manager and SharePoint processes do not compete for resources and you can scale out one without having to also scale out the other. This allows you to have more control over the performance of each role.
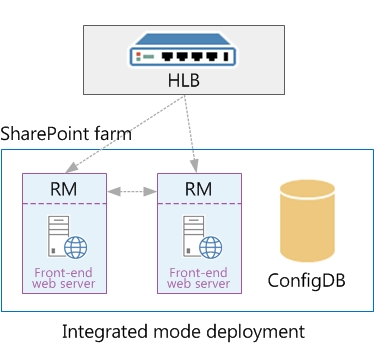
In an integrated mode deployment, all SharePoint front-end web servers run Request Manager. Hardware load balancers send requests to all front-end web servers. When a front-end web server receives a request, Request Manager decides how to handle it.
Integrated mode is good for small-scale deployments when many physical computers are not readily available. This mode lets Request Manager and the rest of SharePoint Server to run on all computers. This mode is common for on-premises deployments.
Use the below PowerShell commands to find the search index location:
Below are the screenshots:

You will get the search index location as shown below :

Microsoft has released the November 2015 Cumulative Update for the SharePoint 2013 product family.
The November 2015 CU we have full server packages (also known as Uber packages). No other CU is required to fully patch SharePoint.
November 2015 CU includes all fixes from November 2015 PU.
Note : All Updates for SharePoint 2013 require SharePoint Server 2013 SP1 to be installed first.
Download link for Nov 2015 CU :
https://support.microsoft.com/en-us/kb/3101373
If your farm has been on a patch level lower than July 2015 CU: Unlike other CUs – after installing the November 2015 CU you need to run the SharePoint 2013 Products Configuration Wizard on each machine in the farm. If you don’t run PSCONFIG after installing November 2015 CU (on a farm which had a lower patch level than July 2015 CU) crawl might no longer work – so ensure to schedule a maintenance window when installing this CU which includes PSCONFIG runs.Check this blog for more info on this :
Issues addressed in this CU :

 3. Check the space consumed by the logged in user profiles. This can be done by navigating to System properties à User profiles. Check whether the space consumed by all the user profiles is normal .If you see any abnormal increase in the space consumed by any user profile then please go ahead and delete that profile by selecting that user profile and clicking on the “delete” button.
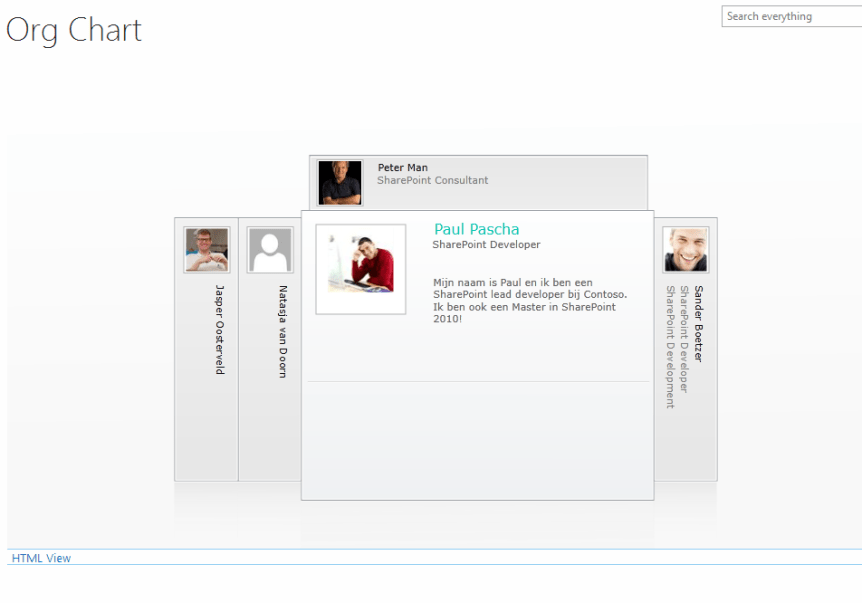
The Web Part, “Org Chart”, that was visible under the About Me section of MySites in previous versions of SharePoint is now hidden in SharePoint 2013 by default. But when you view the About Me page of any another employee it is displayed. This behavior is by design and it’s for better performance reasons.
In previous versions of SharePoint, the profile page always loaded the Org Chart web part. Loading peer, manager and direct report data actually requires an extra database lookup which contributes to a longer page load time. Since most users would prefer to have their personal profile page load faster than to see their own position in the organizational hierarchy, the Org Chart web part is hidden when a user views their own profile page.
This post is intended for those who are seeing an error as shown in the image below while accessing the “My Tasks” link in your SharePoint My site. As you all know for yourself the “My Task” link which you see in your SharePoint My site is driven by the “Work Management Service application” and it’s necessary to ensure that the WMA service is turned on and configured to run successfully. While I say the WMA service is the one that takes care of the “My Task “list that’s not the only component on which the “My Task “ list relies upon . There are couple of other dependencies such as “Search crawl” and “User Profile service” which takes care of the “My Task “list.
The “My Task” list in your SharePoint My site can display three different type of tasks ….
The Work Management Service Application provides functionality to aggregate tasks to a central location on SharePoint Server:
Now, if the WMA (Work Management Service Application ) is not configured properly then you might end up seeing an error as shown in the figure below and you need to perform the below mentioned troubleshooting steps to get this fixed.

Troubleshooting steps to fix this error:
Run the PowerShell command to grant content access to a process account to the MY SITE web application:
12. Perform an IIS reset once done and also restarting the server and critical services is recommended.
IMPORTANT:
The tasks are stored in a hidden list called “WmaAggregatorList_User” at the personal site of individual users.
WMA aggregates tasks from SharePoint lists created in SharePoint Server (internally called TasksWithTimelineAndHierarchy-171) plus upgraded SharePoint lists from earlier versions of SharePoint (internally called Task-107 or GanttTasks-150).
The Distributed Cache plays an important role in SharePoint Server 2013 as it’s a key component for performance and caching. Distributed Cache is not a SharePoint service, it’s a standalone service called AppFabric 1.1 for Windows Server. SharePoint Server 2013 requires Windows Server App Fabric and the App Fabric 1.1 CU 1 (KB 2671763) to be installed .It takes care and improves the performance of the following features in SharePoint Server 2013:
This document explains in detail about the procedure to be followed for patching the App Fabric component in Windows Server. An App Fabric Cumulative Update is exactly the same as a CU for SharePoint, it contains all previous CUs. So if we install CU6 you also get CU1 to CU5 installed.
List of App Fabric 1.1 Cumulative Updates:
Note: If you want to identify the version of App Fabric installed in your machine and also the CU version which is installed, please go to the “Programs and Features” section in Control panel and take a look at installed updates.

System Requirements:
Now let’s take a look on the steps to be followed for installing the CU on a server running SharePoint 2013.
Listed below are the steps to be followed for applying the App Fabric CU’s:
Stop-SPDistributedCacheServiceInstance –Graceful
$instanceName =”SPDistributedCacheService Name=AppFabricCachingService”
$serviceInstance = Get-SPServiceInstance | ? {($_.service.tostring()) -eq $instanceName -and ($_.server.name) -eq $env:computername}
$serviceInstance.Provision()
To see what Distributed cache-servers SharePoint thinks there are run this:
Get-SPServiceInstance | ? {($_.service.tostring()) -eq “SPDistributedCacheService Name=AppFabricCachingService”} | select Server, Status
For AppFabric run this from a machine already in the cache-cluster:
Use-CacheCluster
Get-CacheHost
To remove: Remove-SPDistributedCacheServiceInstance
To Add : Add-SPDistributedCacheServiceInstance
