
Hi Folks ,
Please find the recording of our webinar as well as the slide deck from the link below .
Webinar recording :_ https://youtu.be/71Ts7d-l04w
Please keep checking my blog site for more webinars and useful articles
Happy SharePointing!!!
Hi Folks ,
Please find the recording of our webinar as well as the slide deck from the link below .
Webinar recording :_ https://youtu.be/71Ts7d-l04w
Please keep checking my blog site for more webinars and useful articles
Happy SharePointing!!!

Howdy folks! it’s time for the biggest SharePoint and Office 365 event in town ….
SPS (SharePoint Saturday) Bangalore is all set to happen on Sept 1st at Microsoft’s new Office in Bangalore and you can find all the details about this event from this link below .
http://www.spsevents.org/city/Bangalore/Bangalore2018/home
We have speakers from different parts of India and outside India who would be joining us for this event to share their knowledge and expertise in SharePoint and Office 365 and I urge you all to attend this event without fail and make it a huge success. It’s going to be loads of learning and fun on Sep 1st and I can’t wait to see you folks there.
You can find the complete list of speakers and the topics from the image below.
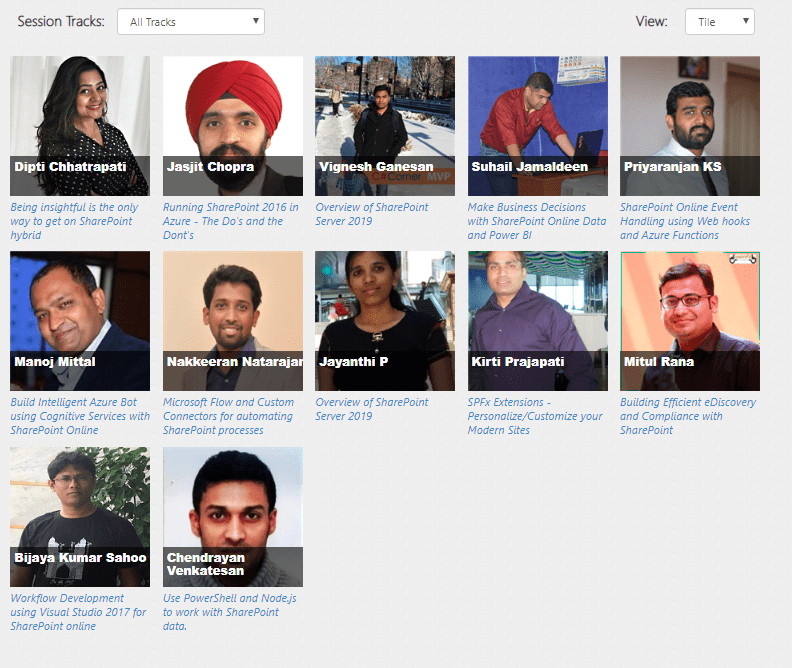
Registration link: _ http://www.spsevents.org/city/Bangalore/Bangalore2018/home
See you all on Sep 1st …. Happy SharePointing folks!!!
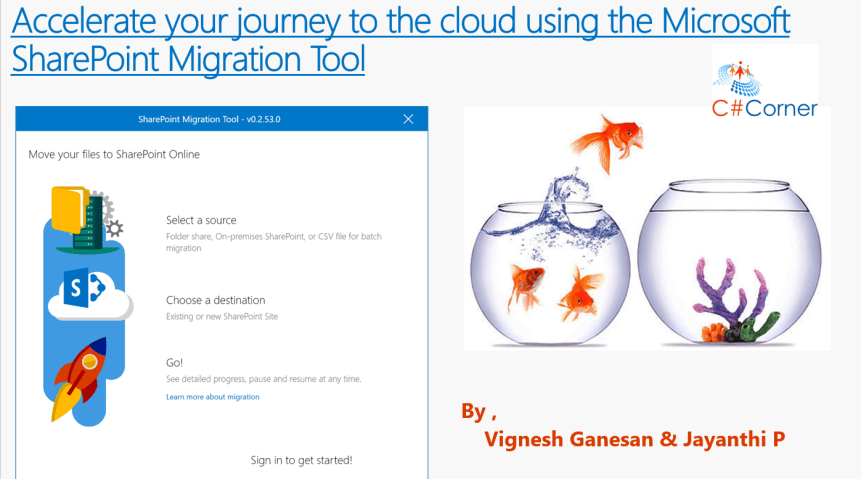
Hi All,
Please join us for a webinar on August 11th ,2018 at 6:00 pm IST on ”Accelerate your journey to the cloud using the Microsoft SharePoint Migration Tool ″

Link to register for this session :_ https://www.c-sharpcorner.com/events/accelerate-your-journey-to-office-365-with-the-sharepoint-migration-tool-from-microsoft
Hi Folks ,
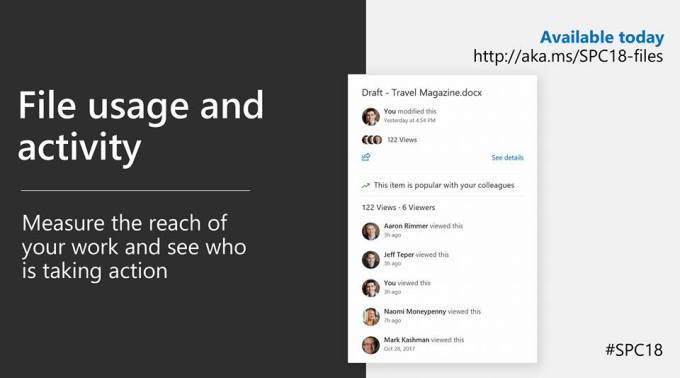
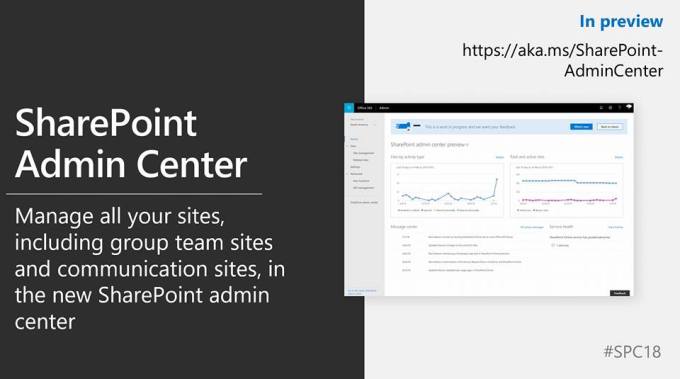
Please go through the images below to have a sneak peek of the new features in Office 365 that was announced in the SharePoint Conference at Las Vegas .Just in case you have missed to see the SharePoint Virtual Summit you can view the recording from this link .
Note : Most of these features that you see below are yet to be released and few of them are already avaiable for you to use in Office 365 .
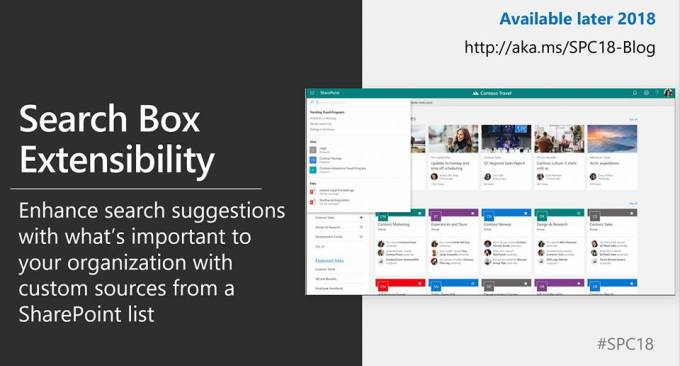
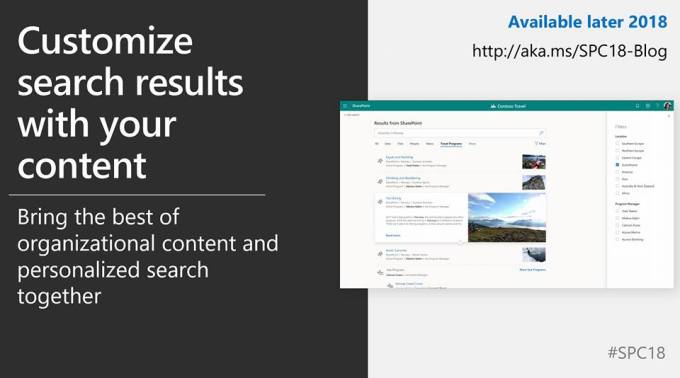

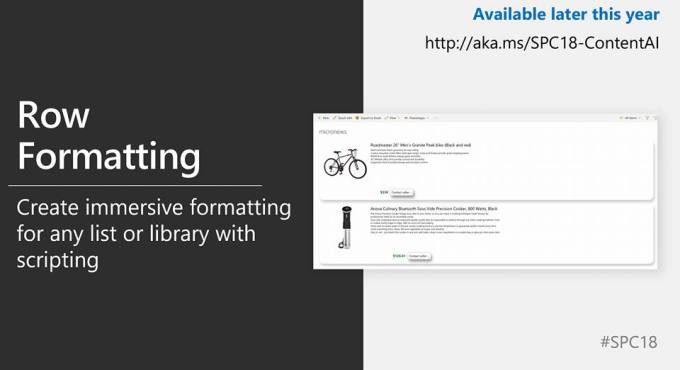
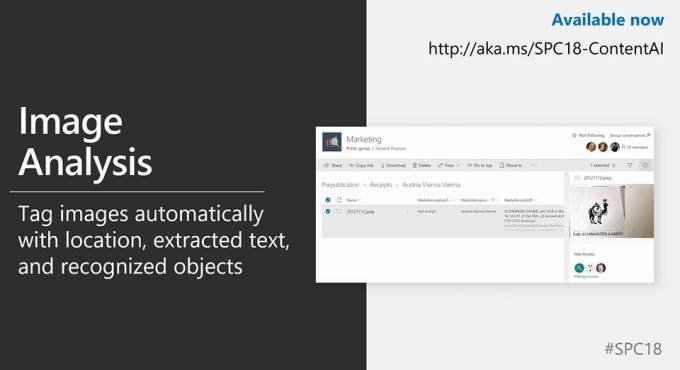

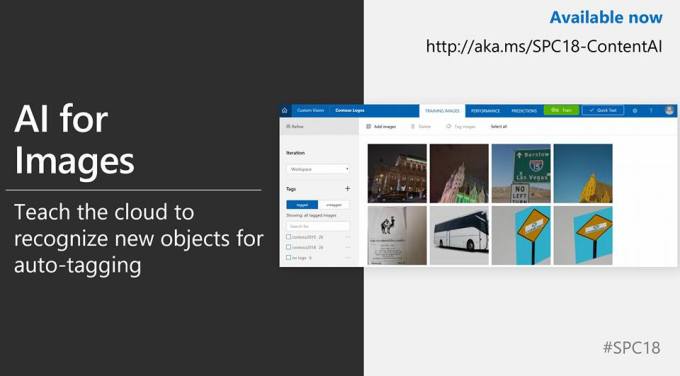
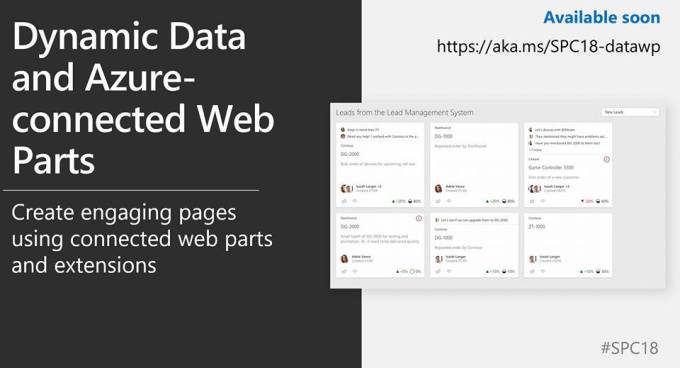
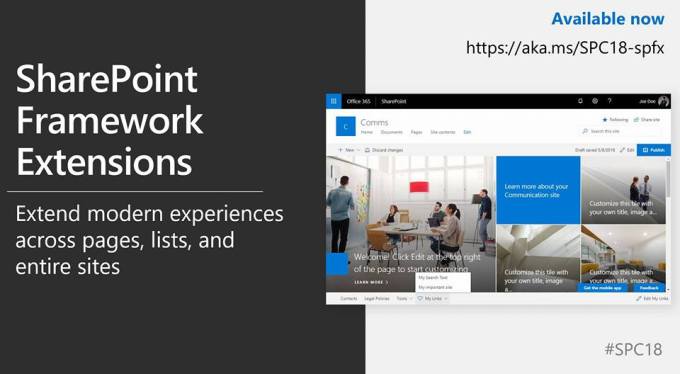
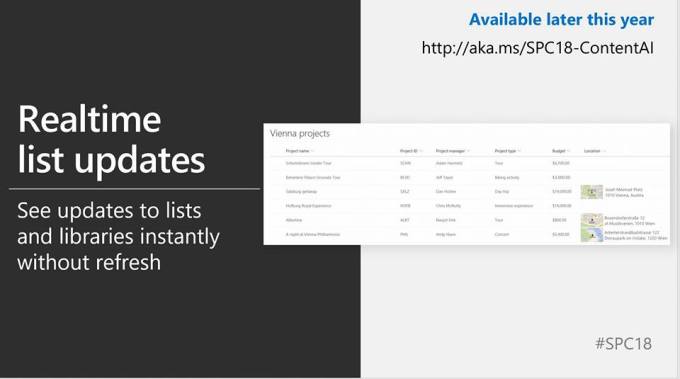

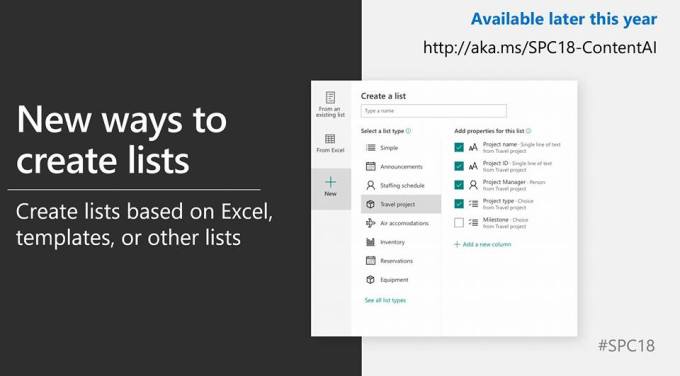
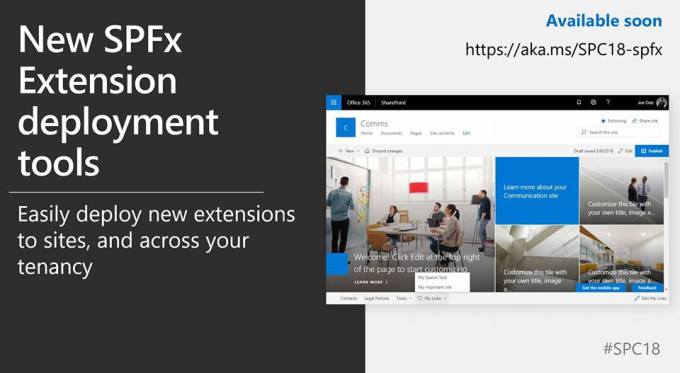
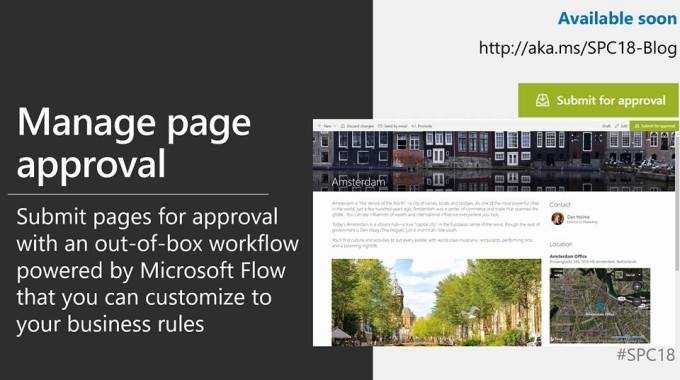
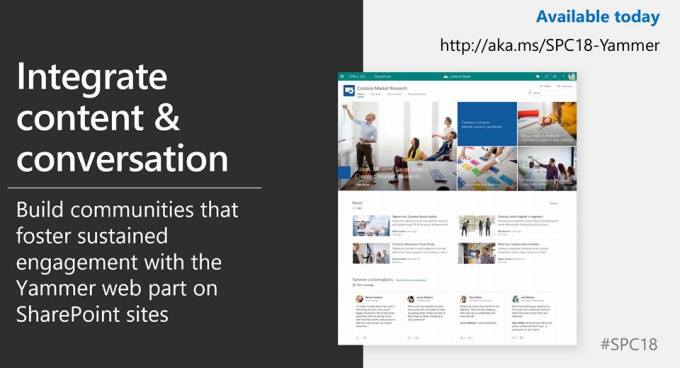
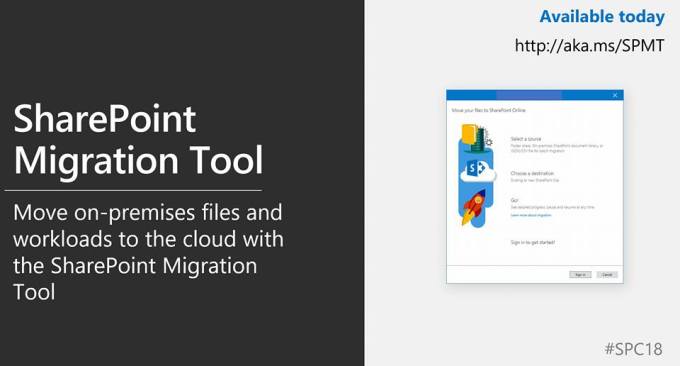
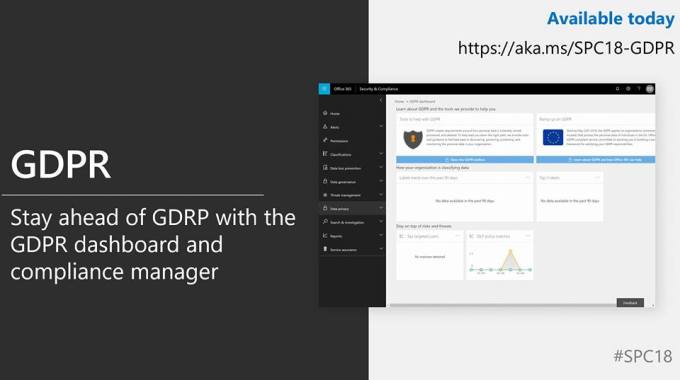
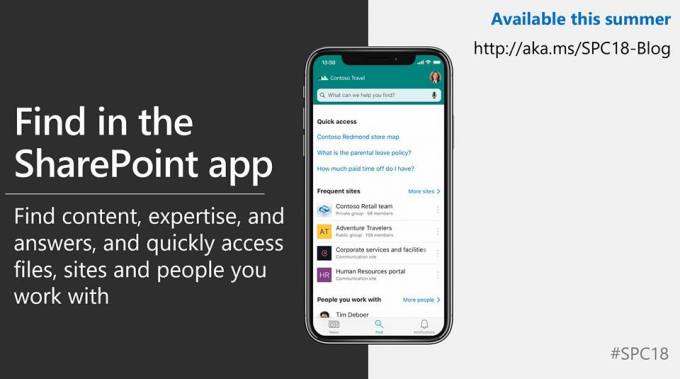


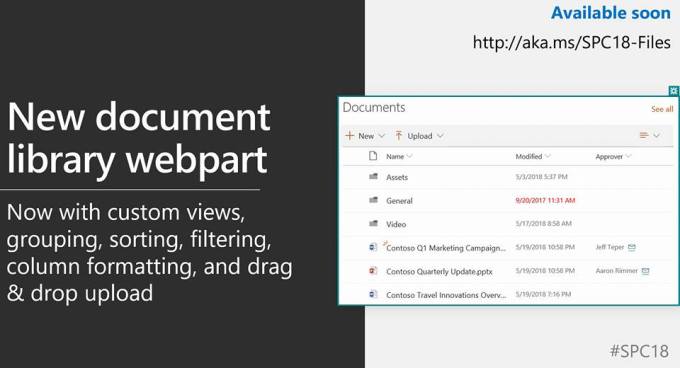
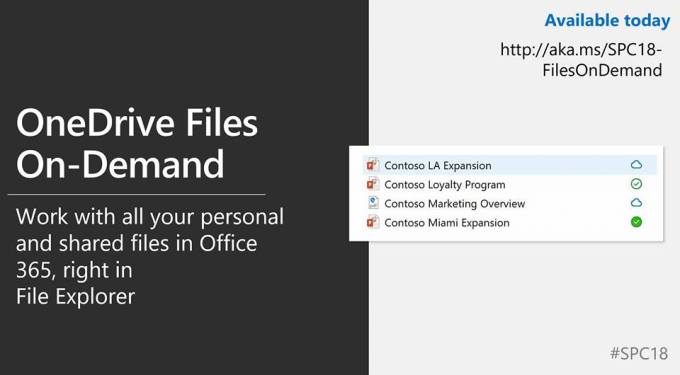
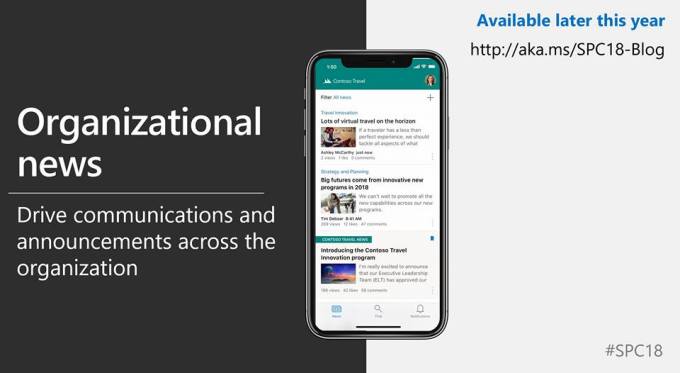
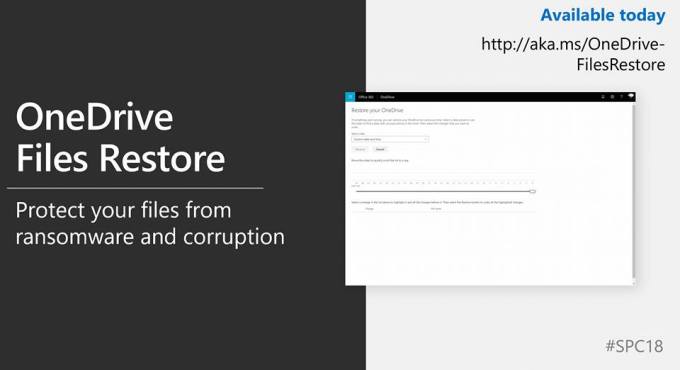
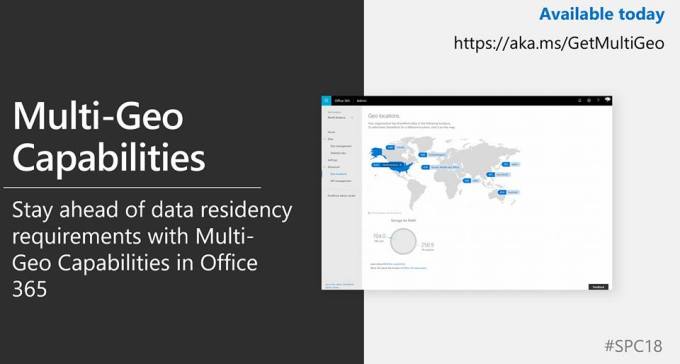
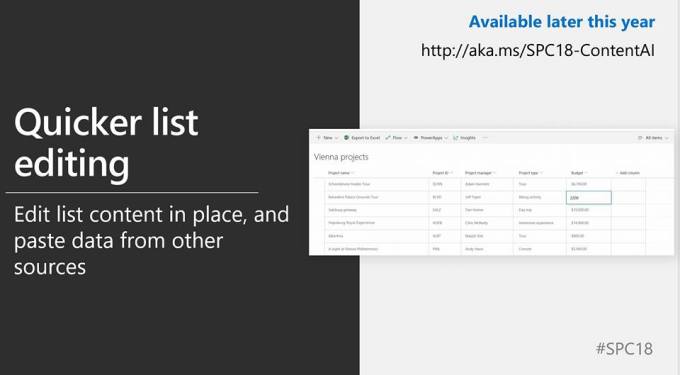
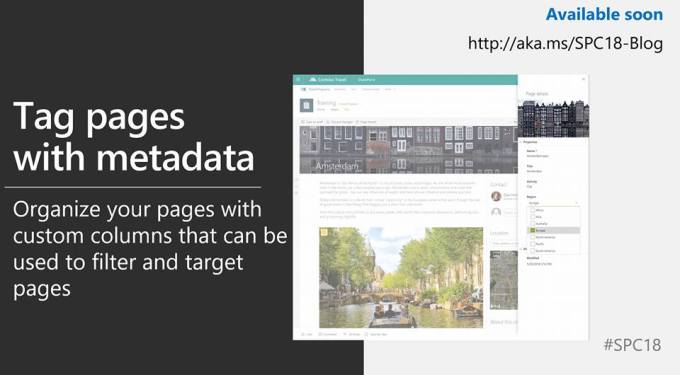
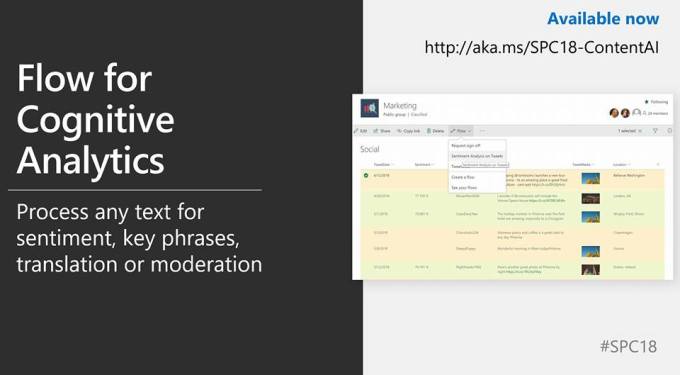
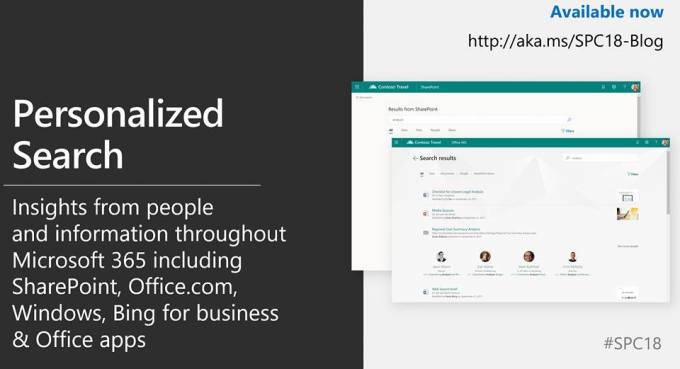
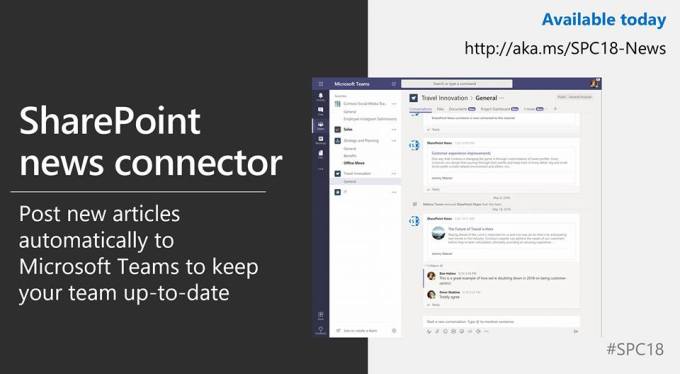
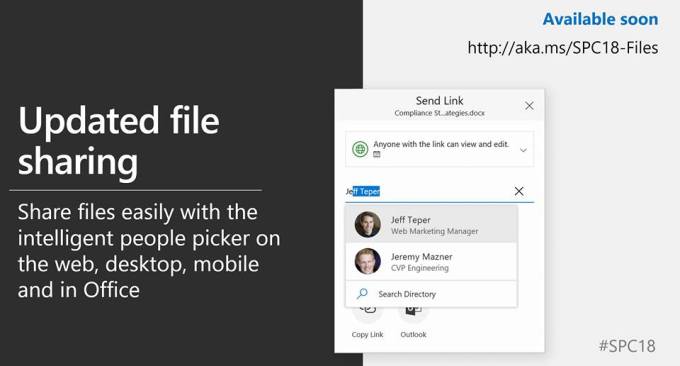
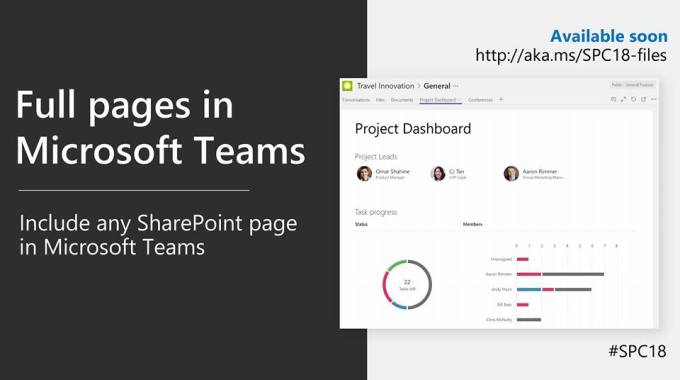

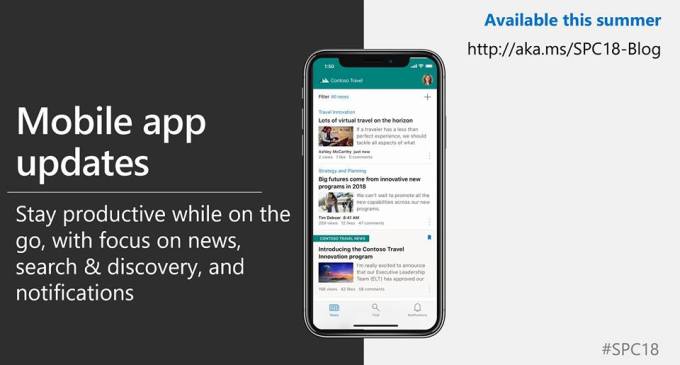
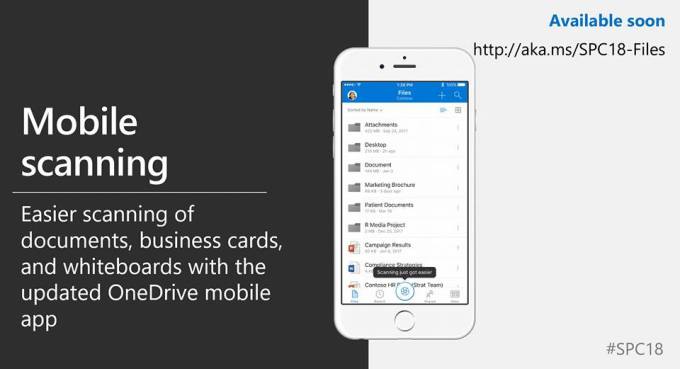
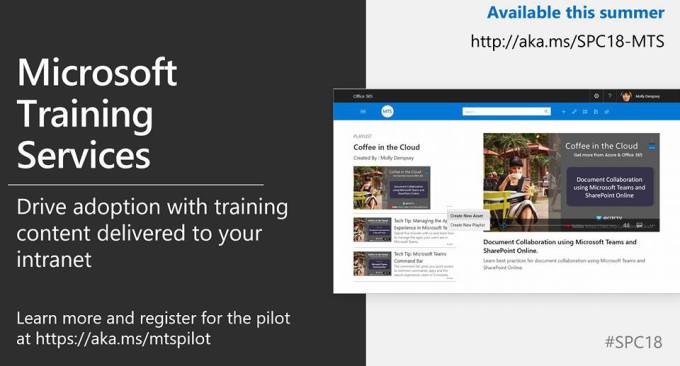
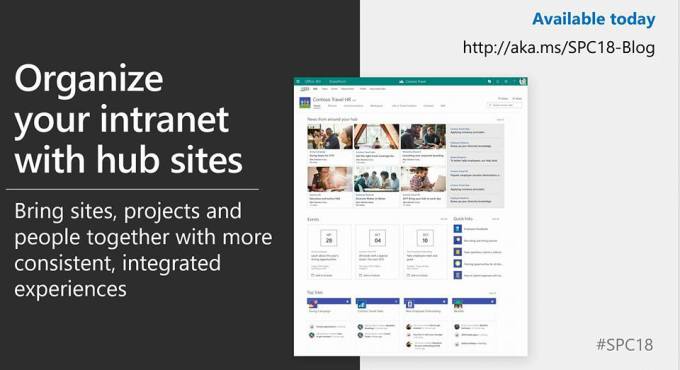

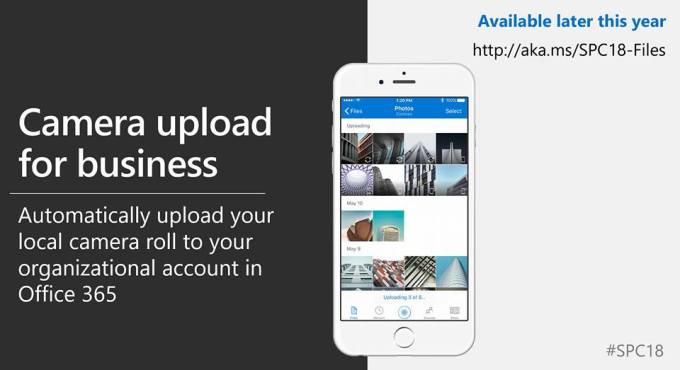
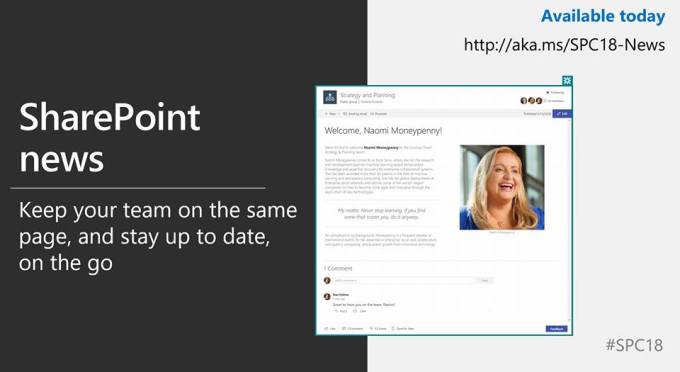
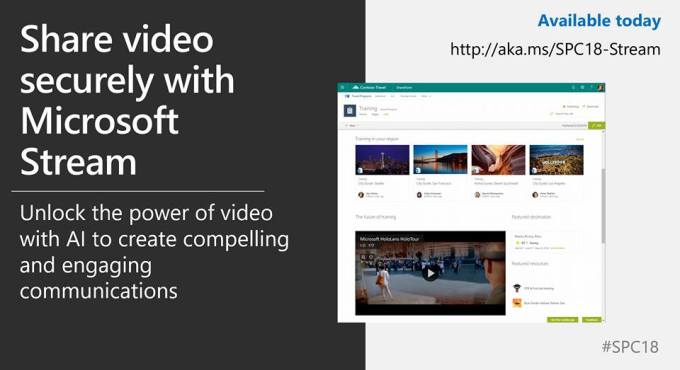
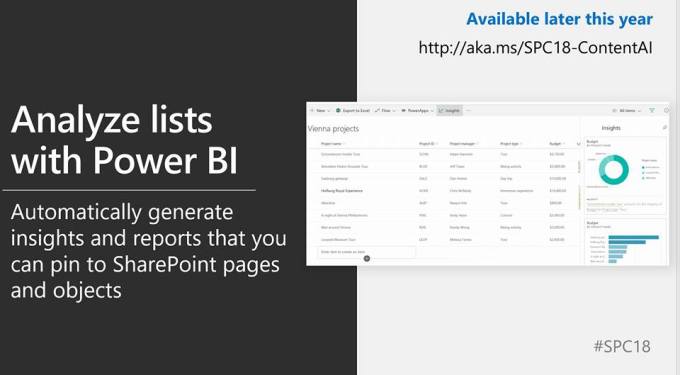
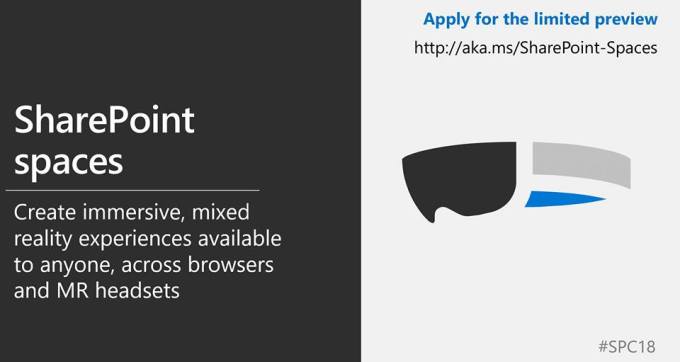

Good luck in adopting these new features in Office 365 …..Happy SharePointing!!!

Note : You can also view my webinar recording on this topic from the link below
So, today’s blog post is going to be focused on the Security and Compliance features in Office 365 so that you folks can understand how secure your Office 365 ecosystem is. It’s a known fact that organizations across the globe are embracing Digital transformation to meet the growing needs and deeds of today’s Cloud first and Mobile first world and Office 365 is playing a vital role in this transformation. Now, if you think about this from a business standpoint, the reason to embrace digital transformation in an organization is wide because it just doesn’t help you to be meet the needs and deeds of your customer, but it also empowers your employees to be more creative and productive. Now, speaking about this I ‘d like to recall a quote from Jeff Bezos (CEO of Amazon) where he says, The biggest threat to successful companies is “…if you won’t or can’t embrace powerful trends quickly. If you fight them, you’re probably fighting the future. Embrace them and you have a tailwind.” I’m pretty sure this makes a lot of sense.
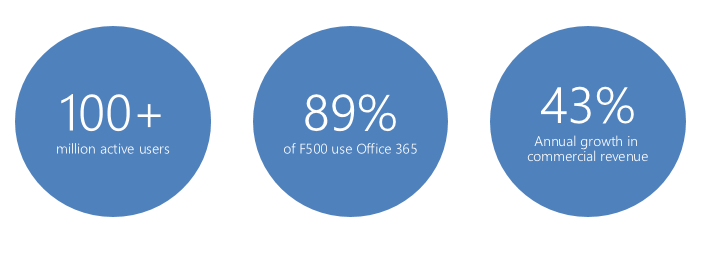
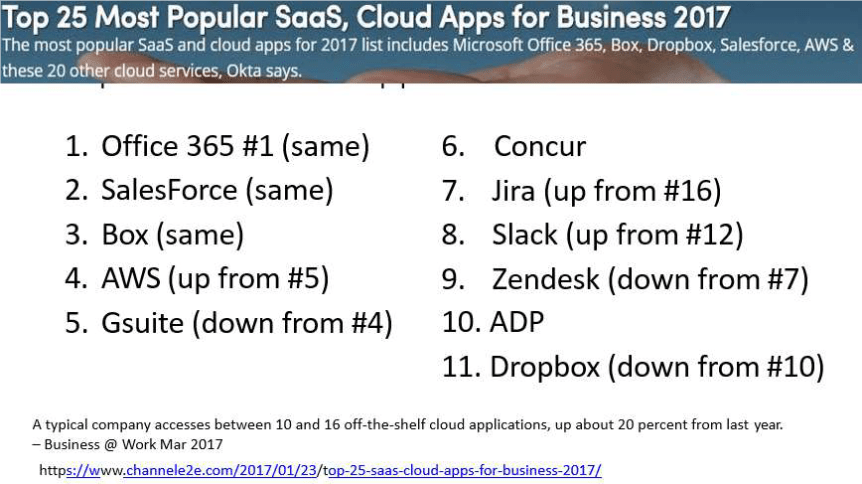
Alright, now speaking about the Security and Compliance features in Office 365, we all know that Office 365(formerly known as BPOS) was introduced on 2011 and it has come a long way since then. It has received many major updates as well as many new features and services alongside this journey and today it has turned out to become world’s number 1 SaaS solution and Microsoft has worked hard to keep up this place. The below mentioned image should give you an overview of the current momentum of Office 365 in today’s IT market.
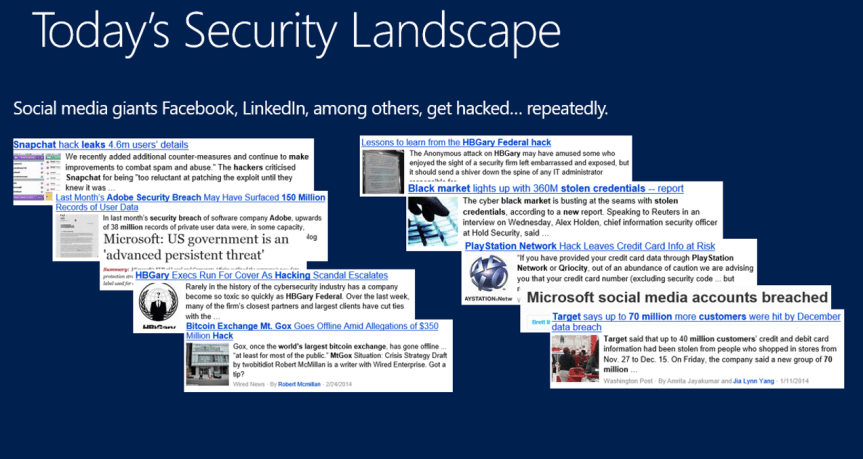
Although, these numbers are great and undoubtfully Office 365 is really a great service. We as customers are always concerned about security because our data is not in our datacenters and instead it’s in Microsoft’s datacenter and there are many other parameters that concerns us. I often hear this from my friends who work as CISO’s in their respective organizations and of course many security folks whom I know in the industry have shared the same vision. So, the burning question in all our minds is …. What about security? How do I ensure that I have not been compromised? How do I make sure that my data is in my control even though Microsoft is the custodian for it? Also in addition to that, today’s security landscape is really scary .

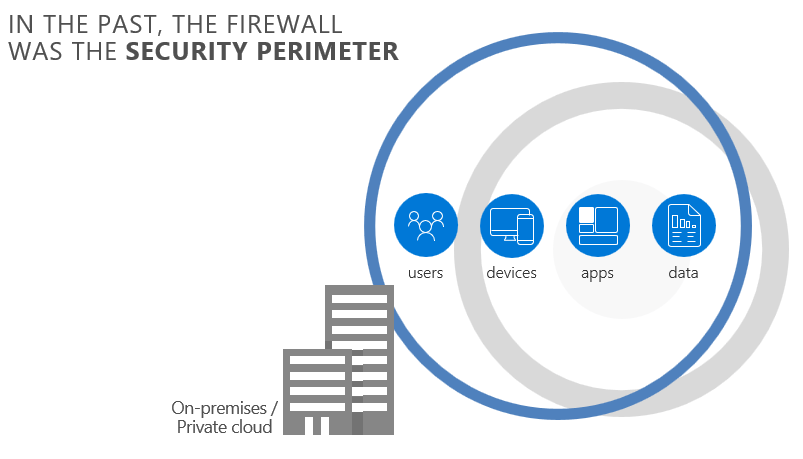
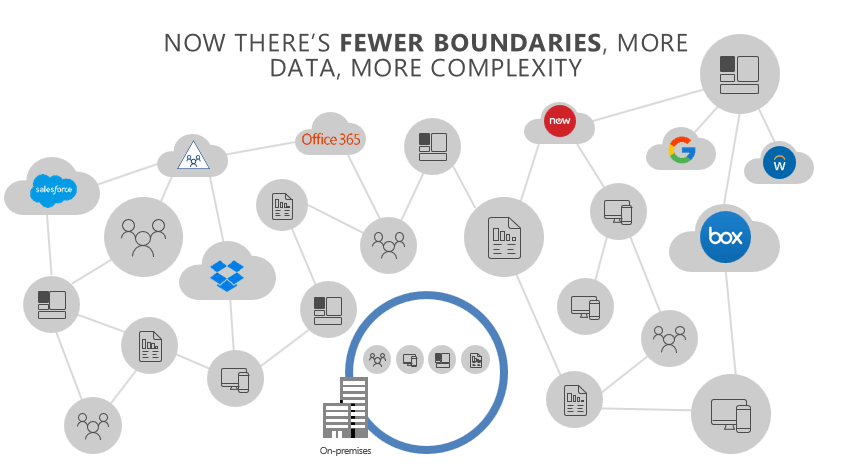
Moreover, it’s just not that …Earlier when we all had our applications such as Exchange Server, SharePoint Server, Skype for Business server & LOB apps running in on-premises servers in our datacenters we had the concept of firewall which was acting as the security perimeter as shown in the image below.
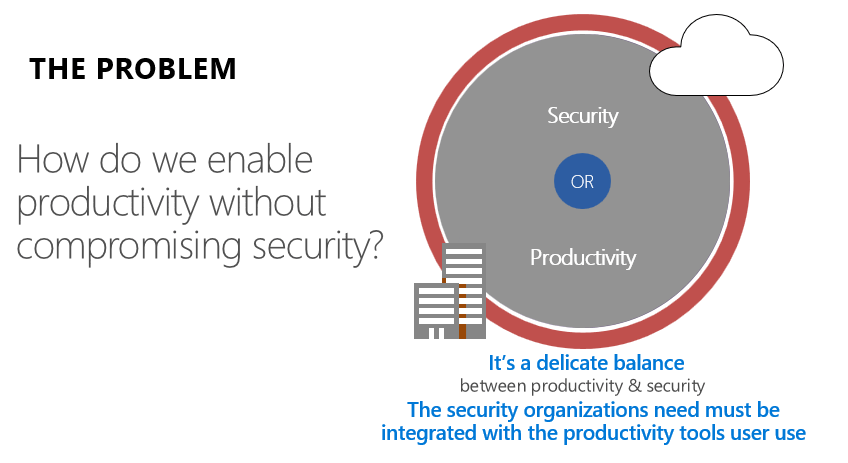
Now, with Cloud we have fewer boundaries but more data and more apps which bring in more complexity as shown in the image below.
This of course raises a question in all our minds as decision makers about how can I enable productivity without compromising security? Because all these services which Office 365 offers are really great, but how do I trust the service? How do I ensure that my data is on safe hands?
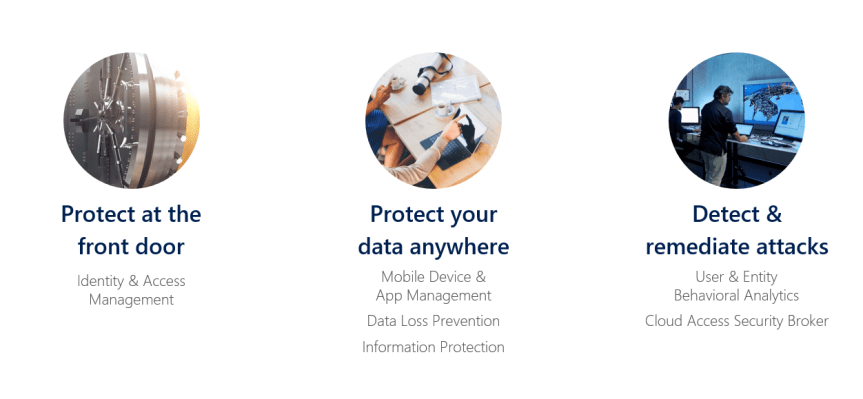
Well, there are a lot of tools out there that can be purchased for this purpose but then all these tools are meant to solve a specific purpose and they can’t solve all the problems related to security in Office 365. So, it’s quite confusing for the Security folks to decide which tool to buy to ensure that their data is secure. We have a wide variety tools but then they don’t solve all the problems and in addition to that you would also end up in managing all these tools individually which requires a lot of manpower and would often lead to management overhead as well. On top of this the license for all these products could cost you a fortune.

So, now that I have lined up all the issues that we face in securing data on a Cloud first mobile first world in front of you folks, I’m going to explain about how to get rid of this and ensure that your data is secure by using all the Security and Compliance features in Office 365.

So, this post is mainly meant to showcase the security and compliance features in Office 365 that organizations can count on to ensure that Office 365 is really a trustworthy service and to also make them understand about how they can benefit from these features without purchasing multiple tools. These features that I’m referring to can be a life saver as you can get everything you want as depicted in the image below.
Note: This is going to a series of articles where I’ll be explaining each feature in detail. So initially I’ll begin with giving an overview of all the features and in a later blog post I’ll be getting into the nitty gritty of all the features. Alright, I guess I’ve set the mood now so let’s get started …
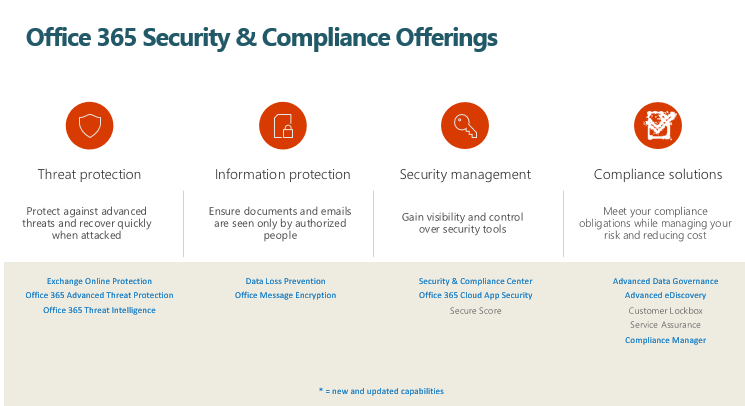
Listed below are the areas of focus for Security and Compliance in Office 365 and we have couple of offerings from Microsoft for each of these areas. These services might not really add more value if you use them individually but when it is put together and given to as a service names as EMS (i.e. Enterprise Mobility and Security) it can make wonders.
Note: All the features that I’ll be mentioning below can either be purchased separately or can be purchased together as package called as Enterprise Mobility and Security. EMS is available to us in two flavors as mentioned below
Please go through the link below to understand the licensing details for EMS E3 & E5
https://www.microsoft.com/en-in/cloud-platform/enterprise-mobility-security-pricing
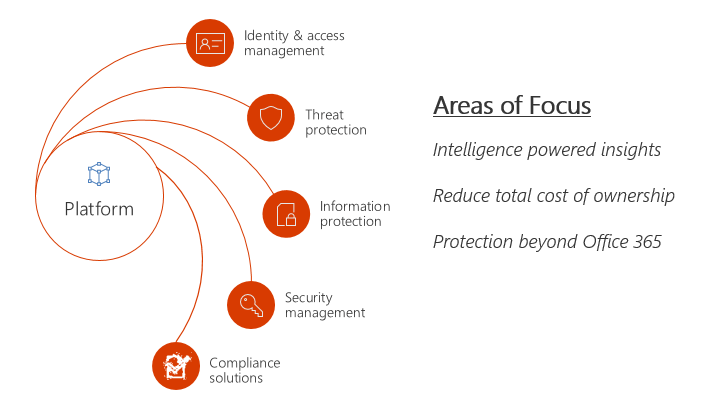
The image below should give you an overview of all the offering we have under each area.
Now, let’s jump in and look into these offering individually.
1.Threat Protection:
Listed below are the offerings we have under Threat Protection category
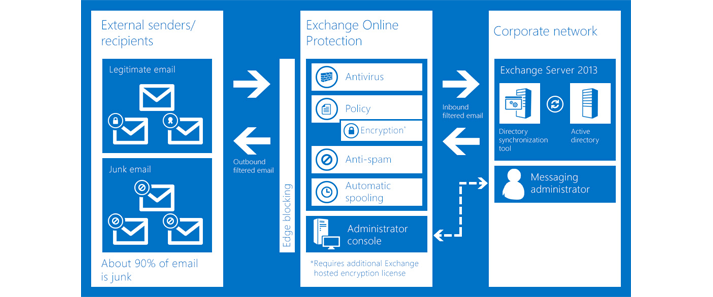
Microsoft Exchange Online Protection (EOP) is an email filtering solution that’s hosted on the cloud and it takes care of protection against spam and malicious malware attacks in your organization. In addition to that it also protects your organization from messaging-policy violations. It sits in front all outlook.com and Office 365 mailboxes and scans all the emails. It can be used for both on-premises and cloud mailboxes.
Listed below are the primary ways of using EOP for message protection:
Standalone scenario: In this method Exchange Online Protection is used to provide cloud -based email filtering service for your on-premises Microsoft Exchange Server environment as well as legacy Exchange Server versions such as Exchange server 2007 or for any other on-premises SMTP email service providers.
With Microsoft Exchange Online (Office 365): By default, EOP protects Microsoft Exchange Online cloud-hosted mailboxes.
Hybrid deployment: EOP can be configured to protect your messaging environment if you have a Hybrid environment configured where you have a mix of mailboxes in on-premises as well as online.
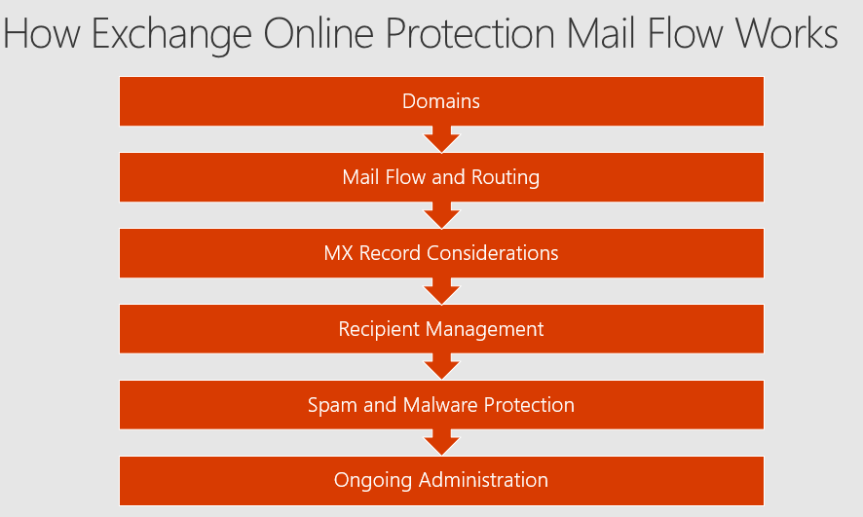
The below mentioned image should give you an overview of how Exchange Online Protection Mail Flow works.
The below image should give you a high-level overview about how EOP processes incoming email.

Explanation:
Now, let’s look into how the mail flow works on an inbound scenario, outbound scenario and on Hybrid mode (i.e. online and on-premises together).
a) How the inbound mail flow works?
b) How the outbound mail flow works?
c) How the mail flow works in Hybrid mode?
Therefore, configure hybrid properly to ensure internal email is treated as internal
EOP Licensing:
Also, please go through this link below to know in detail about EOP licensing.
https://products.office.com/en-us/exchange/exchange-email-security-spam-protection
2.Office 365 Advanced Threat Protection (aka: ATP):
Office 365 Advanced Threat protection protects your email, SharePoint & OneDrive for Business files and Office Online files against unknown and highly sophisticated attacks. Initially when ATP was launched it was available only for emails. But today, ATP can take care of SharePoint Online, OneDrive for Business, Microsoft Teams and also Office Online.

Listed below are the four pillars of Office 365 Advanced Threat Protection:
New malware campaigns are being launched every day by attackers, and Office 365 has a solution to help protect your email, files, and online storage against them. Office 365 Advanced Threat Protection can help to protect user’s mailboxes, SharePoint and OneDrive files, online storage, and applications against new, sophisticated attacks in real time. It offers holistic protection in Microsoft Teams, Word, Excel, PowerPoint, Visio, SharePoint Online, and OneDrive for Business. By providing protection against unsafe attachments and expanding the protection capabilities against malicious links, it leverages the security features of Exchange Online Protection to provide better zero-day protection.
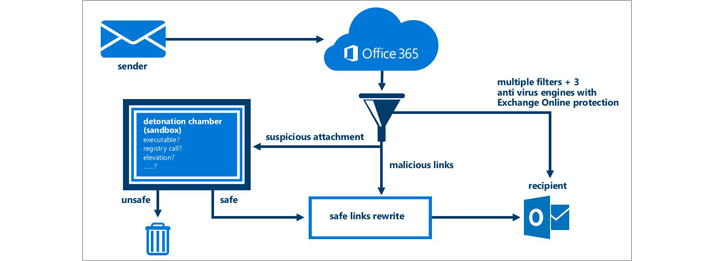
2. Protect against unsafe attachments:
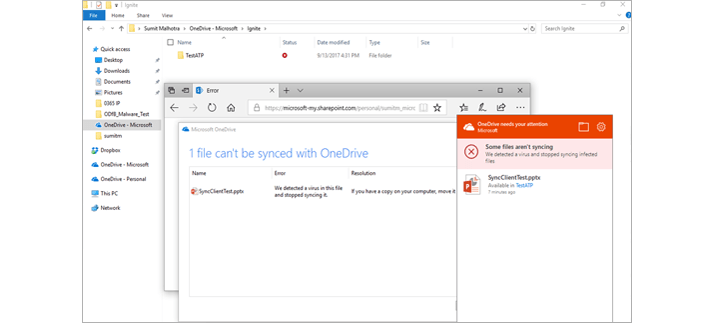
With Safe Attachments, you can prevent malicious attachments from impacting your messaging environment, even if their signatures are not known. Any content that looks suspicious goes through a real-time behavioral malware analysis that uses machine learning techniques to validate the content for suspicious activities. Unsafe attachments gets thoroughly scanned in a sandboxed environment before being sent to recipients. The advantage is a malware free and cleaner inbox with better zero-day attack protection. So what basically happens behind the scenes here is , every email gets scanned in the Safe attachment sandboxed environment which is built by Microsoft and the recipient would initially just receive the email body without the attachment stating that his attachment is being scanned and would be delivered in a minute .If the Safe attachment sandboxed environment doesn’t find any malicious content the recipient will receive the attachment in next few minutes , if not the attachment would be quarantined and the Office 365 admin as well as the user would be notified . Also, for any given reason if the attachment which has malicious content in it gets delivered and later MS figures out that it has malicious files in it, even at that point of time ATP can pull back that email despite of it reaching the user’s mailbox.
3.Protect your environment when users click malicious links:
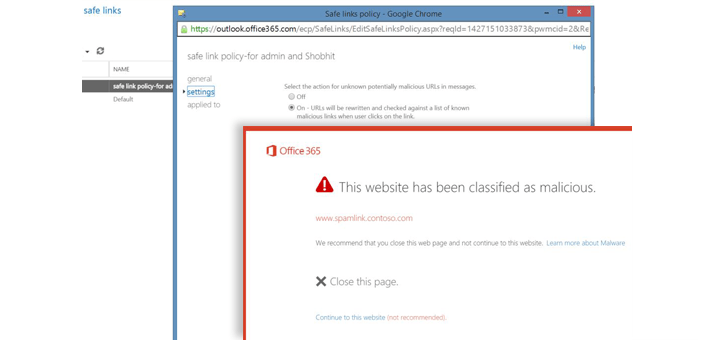
Exchange Online Protection which we discussed above provides protection against harmful links by scanning the content in the link. Safe Links expands on this by protecting your environment when an end user clicks on link which is shared to him via an email. While the content is being scanned, the URLs are rewritten to go through Office 365. The URLs are examined in real time, at the time a user clicks them. If a link is unsafe, the user is warned not to visit the site or informed that the site has been blocked as shown in the screenshot above. Reporting is available, so administrators can track which users clicked a link and when they clicked it. In this case, the URL’s gets scanned in the Safe Link virtual environment by Microsoft which is similar to the Safe attachment sandboxed environment that I explained above.
4. Get rich reporting and track links in messages:
Gain critical insights into who is being targeted in your organization and the category of attacks you are facing. Reporting and message trace allows us to check the messages that have been blocked due to unknown viruses or harmful malwares. In addition to that URL trace allows us to track individual malicious links in the messages that have been clicked.
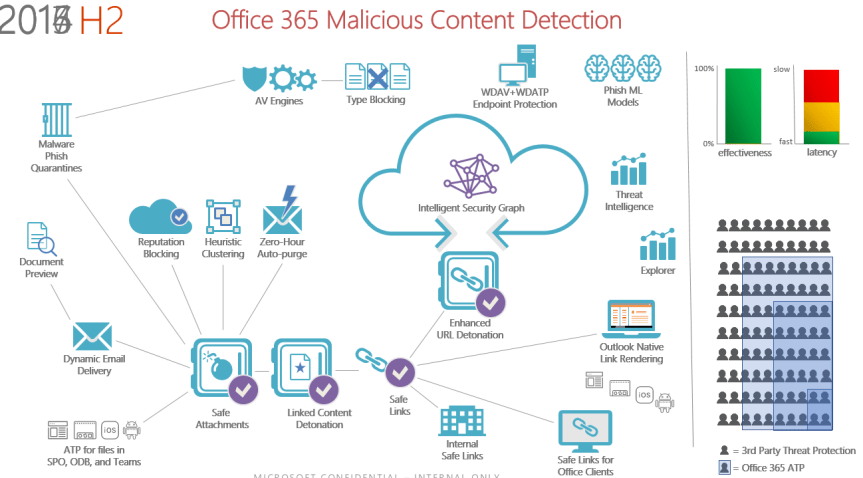
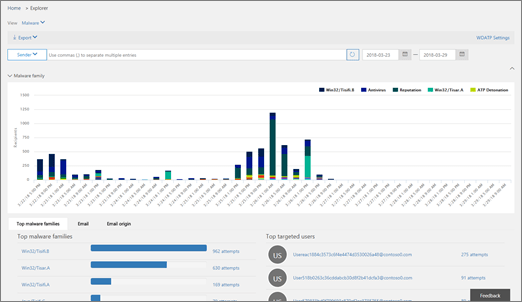
The below mentioned image should give you a complete overview about the architecture of Advanced Threat Protection in Office 365.
Purchasing Office 365 Advanced Threat Protection:
You can add Advanced Threat Protection to the following Exchange and Office 365 subscription plans:
5.Office 365 Threat Intelligence:
Threat Intelligence makes use of the Microsoft Intelligent Security Graph, which analyzes billions of data points from Microsoft global data centers, Office clients, email, user authentications, signals and much more from the Windows and Azure ecosystems and other incidents that impact the Office 365 ecosystem.
So, in a nutshell what’s Office 365 Threat Intelligence? Well, Office 365 Threat Intelligence helps Office 365 administrators and Security folks protect their organization’s Office 365 users by doing the below mentioned three things ….
Now, if you’re wondering about what’s a Microsoft Intelligent Security Graph which I’ve explained above, let me try to explain that below.
The Microsoft Intelligent Security graph is a service built by Microsoft to collect telemetry data generated by all users using Office 365, devices that are connected to Office 365, IP addresses from which you login to Office 365 etc. and they have built an intelligent security graph. Now this basically has Machine Learning and Artificial intelligence built into it so that it studies every user’s behavior in Office 365 (meaning, from where a user logs in often, from which IP address does he/she login, from which country does he login, from which mobile device does he often connects to Office 365 etc.) and for any given reason if it finds an abnormal or anomaly activity from the normal behavior it marks that activity as malicious and takes appropriate security measures. The best part is, all this is done on its own without any human intervention. The below image should help you understand the amount of telemetry data Microsoft collects every month.


Although, this is jaw dropping and sounds bit crazy, there’s a method to this madness. Now, let me try to explain that, the attacks that you see today in a cloud first mobile first world are very sophisticated and you need to respond to that in minutes and not in hours or days and if your failing to do so the amount damage caused could be really unbearable as attackers out there are getting smarter day by day. So, I’m glad that Microsoft has built the Microsoft Intelligent Security graph for their Cloud services which helps us to be protected. Now based on the signal it gets from a user’s activity the below mentioned actions would be prompted for the user as shown in the image below. Microsoft says that they analyze 10 TB of data every day and this is expected to increase eventually.
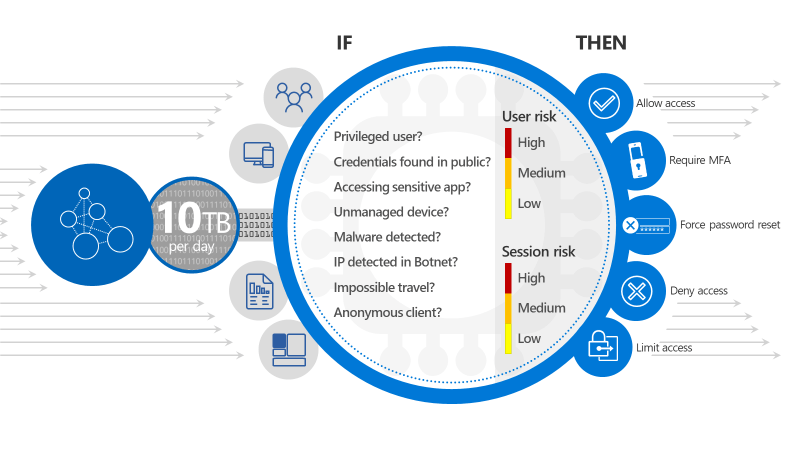 So, based on the conditions given to it such as (privileged user, unmanaged device etc.) it will grant access to the user. This is called as Conditional Access in Office 365 and I’ll discuss about this in later blog post.
If you’re interested in knowing more about Microsoft Intelligent Security graph, I’d urge you all to go through the below mentioned two links.
http://cloud-platform-assets.azurewebsites.net/intelligent-security-graph/
https://www.youtube.com/watch?v=-Q_G3yF9ZL4
So, what else do we have under Threat Intelligence? Well, we have three important components as a part of Threat intelligence which I want you folks to pay attention to.
You can use the Threat dashboard (this is also referred to as the Security dashboard) to quickly see what threats have been addressed, and this can also be used as a visual way to report to business decision makers how Office 365 services are securing your business.
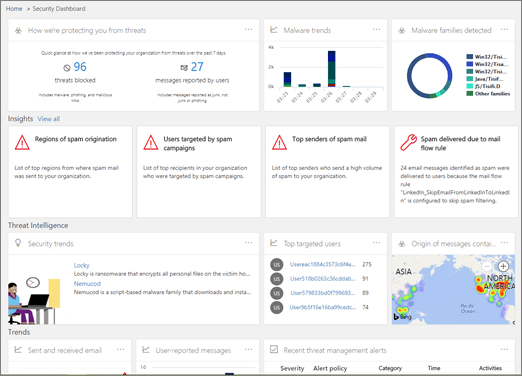
To access this dashboard, navigate to Security & Compliance Center in the Office 365 admin center –>go to Threat management –>Dashboard.
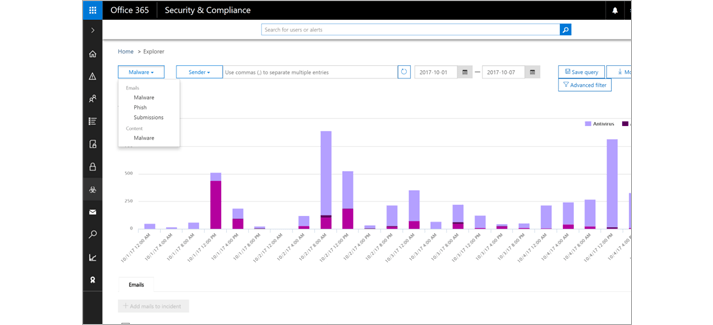
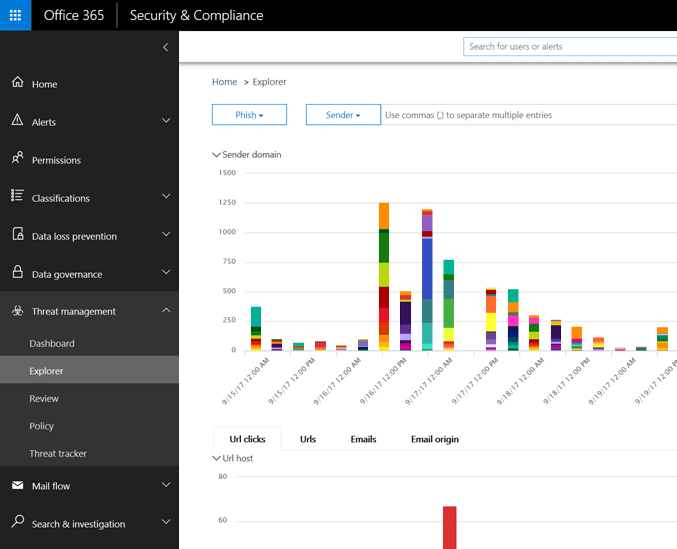
Threat Explorer:
Threat explorer helps you to analyze threats, see the volume of attacks periodically, and analyze data by threat families, attacker infrastructure, and much more. The Threat explorer is the starting place for any security analyst’s investigation workflow.
To access this report, navigate to Security & Compliance Center in the Office 365 admin center –> go to Threat management–> Explorer.
Incidents:
You can use the Incidents list section to see a list of current security incidents. These Incidents can be used to track threats such as suspicious email messages and to conduct detailed investigation on those emails and drive them to remediation.
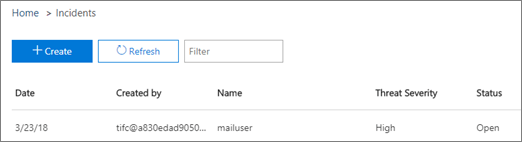
To access the list of current incidents for your organization, navigate to Security & Compliance Center in the Office 365 admin center –> go to Threat management –>Review –> Incidents.
Purchasing Office 365 Threat Intelligence:
Office 365 Threat Intelligence is available by default in Office 365 E5 and if you’re using a different plan such as Office 365 Enterprise E3 or Office 365 Enterprise E1, then you can add Office 365 Threat Intelligence as an addon to your existing plan
Alright folks, that’s all I have for Part 1 and I’ll see you folks on Part 2 …. Good luck in keeping your Office 365 ecosystem secure by utilizing all the features that I’ve described above!!!
For all those folks who missed the live streaming of the SharePoint Virtual Summit yesterday , here’s the link to view the recording . #SPC2018
https://mediastream.microsoft.com/events/2018/1805/SharepointSummit/index-od.html
Good luck with all the new features in SharePoint Online & OneDrive for Business ….Happy SharePointing!!!!
Webinar Recording :_ https://youtu.be/UjJuoZ_7gvQ
Link to the PPT Slides :_ https://www.slideshare.net/VigneshGanesanMCPMCI/part-2-deep-dive-into-the-new-features-of-sharepoint-online-and-onedrive-for-business
Please keep checking my blog site for more webinars and useful articles .
Good luck with the new features in SharePoint Online and OneDrive for Business !!!
Howdy Folks! As promised in previous blog post related to Office groups , I’m back now with some cool PowerShell cmdlets which should ease your work in managing Office 365 groups in your organization . If you’re new to Office 365 groups, I humbly request you to read in detail about Office 365 groups by accessing this link. I’ve tried my best to explain Office 365 groups there. You can read this post on HubFly blog site as well. Alright, let’s get started ….
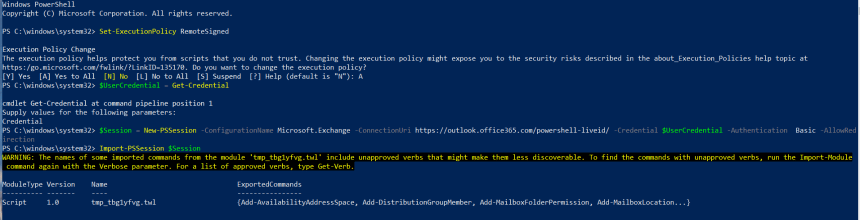
Note : Before you can run all these PowerShell cmdlets below , you need to load the Exchange Online management shell by following this link .I’ve given a screenshot below for your reference .
Listed below are the operations that you can perform by following the PowerShell commands mentioned below
So, let’s look into all these operations in detail below….
Get-UnifiedGroup

This will remove a specific Office 365 group from your tenant.
Remove-UnifiedGroup -Identity “Test Group”
Set-UnifiedGroup
Ex 1: Set-UnifiedGroup -Identity “HR Team” -AccessType Private
This example changes the Office 365 Group named HR Team from a public group to a private group.
Ex 2: Set-UnifiedGroup -Identity “HR Team” -PrimarySmtpAddress hrteam@o365techy.onmicrosoft.com -RequireSenderAuthenticationEnabled $false
This example makes the following changes to the Office 365 Group named HR Team:
i)The primary email address is changed to hrteam@o365techy.onmicrosoft.com.
ii)The Office 365 Group is allowed to receive mail from unauthenticated (external) senders.
Get-UnifiedGroupLinks
Ex: Get-UnifiedGroupLinks -Identity “Transport Department” -LinkType Members
This example shows the members of the Office 365 Group named Transport Department
Similarly, you can use the script below to get the list of all the members from all the Office 365 groups in you tenant.
This will run and display the results as shown in the screenshot below.

Get-UnifiedGroup | Select Id, DisplayName, ManagedBy, Alias, AccessType, WhenCreated, @{Expression={([array](Get-UnifiedGroupLinks -Identity $_.Id -LinkType Members)).Count }; Label=’Members’} | Sort-Object whencreated | Format-Table displayname, alias, managedby, Members, accesstype, whencreated

Get-UnifiedGroup | Where-Object {$_.AccessType -eq ‘Private’} | Sort-Object whencreated | Format-Table displayname, alias, managedby, accesstype, whencreated

Get-AzureADMSDeletedGroup | Sort-Object DeletedDateTime -Descending | Format-Table Id, DisplayName, Description, Visibility, DeletedDateTime
Note: To run this command, you need to do the below mentioned steps, else you would end up getting an error as shown in the image below. If you pay close attention to the cmdlet you would notice that this is related to Azure AD and hence you need to load the Azure AD PowerShell module for this.
I’d suggest performing these tasks in a different PowerShell window for ease of use.

5. Once you’re done connecting to Azure AD, please go ahead and run the above-mentioned cmdlet to get the list of deleted Office 365 groups in descending order and you will get the results as shown in the image below. In my case I don’t have any deleted Office 365 group and hence it didn’t return anything.

8.To get the list of orphaned Office 365 groups in your tenant:
$Groups = Get-UnifiedGroup | Where-Object {([array](Get-UnifiedGroupLinks -Identity $_.Id -LinkType Owners)).Count -eq 0} `
| Select Id, DisplayName, ManagedBy, WhenCreated
ForEach ($G in $Groups) {
Write-Host “Warning! The following group has no owner:” $G.DisplayName
}

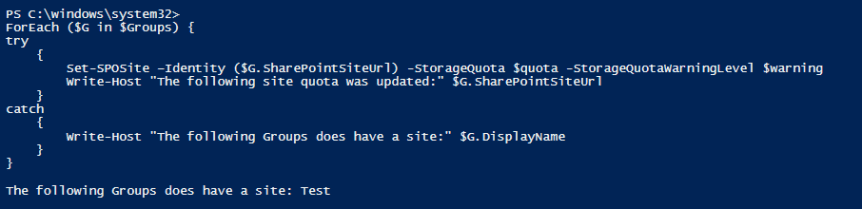
9.To retrieve the list of recently created Office 365 groups:
# Variables:
# Cutoff date in days
# Storage quota in MB
# Storage quota warning level in MB
#………………………………………………………………………………………………………………………………………
$cutoffdate = ((Get-Date).AddDays(-20))
$quota = 500
$warning = 400
$Groups = Get-UnifiedGroup | Where-Object {$_.WhenCreated -ge $cutoffdate} | Sort-Object whencreated | Select DisplayName, WhenCreated, SharePointSiteUrl
![]()
ForEach ($G in $Groups) {
try
{
Set-SPOSite –Identity ($G.SharePointSiteUrl) -StorageQuota $quota -StorageQuotaWarningLevel $warning
Write-Host “The following site quota was updated:” $G.SharePointSiteUrl
}
catch
{
Write-Host “The following Groups does have a site:” $G.DisplayName
}
}
This will run and update the quota of the site as shown in the screenshot below.
11.To create new Directory Settings for Groups template:
There are multiple templates that are part of your Azure AD tenant. This template can contain a settings object which has a collection of values. By using these values, we can set the parameters below. This needs to be done before you can set any values
| Setting | Description |
| · EnableGroupCreation
· Type: Boolean · Default: True |
The flag indicating whether Office 365 group creation is allowed in the directory by non-admin users. This setting does not require an Azure Active Directory Premium P1 license. |
| · GroupCreationAllowedGroupId
· Type: String · Default: “” |
GUID of the security group for which the members are allowed to create Office 365 groups even when EnableGroupCreation == false. |
| · UsageGuidelinesUrl
· Type: String · Default: “” |
A link to the Group Usage Guidelines. |
| · ClassificationDescriptions
· Type: String · Default: “” |
A comma-delimited list of classification descriptions. |
| · DefaultClassification
· Type: String · Default: “” |
The classification that is to be used as the default classification for a group if none was specified. |
| · PrefixSuffixNamingRequirement
· Type: String · Default: “” |
String of a maximum length of 64 characters that defines the naming convention configured for Office 365 groups. For more information, see Enforce a naming policy for Office 365 groups (preview). |
| · CustomBlockedWordsList
· Type: String · Default: “” |
Comma-separated string of phrases that users will not be permitted to use in group names or aliases. For more information, see Enforce a naming policy for Office 365 groups (preview). |
| · EnableMSStandardBlockedWords
· Type: Boolean · Default: “False” |
Do not use |
| · AllowGuestsToBeGroupOwner
· Type: Boolean · Default: False |
Boolean indicating whether or not a guest user can be an owner of groups. |
| · AllowGuestsToAccessGroups
· Type: Boolean · Default: True |
Boolean indicating whether or not a guest user can have access to Office 365 groups content. This setting does not require an Azure Active Directory Premium P1 license. |
| · GuestUsageGuidelinesUrl
· Type: String · Default: “” |
The URL of a link to the guest usage guidelines. |
| · AllowToAddGuests
· Type: Boolean · Default: True |
A Boolean indicating whether or not is allowed to add guests to this directory. |
| · ClassificationList
· Type: String · Default: “” |
A comma-delimited list of valid classification values that can be applied |
Let me walk you through the complete process of creating directory settings here.
Get-AzureADDirectorySetting | ForEach Values
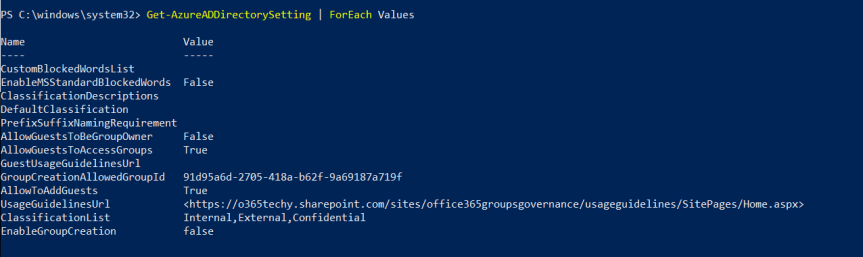
Note: If you check the screenshot above you will notice that I have configured few directory settings such as “Usage Guidelines URL “and “Classification List “and I’ll be showing you how to configure that using PowerShell in the examples below.
5. If you do not have any settings configured the value returned will be blank as show in the screenshot below.

6. Alright, now let’s see some examples to set group settings.
7. All examples below will use the Get-AzureADDirectorySetting cmdlet and store that in a variable and then use the Set-AzureADDirectorySetting cmdlet with the updated settings. The full command to run a setting update is as follows. Also, I’d suggest to use PowerShell ISE for running these cmdlets for ease of usage.
$settings = Get-AzureADDirectorySetting | where-object {$_.displayname -eq “Group.Unified”}
$settings[“SETTING NAME”] = “”
Set-AzureADDirectorySetting -Id $settings.Id -DirectorySetting $settings
 Ok, now let’s look into some scenarios here …
Scenario 1: Restricting Office 365 groups creation for all the users in your organization except for few users who belong to a specific Security group
$group = Get-AzureADGroup -All $True | Where-Object {$_.DisplayName -eq “Office 365 groups creation allowed”}
$settings = Get-AzureADDirectorySetting | where-object {$_.displayname -eq “Group.Unified”}
$settings[“EnableGroupCreation”] = “false”
$settings[“GroupCreationAllowedGroupId”] = $group.ObjectId
Set-AzureADDirectorySetting -Id $settings.Id -DirectorySetting $settings
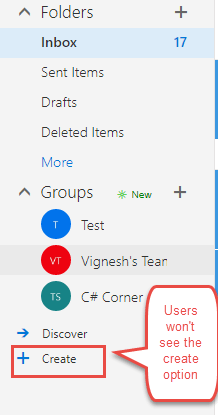
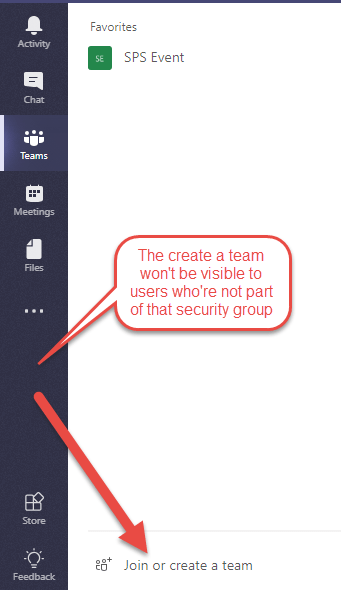
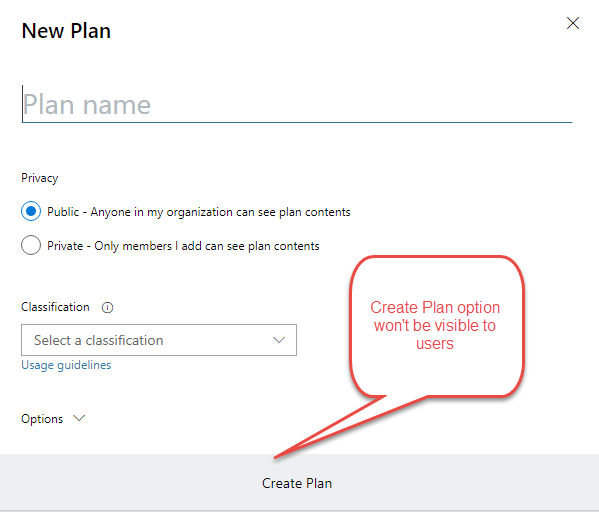
 In this scenario here, I created a security group named “Office 365 groups creation allowed” and I’ve added few members to it. So, by doing this I can grant access only to those members to create Office 365 groups and not to all the users in my organization. Also, an important point to bear in mind here is, if I’m restricting the creation of Office 365 groups then these users won’t be able to create a Team, a Planner, a Yammer group etc. So, the users will be restricted by creating anything which creates an Office 365 group in the backend. So, from an end user perspective, the “create” button which you see in the screenshot below for creating Office 365 groups won’t be visible to them. The same applies for other services also, users won’t get the “Create Planner “or “Create Team” button once this option is enabled. This is one way to have control on Office 365 groups creation in your organization
In Teams, the “Create a Team “button won’t be visible for the users who are not part of that Security group which allows the creation of Office 365 groups.
In Planner, the “Create a Plan “button won’t be visible for the users who are not part of that Security group which allows the creation of Office 365 groups.
Similarly , as already explained above other services which creates an Office 365 group on the backend won’t be available for end users . By doing this you can have control over who gets to create an Office 365 groups and other services such as Teams and Planner in your organization .
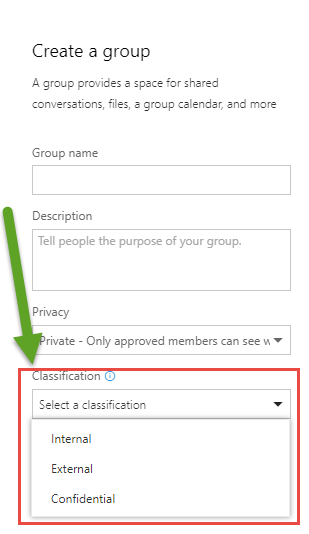
Scenario 2: Setting Office 365 groups classification
$settings = Get-AzureADDirectorySetting | where-object {$_.displayname -eq “Group.Unified”}
$settings[“ClassificationList”] = “Internal,External,Confidential”
Set-AzureADDirectorySetting -Id $settings.Id -DirectorySetting $settings
In this scenario, we’re enabling the classification option so that you can classify your groups accordingly. Once this is done whenever you try to create an Office 365 group from the outlook webmail (provided that you have access to create Office 365 groups) you will get an option to choose the classification for that group also as shown in the image below. This could be useful from a compliance and governance perspective.
Once that’s done you can set the classification for an existing Office 365 by running the below PowerShell command.
Set-UnifiedGroup <TestGroup@o365techy.onmicrosoft.com> -Classification <Internal>
Also, if you want to create a new group with a classification then run the below PowerShell command for that.
New-UnifiedGroup <TestGroup@o365techy.onmicrosoft.com> -Classification <External> -AccessType <Public>
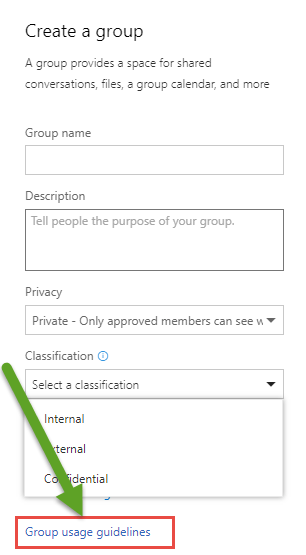
Scenario 3: Setting Usage Guidelines URL
$settings = Get-AzureADDirectorySetting | where-object {$_.displayname -eq “Group.Unified”}
$setting[“UsageGuidelinesUrl”] = “<https://o365techy.sharepoint.com/sites/office365groupsgovernance/usageguidelines/SitePages/Home.aspx>”
Set-AzureADDirectorySetting -Id $settings.Id -DirectorySetting $settings

In this scenario, I’ve created a SharePoint subsite named “Usage Guidelines” which speaks about all the guidelines a user must follow while using Office 365 groups in my organization and the user can refer that while creating / using Office 365 groups. Once this has been enabled this what the end user view would be like. Please check the screenshot below.
Scenario 4: Restrict all access for guest users to Groups including the ones that were already granted access
$settings = Get-AzureADDirectorySetting | where-object {$_.displayname -eq “Group.Unified”}
$settings[“AllowGuestsToAccessGroups”] = “False”
Set-AzureADDirectorySetting -Id $settings.Id -DirectorySetting $settings
 Scenario 5: Restrict the ability to add any new guest users but do not restrict existing guest users
$settings = Get-AzureADDirectorySetting | where-object {$_.displayname -eq “Group.Unified”}
$settings[“AllowToAddGuests”] = “False”
$settings[“AllowGuestsToAccessGroups”] = “True”
Set-AzureADDirectorySetting -Id $settings.Id -DirectorySetting $settings
 Finally, if you want to review all the updated settings then please run the below mentioned PowerShell cmdlet as already described above and it will return the updated settings.
Get-AzureADDirectorySetting | ForEach Values

If you want to remove the group settings that we configured in all the scenarios above then please run the below PowerShell command.
$settings = Get-AzureADDirectorySetting | where-object {$_.displayname -eq “Group.Unified”}
Remove-AzureADDirectorySetting -Id$settings.Id
 12.To update the classifications for all the Office 365 groups:
## Set classifications for all groups
$Groups = Get-UnifiedGroup | Where-Object {$_.Classification -Eq $Null} | Select DisplayName, Classification
ForEach ($G in $Groups) {
If ($G.Classification -Eq $Null)
{
Write-Host $G.DisplayName
Set-UnifiedGroup -Identity $G.DisplayName -Classification “Internal”
}
}
#……………………………..
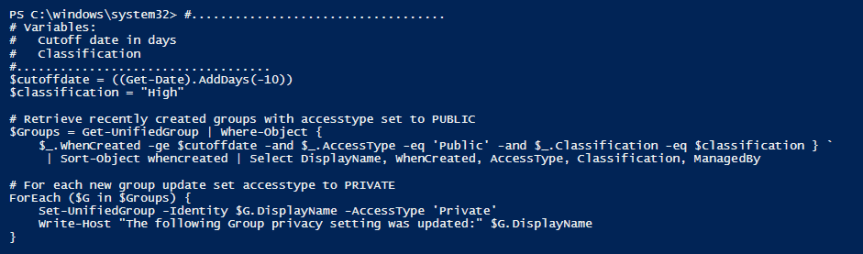
# Variables:
# Cut off date in days
# Classification
#……………………………..
$cutoffdate = ((Get-Date).AddDays(-10))
$classification = “High”
# Retrieve recently created groups with accesstype set to PUBLIC
$Groups = Get-UnifiedGroup | Where-Object {
$_.WhenCreated -ge $cutoffdate -and $_.AccessType -eq ‘Public’ -and $_.Classification -eq $classification } `
| Sort-Object whencreated | Select DisplayName, WhenCreated, AccessType, Classification, ManagedBy
# For each new group update set accesstype to PRIVATE
ForEach ($G in $Groups) {
Set-UnifiedGroup -Identity $G.DisplayName -AccessType ‘Private’
Write-Host “The following Group privacy setting was updated:” $G.DisplayName
}
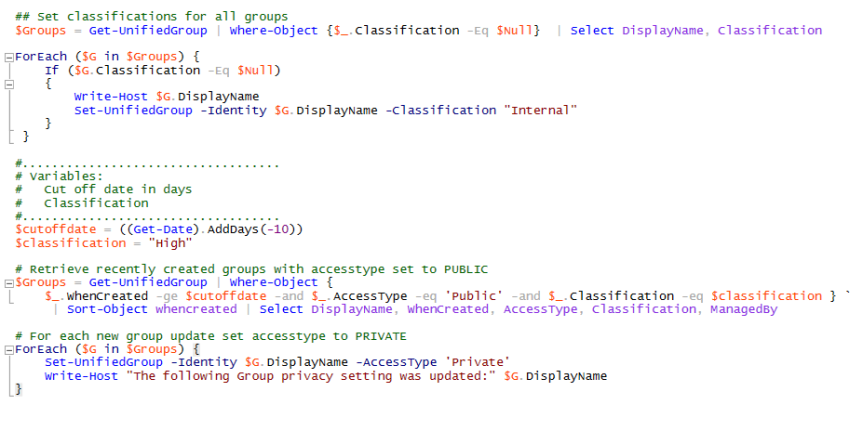 This will run and update the classification for all the Office 365 groups as shown in the image below

#……………………………..
# Variables:
# Cutoff date in days
# Classification
#……………………………..
$cutoffdate = ((Get-Date).AddDays(-10))
$classification = “High”
# Retrieve recently created groups with accesstype set to PUBLIC
$Groups = Get-UnifiedGroup | Where-Object {
$_.WhenCreated -ge $cutoffdate -and $_.AccessType -eq ‘Public’ -and $_.Classification -eq $classification } `
| Sort-Object whencreated | Select DisplayName, WhenCreated, AccessType, Classification, ManagedBy
# For each new group update set accesstype to PRIVATE
ForEach ($G in $Groups) {
Set-UnifiedGroup -Identity $G.DisplayName -AccessType ‘Private’
Write-Host “The following Group privacy setting was updated:” $G.DisplayName
}

14.To determine where a group was provisioned (Planner, Yammer, Teams etc.)
To get the list of Yammer integrated Office 365 group list:
Get-UnifiedGroup |Where-Object {$_.ProvisioningOption -eq ‘YammerProvisioning’} |select DisplayName,Alias,ProvisioningOption,GroupSKU,SharePointSiteUrl,SharePointDocumentsUrl,AccessType
To get the list of Teams integrated Office 365 group list:
Get-UnifiedGroup |Where-Object {$_.ProvisioningOption -eq ‘ExchangeProvisioningFlags:481’}|select DisplayName,Alias,ProvisioningOption,GroupSKU,SharePointSiteUrl,SharePointDocumentsUrl,AccessType
Similarly, we expect MSFT to work on for Planner and other services which create an Office 365 on the backend.
15.To get the list of Obsolete Office 365 groups in your tenant:
This is a PowerShell script from Office 365 fame Tony Redmond and the explanation for the script can be found below.
Note : You need to be connected to Exchange Online PowerShell module as well as the SharePoint Online PowerShell module to run this script
Like any object, an Office 365 Group might become unused over time. No current method exists to detect what groups are underused, so here’s a script that does the job for you by checking audit records to establish whether any SharePoint file activity has occurred in the group document library in the last 90 days and whether any conversations have happened in the group mailbox in the last year. Seeing that it’s all done in simple PowerShell, you can tailor the code to your heart’s content. A HTML report file is generated at the end, which contains some statistics like:
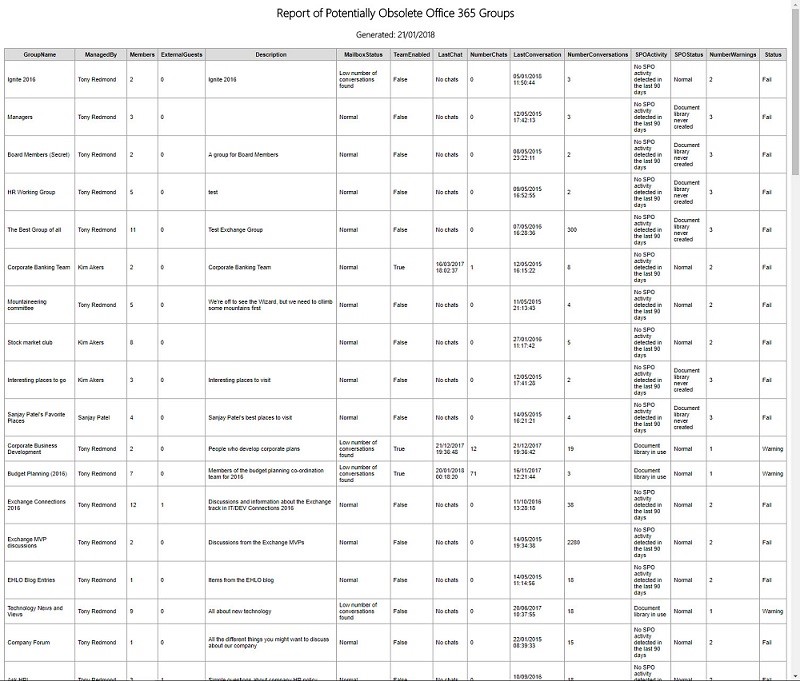
Number of groups scanned: 155
Number of potentially obsolete groups (based on document library activity): 132
Number of potentially obsolete groups (based on conversation activity): 60
Number of Teams-enabled groups: 41
Percentage of Teams-enabled groups: 26.45%
Script:
Check for obsolete Office 365 groups
Thanks for reading this post …. Good luck with Office 365 groups!!!!
Hi All,
Please join us for a webinar on May 19th ,2018 at 6:00 pm IST on ”Deep Dive into the new features of SharePoint Online and OneDrive for Business-Part 2″

Agenda:
This is continuity of our previous session on the same topic .If you haven’t attended Part 1 of this session you can view the recording from the link below . We will be discussing in detail about all the new features that has been rolled out by Microsoft for SharePoint Online and OneDrive for Business
Part 1 recording : _ https://youtu.be/LPohYbozOSM
Link to enroll for Part 2 :_ https://www.c-sharpcorner.com/events/deep-dive-into-the-new-features-of-sharepoint-online-and-onedrive-for-business-part-2
Thanks for enrolling yourself for this session !!!
I’ll be talking on Global Azure Bootcamp at Bengaluru this year .

The details about the event as well as the agenda can be found in this link : http://bengaluru.azurebootcamp.net/
