SharePoint 2016 RTM to go live soon… Maybe March 14

Dreams do come true: The final version of SharePoint 2016 could be here in less than five weeks.

Earlier today, Gregory Appel, in response to a question posed by a participant in his seminar on Excel Services and BI in SharePoint 2016, said SharePoint 2016 RTM (Release-To-Manufacturing) should be available by March 14.

He also said Office Online Server would be pushed to RTM at the same time.

RTM versions of software are versions that are released to hardware manufacturers, typically before general release to work out any remaining bugs.

Appel is a senior program manager in Excel and based in the Microsoft Israel Development Center. He was addressing participants in an Unity Connect session. In response to a question, Appel replied:

2016_10_02 SharePoint RTM Tweet

His statement was tweeted from the seminar by session participant Rainer Jeschor.

While Microsoft has yet to confirm the date for the RTM or the full general release that will follow, March 14 is in keeping with the spring timetable that Microsoft confirmed when it unveiled the Release Candidate in January.

The RC is as close as you can get to a full release. And it is “mostly feature complete,” Bill Baer, senior product manager for the SharePoint team, noted in a blog post at the time.

Appel did not go into any more details as to what might have changed since then, but it’s unlikely that it will be much different than the RC.


SharePoint 2016 : Zero down time patching

I honestly couldn’t refrain myself from sharing the below mentioned two blogs where the author has did a wonderful job in explaining Zero down time patching in SharePoint 2016.Please take look ….


http://sharepointpromag.com/sharepoint/sharepoint-2016-what-you-need-know-about-zero-downtime-patching

http://sharepointpromag.com/sharepoint/sharepoint-2016-what-patch


Issues with MDS feature in SharePoint 2013:

This post is related to the previous post I made in my blog describing the “Issues involved with Minimal Download Strategy feature”. I’m not going to really get into the meats and potatoes of that issue here once again .However , if you want to create a KB article for your end users letting them know that this is a known issue in SharePoint 2013 , then this would be the article for that ….

The Minimal Download Strategy  (MDS) feature in SharePoint 2013 can introduce the below mentioned two issues when you enable it in a team site. It’s a known fact that MDS will be turned on by default in a team site in SharePoint 2013.

Issue 1Deleting a document from a document library will produce an error as shown in the screenshot below.

MDS 1

Explanation:

When you go to a document library in a team site which has the MDS feature turned on and try to delete a document, it’s going to produce an error as shown in the screenshot above.

Repro steps:

Go to a document library in a team site which has the MDS feature activated (remember this feature will be activated by default in a SharePoint Team site) and try to delete a document from a document library by clicking on the “ellipsis” –>“Delete document “BUTTON, you will see an error as shown below without any correlation ID. However, the document would still get deleted from the document library.

Now, this error is not because of any bad configuration in your SharePoint Farm or due to any feature dependency for the MDS feature to work seamlessly .This seems to be a problem with the product itself and looks like this hasn’t been fixed yet.

Workaround:

  1. This error doesn’t show up when you try to delete the document using the “delete document”button in the top ribbon interface.

MDS 2

  1. Also if you try to by-pass your load balancer by changing the host file of your PC to point a specific WFE, this error won’t show up.

Issue 2: Trying to create a new view in a document library will produce an error as shown in the screenshot below

MDS 3

URL will show this error code:  _vti_bin/owssvr.dll?CS=65001

Explanation:

When you go to a document library in a team site which has the MDS feature turned on and try to create a new view, it’s going to produce an error as shown in the screenshot above and the site url will also display this error code : vti_bin/owssvr.dll?CS=65001

Repro steps:

Go to a document library in a team site which has the MDS feature activated (remember this feature will be activated by default in a SharePoint Team site) and try to create a new view by clicking on the “ellipsis” –>“Create a new view “BUTTON, you will see an error as shown below without any correlation ID. However, the new view will still get created.

Workaround:

There is no workaround identified for this as of now, as the error pops up even if you use the “Create view “option in the top ribbon interface. However as already mentioned above the view would still get created.

Note: This error wouldn’t show up if you try to by-pass your load balancer by changing the host file of your PC to point a specific WFE

Conclusion:

We have did our troubleshooting on this issue by working with Microsoft and this seems to be a bug in the product. The F5 load balancer which takes care of handling user requests to the portal seems to be causing the trouble here.

Powershell script to find and delete orphaned users in SharePoint

[System.Reflection.Assembly]::LoadWithPartialName("Microsoft.SharePoint")

#Functions to Imitate SharePoint 2010 Cmdlets in MOSS 2007
function global:Get-SPWebApplication($WebAppURL)
 {
  return [Microsoft.SharePoint.Administration.SPWebApplication]::Lookup($WebAppURL)
 }
function global:Get-SPSite($url)
 {
    return new-Object Microsoft.SharePoint.SPSite($url)
 }
function global:Get-SPWeb($url)
{
  $site= New-Object Microsoft.SharePoint.SPSite($url)
        if($site -ne $null)
            {
               $web=$site.OpenWeb();      
            }
    return $web
}
#Function to Check if an User exists in AD
function CheckUserExistsInAD()
   {
   Param( [Parameter(Mandatory=$true)] [string]$UserLoginID )
 
  #Search the User in AD
  $forest = [System.DirectoryServices.ActiveDirectory.Forest]::GetCurrentForest()
  foreach ($Domain in $forest.Domains)
  {
   $context = new-object System.DirectoryServices.ActiveDirectory.DirectoryContext("Domain", $Domain.Name)
         $domain = [System.DirectoryServices.ActiveDirectory.Domain]::GetDomain($context)
   
   $root = $domain.GetDirectoryEntry()
         $search = [System.DirectoryServices.DirectorySearcher]$root
         $search.Filter = "(&(objectCategory=User)(samAccountName=$UserLoginID))"
         $result = $search.FindOne()
         if ($result -ne $null)
         {
           return $true
         }
  }
  return $false
 }
 
 $WebAppURL="<a class="vglnk" href="https://sharepoint.crescent.com" rel="nofollow"><span>https</span><span>://</span><span>sharepoint</span><span>.</span><span>crescent</span><span>.</span><span>com</span></a>"
 #Get all Site Collections of the web application
 $WebApp = Get-SPWebApplication $WebAppURL
 #Iterate through all Site Collections
 foreach($site in $WebApp.Sites) 
    {
 #Get all Webs with Unique Permissions - Which includes Root Webs
 $WebsColl = $site.AllWebs | Where {$_.HasUniqueRoleAssignments -eq $True} | ForEach-Object {
        
        $OrphanedUsers = @()
        
  #Iterate through the users collection
  foreach($User in $_.SiteUsers)
  {
      #Exclude Built-in User Accounts , Security Groups & an external domain "corporate"
   if(($User.LoginName.ToLower() -ne "nt authority\authenticated users") -and
                ($User.LoginName.ToLower() -ne "sharepoint\system") -and
                  ($User.LoginName.ToLower() -ne "nt authority\local service"-and
                      ($user.IsDomainGroup -eq $false ) -and
                          ($User.LoginName.ToLower().StartsWith("corporate") -ne $true) )
                   {
                    $UserName = $User.LoginName.split("\")  #Domain\UserName
                    $AccountName = $UserName[1]    #UserName
                    if ( ( CheckUserExistsInAD $AccountName) -eq $false )
                    {
                         Write-Host "$($User.Name)($($User.LoginName)) from $($_.URL) doesn't Exists in AD!"
                                    
                                    #Make a note of the Orphaned user
                                    $OrphanedUsers+=$User.LoginName
                    }
                   }
  }
        
        # ****  Remove Users ****#
        # Remove the Orphaned Users from the site
        # foreach($OrpUser in $OrphanedUsers)
        #   {
        #        $_.SiteUsers.Remove($OrpUser)
        #        Write-host "Removed the Orphaned user $($OrpUser) from $($_.URL) "
        #   }
        
 }
}


Solution for the list view issue with MS16-004 (January 2016 PU) for SharePoint 2013

Please refer to Stefan Gobner’s blog link below where he talks about the fix for the list view issue that was introduced with (MS 16-004) Jan 12,2016 security patch update .

https://blogs.technet.microsoft.com/stefan_gossner/2016/01/15/solution-for-the-list-view-issue-with-ms16-004-january-2016-pu-for-sharepoint-2013/


What to expect from Visio Service in SharePoint 2013?

VisiodrawingInSP480x412

Alright ,I happened to work on a small project where I was supposed to configure the “Visio Services” in SharePoint Server 2013 for my customers  and I’m writing this article to share my experience on  that . Now , I’m not going to talk about how to configure “Visio Services” in SharePoint 2013 as I guess that’s a pretty straight forward process unless you’re gonna deal with configuring external data sources .

I’m just gonna talk about what to expect from Visio services in SharePoint 2013 , once again this article is only gonna discuss about the bare minimum features in Visio Services and I’m not gonna take a deep dive into it and talk about stuff like  external data sources in this post .I’m saving that topic for a different post ….

1.What is Visio Service in SharePoint Server 2013?

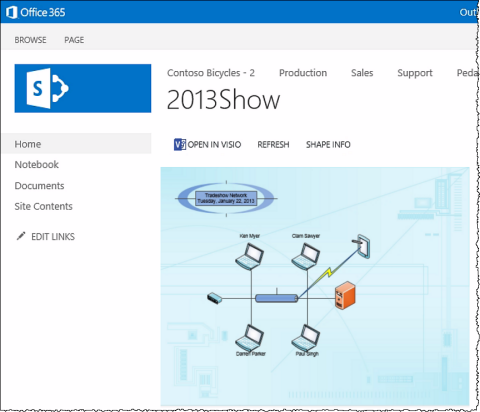
Visio Service in SharePoint Server 2013 can let users share and view Visio diagrams.

2.What’s the use and benefits of Visio Service?

Visio diagrams can be rendered by Visio Services and viewed in a Web browser. This lets users view Visio documents without having Visio or the Visio Viewer installed on the local computer. This also allows diagrams to be viewed on mobile devices. Basic exploration and navigation of these rendered diagrams are supported within the “Visio Web Access” Web Part. Page designers can configure the user interface and functionality of the Web Part.

3.What are the supported Visio file formats in SharePoint Server 2013?

Visio Services in SharePoint Server 2013 can render diagrams created in Visio 2010 or Visio 2013.

For Visio 2010,

Visio diagrams created in Visio 2010 must be created using Visio 2010 Professional or Visio 2010 Premium and must be published to a SharePoint site as a Visio Web drawing (*.vdw) file

For Visio 2013,

Visio diagrams created in Visio 2013 must be created by using Visio Professional 2013. The new standard diagram format in Visio Professional 2013 (*.vsdx files) can be rendered by Visio Services, along with the Web drawing (.vdw) format

4.Which file format is not supported by Visio service in SharePoint Server 2013?

(.vsd files) are not rendered by Visio Services and require Visio 2010 client app to be viewed. Similarly you won’t be able to open a Visio file with (.vsdx) file format using Visio 2010 client app and in order to open it you need to have the Service pack 2 for Visio 2010 installed in your PC.

5. Where can I upload a Visio file to view it?

Like any other Microsoft office files you can upload a Visio file to a document library in SharePoint for your users to view it and to share it with others.

6.What can’t be done using Visio services?

As already mention above “Visio services” in SharePoint can only allow users to view Visio files and hence you can’t edit a Visio file using Visio services. In order to edit a Visio file that is stored within SharePoint you should have the Visio client application installed in your PC.

7.What happens when I click on the “OPEN IN VISIO “button on a Visio file?

Visio 1

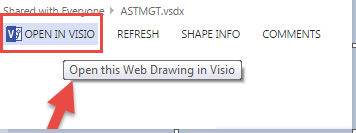
Clicking on this button will check whether you have the supported Visio client application installed in your PC and will open the Visio file using the Visio client app. You can edit the file if you want and save it back to SharePoint.

8.How to use the Visio Web Access Web Part to display a Visio file in SharePoint?

Please follow the steps below to make use of the “Visio Web Access web part”:

1.Make sure you have the “SharePoint Server Enterprise Site collection feature” activated under Site collection features. If you don’t have access to do this, please ask your Site collection administrator to this.

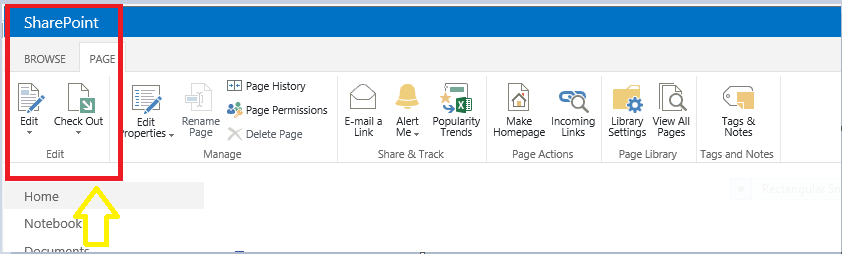
2.Make sure you have edit/design rights on the SharePoint site and click on the top ribbon on the SharePoint page and hit the “edit” button as shown in the image below.

Visio 2

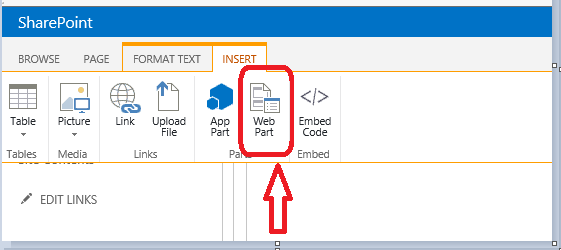
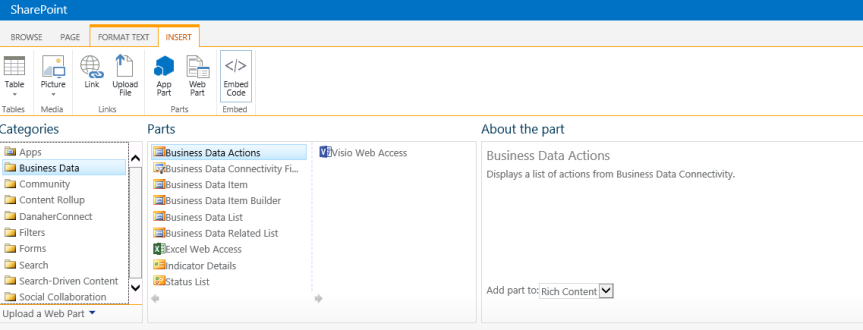
3.Once done, click on the “insert” button and try to add the “Visio Web Access web part” by clicking on “Web part” .Please check the screenshot below.

Visio 1

4.Choose the “Visio Web access” web part from the Business data category as shown in the image below.

Visio 3

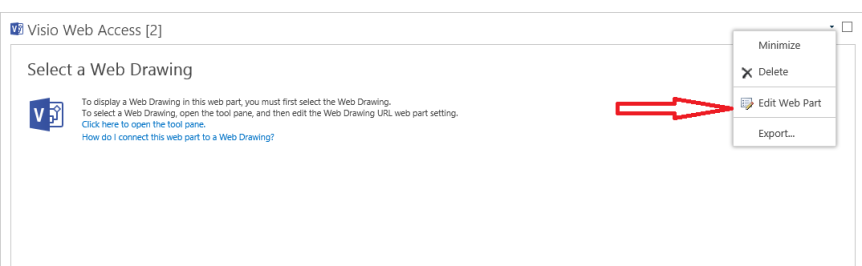
5.Once done clicking on the “Visio web access “web part, please choose where exactly you want the web part to be displayed in the page.

6.After adding the web part to your site, please click on the drop-down on the top right corner and choose the edit web part option as shown in the image below.

Visio 4

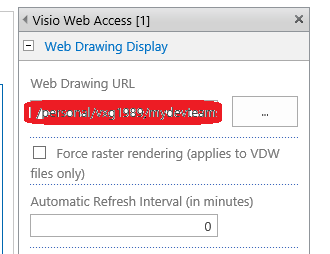
7. Choose the path of the Visio file by clicking on the “Web drawing url “ option on the tool pane .Make sure you have the Visio file already saved in a document library beforehand .

Visio 5

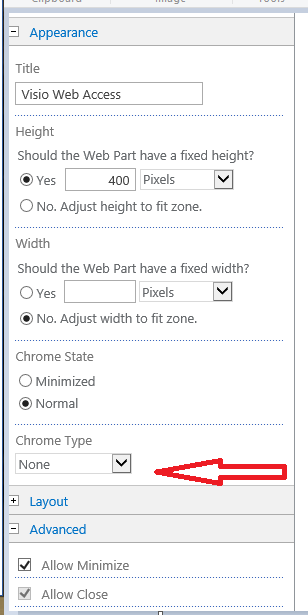
8. Once you’re done adding the “Visio file” go to the “Appearance” section below and choose “None” under “Chrome Type” as shown in the image below.

Visio 6

9. That’s it, you’re all done now. You should be able to see the Visio file being displayed on the SharePoint site.


Cleaning up disk space in SharePoint servers:

This article mainly discusses on the steps to be performed if you happen to come across a scenario where the “C drive”  is filled in the SharePoint server. In our environment we have the SharePoint Servers installed on the C drive and it’s very important that we maintain an adequate amount of free space in the C drive for SharePoint to function seamlessly.

Please use the WinDirStat tool to check the contents in the C drive .This will give you a detailed information about all the folders in the C drive and thus can be used to identify the folders which is larger in space.

WinDirStat Tool:

       WinDirStat is a disk usage statistics viewer and cleanup tool for various versions.

On start up, it reads the whole directory tree once and then presents it in three useful views:

  1. The directory list, which resembles the tree view of the Windows Explorer but is sorted by file/subtree size,

  2. The tree map, which shows the whole contents of the directory tree straight away,

  3. The extension list, which serves as a legend and shows statistics about the file types.

WinDirStat Tool download link :_ http://filehippo.com/download_windirstat/

Listed below are few scenarios that can contribute to the C disk space increase:

  1. The Windows update option is set as “ Download updates but let me choose whether to install them”

1

  If you choose this option in the “Windows update center” then the Windows update service will start to automatically download the updates from the Microsoft Update server and will be waiting for us to install it. The update files in this case will be automatically downloaded to the Software distribution folder(C:\Windows\SoftwareDistribution\Download) increasing the C drive space.

Fix:  Please make sure that this option is set to “Check for updates but let me choose whether to install them “. In this case the download center won’t download any updates from the Microsoft servers unless and until we manually click on the “download “button to download the updates. Hence this won’t result in unnecessary disk space increase.

2. Check whether “Diagnostic Logging” is set to “Verbose” in Central Administration. If that’s the case then the log file size will increase rapidly resulting in a disk space increase.

Note:  However, this depends on the path configured for “Diagnostic Logging “.If its set to some other drive other than the “C drive “ then there shouldn’t be any problem.

https://technet.microsoft.com/en-us/library/ee748619(v=office.14).aspx

23. Check the space consumed by the logged in user profiles. This can be done by navigating to System properties à User profiles. Check whether the space consumed by all the user profiles is normal .If you see any abnormal increase in the space consumed by any user profile then please go ahead and delete that profile by selecting that user profile and clicking on the “delete” button.

Note: If you delete the user profile from “System properties” then this will remove the user profile from the registry as well. The next time someone logs into the server with that account, a new user profile will be created for that account.

4

Steps for troubleshooting “My Tasks error in SharePoint 2013 My site“

This post is intended for those who are seeing an error as shown in the image below while accessing the “My Tasks” link in your SharePoint My site. As you all know for yourself the “My Task” link which you see in your SharePoint My site is driven by the “Work Management Service application” and it’s necessary to ensure that the WMA service is turned on and configured to run successfully. While I say the WMA service is the one that takes care of the “My Task “list that’s not the only component on which the “My Task “  list relies upon . There are couple of other dependencies such as “Search crawl” and “User Profile service” which takes care of the “My Task “list.

The “My Task” list in your SharePoint My site can display three different type of tasks ….

  1. The tasks assigned to you from Outlook ( this is possible only when you’re running Exchange Server 2013 and SharePoint Server 2013…they both need to be running on 2013 version )
  2. The tasks assigned to you from MS Project if you have that running in your environment and have configured that to sync with SharePoint.
  3. The tasks assigned to you using the default SharePoint “Task list “.

The Work Management Service Application provides functionality to aggregate tasks to a central location on SharePoint Server:

  1. Users get the possibility to view and track their to-dos and tasks.
  2. Tasks can be cached to a user’s personal site.
  3. Tasks can sync to Outlook where users can edit them wherever they have access to Outlook.
  4. Tasks can be aggregated from Exchange, Project Server and SharePoint.
  5. Based on ‘Provider model’ so that other systems can be integrated in the future.

Now, if the WMA (Work Management Service Application ) is not configured properly then you might end up seeing an error as shown in the figure below and you need to perform the below mentioned troubleshooting steps to get this fixed.

My task

Troubleshooting steps to fix this error:

  1. The Work Management Service Application should use the same account as the web application.
  2. Verify whether the service account for Work Management Service application has full control permissions on the User Profile Service application on Central Administration.
  3. Verify whether the service account for Work Management Service application has full control permissions on the Work Management Service application on Central Administration.
  4. Ensure that you do the above mentioned steps on the instance of the service application which is connected to the My site web application.
  5. Grant “Full Control” to the work management service account on the User Profile service application using “administrators” button on the ribbon.
  6. In addition to that grant “Full control” to the work management service account on the user profile service application using the “permissions” button on the ribbon.
  7. Ensure that the work management service account is given appropriate permissions in the “My site” content database.
  8. Check whether the service account of the Work management service application is equal to the identity of the web application pool because this could be an issue with the permissions too.
  9. Restart the Work management service and the user profile service on the servers.
  10. Perform an IIS reset.
  11. If this didn’t help ,please run the below mentioned PowerShell command

Run the PowerShell command to grant content access to a process account to the MY SITE web application:

  • $webApp = Get-SpWebApplication [URL of the MYSite web application
    $webapp.GrantAccessToProcessIdentity(“[Work Management account]”)
  • Note: this should do three things:
  •      Add the work management account to the user policy of the web application
  •      Add the work  management account to the config database with the permissions of     WSS_Content_Application_Pools
  •      Add the work management account to the My Site content database with the permissions of SPDataAccess.

12. Perform an IIS reset once done and also restarting the server and critical services is recommended.

IMPORTANT:

The tasks are stored in a hidden list called “WmaAggregatorList_User” at the personal site of individual users.

WMA aggregates tasks from SharePoint lists created in SharePoint Server (internally called TasksWithTimelineAndHierarchy-171) plus upgraded SharePoint lists from earlier versions of SharePoint (internally called Task-107 or GanttTasks-150).


Patching Distributed Cache in SharePoint Server 2013

The Distributed Cache plays an important role in SharePoint Server 2013 as it’s a key component for performance and caching. Distributed Cache is not a SharePoint service, it’s a standalone service called AppFabric 1.1 for Windows Server. SharePoint Server 2013 requires Windows Server App Fabric and the App Fabric 1.1 CU 1 (KB 2671763) to be installed .It takes care and improves the performance of the following features in SharePoint Server 2013:

  • Authentication
  • Newsfeeds
  • OneNote client access
  • Security Trimming
  • Page load performance

This document explains in detail about the procedure to be followed for patching the App Fabric component in Windows Server. An App Fabric Cumulative Update is exactly the same as a CU for SharePoint, it contains all previous CUs. So if we install CU6 you also get CU1 to CU5 installed.

List of App Fabric 1.1 Cumulative Updates:

Note: If you want to identify the version of App Fabric installed in your machine and also the CU version which is installed, please go to the “Programs and Features” section in Control panel and take a look at installed updates.

AF

  1. The version number would be listed there.
  2. The installed CU would also be listed there with the corresponding KB number.


System Requirements:

  1. Windows Server 2012/2012 R2 32-bit or 64-bit.
  2. Before applying the cumulative update, make sure you have administrative privileges on the computer where you’re installing this software.
  3. To apply this cumulative update package, we must have AppFabric 1.1 for Windows Server installed. Additionally, we should also have the Microsoft .NET Framework 4.5 installed.
  4. A system restart is required after installing the Cumulative Update.

Now let’s take a look on the steps to be followed for installing the CU on a server running SharePoint 2013.

Listed below are the steps to be followed for applying the App Fabric CU’s:

  1. Please download the CU from Microsoft download center .I’m considering the CU 6 here. Download link for App Fabric 1.1. CU 6 :_ https://support.microsoft.com/en-us/kb/3042099
  2. Once done downloading the cumulative update package to the server in which you’re going to run it, please run the below mentioned to gracefully shutdown the service instance on the local machine.

Stop-SPDistributedCacheServiceInstance –Graceful

  1. This command will gracefully shutdown the service instance on the local machine. A graceful shutdown means that all the cache items will be distributed to the other service instances in the cache cluster.
  2. Wait for minutes to make sure that all the cached items has properly propagated to the other servers.
  3. Now it’s time to run the package, run the patch executable and follow the instructions. It’s basically a next, next, finish procedure. The App Fabric 1.1 CU 6 doesn’t need any specific change to be made on the exe.config  file like how CU 3 did. So please proceed further by clicking next.
  4. Once you’re done installing the CU, please restart the computer.
  5. When the machine is back online, please run the below mentioned command to start the service instance again. The App Fabric Windows Service will be disabled when its shutdown and we are not supposed to start it manually. Please use the below mentioned PowerShell command to do that.

$instanceName =”SPDistributedCacheService Name=AppFabricCachingService”

$serviceInstance = Get-SPServiceInstance | ? {($_.service.tostring()) -eq $instanceName -and ($_.server.name) -eq $env:computername}

$serviceInstance.Provision()

  1. This command will turn on the Distributed Cache service instance on the machine and will start the AppFabric Windows Service.
  2. Once you’re done completing all the above mentioned steps you’re now ready to move on to the next machine.
  3. Please allow some time for the newly patched cache service instance to catch up.
  4. Finally run the below mentioned commands to check if the Distributed cache service is back online.

To see what  Distributed cache-servers SharePoint thinks there are run this:

Get-SPServiceInstance | ? {($_.service.tostring()) -eq “SPDistributedCacheService              Name=AppFabricCachingService”} | select Server, Status

For AppFabric run this from a machine already in the cache-cluster:

Use-CacheCluster

Get-CacheHost

  1. This will confirm whether the Distributed cache service is back online from a SharePoint as well as from an App Fabric perspective.
  2. For any reason, if you don’t see the status of the servers as “online”, please go ahead and run the below mentioned command to remove and re-add the Distributed Cache Service Instance.

To remove:  Remove-SPDistributedCacheServiceInstance

To Add   :    Add-SPDistributedCacheServiceInstance

  1. Run the remove command first and then wait for couple of minutes and then run the add command.
  2. At last, once everything looks fine you’re good to go ahead and patch the second server following the same steps mentioned above.

Troubleshooting Distributed Cache in SharePoint Server 2013

The Distributed Cache plays an important role in SharePoint Server 2013 as it’s a key component for performance and caching. Distributed Cache is not a SharePoint service, it’s a standalone service called AppFabric 1.1 for Windows Server. SharePoint Server 2013 requires Windows Server App Fabric and the App Fabric 1.1 CU 1 (KB 2671763) to be installed .It takes care and improves the performance of the following features in SharePoint Server 2013:

  • Authentication
  • Newsfeeds
  • OneNote client access
  • Security Trimming
  • Page load performance

It’s always quite comfortable to manage Distributed Cache in SharePoint Server 2013 using PowerShell and the same applies while troubleshooting it also .This articles discusses on the useful PowerShell commands that can be used to troubleshoot Distributed Cache service in SharePoint Server 2013.

                     Command                    Explanation
                  Use-CacheCluster This is used to enable cache administration via PowerShell.
                  Get-CacheHost This would get you the list of every server in the cluster as well as the state of the service on that server.
      Get-CacheHostConfig <HostName> <Port> This would give you the general configuration details about a specific host in the cache cluster. All Windows Server AppFabric cache hosts use TCP/IP to communicate with each other and support the cache cluster. The SharePoint distributed cache is an AppFabric cache behind the scenes and  it uses the default AppFabric ports for server to server communication. These ports should be allowed through your firewalls for the cacheservice  to function correctly.
           Get-CacheAllowedClientAccounts This would tell which accounts/groups have rights to connect to the cache cluster as clients. This seems to be the standard configuration in SharePoint 2013.
                   Get-Cache Gets a listing of all the default caches in the farm. All caches have the Id (Guid) of the farm appended to the name.
       Get-CacheConfig <CacheName> Gives you the details about a specific cache instance
         Restart-CacheCluster This will restart the distributed cache service on all servers in the cluster and it will also clear the contents of the cache.
  Stop-SPDistributedCacheServiceInstance -Graceful This will stop the distributed cache service on an individual machine. The Graceful parameter will allow the cache service to migrate cached items to another host in the cluster.
 Remove-SPDistributedCacheServiceInstance Removes a cache host from the cluster. The best practice is to stop the cache service before you remove it.
  Add-SPDistributedCacheServiceInstance This command will add the cache host back to the cluster. If there is more than one host in the cluster, it will take a few minutes for the service to start and for any cached items to be synchronized to the new host.
   Get-CacheClusterHealth  Returns health statistics for all of the named caches in the cache cluster.
    Clear-CacheLogging  This command is used to disable all logging for the current admin
    Get-CacheStatistics Gives the statistics for a Cache or for a Cache Host.
     Start-CacheHost This would start the Caching Service on the specified cache host. If no cache hosts are up in the cache cluster, use the Start-CacheCluster command instead
     Stop-CacheCluster Stops the Caching Services on all cache hosts in the cluster.
    Stop-CacheHost Stops the specified cache host service.
   Test-CacheConfigAvailability Tests the connection with the cache cluster configuration store. This command will throw an exception if the connection fails.

In addition to the commands listed above there are couple of other things which you’re supposed to know while troubleshooting Distributed Cache Service/App Fabric.

  1. Query AppFabric for Caching Servers/Statuses :

To get the list of servers that AppFabric thinks there should in the cluster run “Get-CacheHost” (use “Use-CacheCluster” if necessary). This command gives us the list of the servers and also their availability status as far as AppFabric’s concerned.

  1. Query SharePoint for Caching Servers/Statuses :

To do the same for SharePoint, run:

Get-SPServiceInstance | ? {($_.service.tostring()) -eq “SPDistributedCacheService Name=AppFabricCachingService”} | select Server, Status

This will give you the same kind of data but from SharePoint perspective.  Make sure all the servers show the status as “Online” but more importantly that both SP & AF have the same names between them. If you see “cacheHostInfo is null” somewhere then it’s quite likely there’s a mismatch here.

What if one or more App Fabric Service Instance is disabled?

Run the below mentioned PowerShell command …..

Get-SPServiceInstance | ? {($_.service.tostring()) -eq “SPDistributedCacheService Name=AppFabricCachingService”} | select Server, Status

If any status shows as “disabled” then we have a problem and in that case please perform the below mentioned steps:

  1. Remove the service-instance (see above).
  2. Try re-adding it with Add-SPDistributedCacheServiceInstance
  3. Verify the new service-instance is “online”.

If for some reason Add-SPDistributedCacheServiceInstance doesn’t give you a healthy endpoint, try running Remove-SPDistributedCacheServiceInstance then Add-SPDistributedCacheServiceInstance on the server in question. If you still can’t get a healthy endpoint then it needs some serious consideration.


Command to Stop and Start the Distributed Cache service:

To start the Distributed Cache service by using Windows PowerShell:

At the Windows PowerShell command prompt, run the following command:

$instanceName =”SPDistributedCacheService Name=AppFabricCachingService”

$serviceInstance = Get-SPServiceInstance | ? {($_.service.tostring()) -eq $instanceName -and ($_.server.name) -eq $env:computername}

$serviceInstance.Provision()

To stop the Distributed Cache service by using Windows PowerShell :

At the Windows PowerShell command prompt, run the following command:

$instanceName =”SPDistributedCacheService Name=AppFabricCachingService”

$serviceInstance = Get-SPServiceInstance | ? {($_.service.tostring()) -eq $instanceName -and ($_.server.name) -eq $env:computername}

$serviceInstance.Unprovision()