
Alright are you one of those guys who manages the SharePoint infrastructure in your firm all alone? Do you think you’re really doing a good job in monitoring all the mission critical services such as Search, User profile services, Managed metadata, BI & BCS? Well if you’re already doing that then kudos to you but if you’re not then you definitely know how messier things could get if they break and you didn’t notice that .
So with that being said I’m going to discuss about monitoring Search service in this post. You see, the problem with search is, it always needs some extra caring and boosting when compared to other SharePoint services. If you just deploy search service and then test it and say “Alright…I’m done deploying search …It works fine, my users can get what they want and I’m a happy person now”…. then you’re making a very bad mistake .If there is any other application you treat this way then I just can’t think about how bad the aftermath would be.
Well ,I don’t mean to scare you guys ,but being SharePoint practitioners don’t you guys think Search needs a little more extra caring ? I would say yes it does and the purpose of this post is to let you know about the inbuilt tools that SharePoint search service offers to diagnose/monitor it and how you guys can start doing that if you’re not doing that already.
As you all know, Search is really mission critical for any successful SharePoint based intranet portal and it’s the job of the SharePoint engineer (you) to perform the below mentioned steps to check and ensure that the search service is running fine without any issue.
Note: It probably won’t be a good idea to do all these steps on daily basis unless you really want to spend couple of hours every day just in monitoring search .However, it would still make sense to perform step 2,7 & 14 everyday just to make sure that search is running fine . You can perform all the other steps on a weekly basis.
Alright now let’s get into the real meats and potatoes…..
1.Access the Search service application from the Central administration using the Farm admin account .(If you’re not given Farm admin rights, make sure you’re atleast given Search service application administration rights )
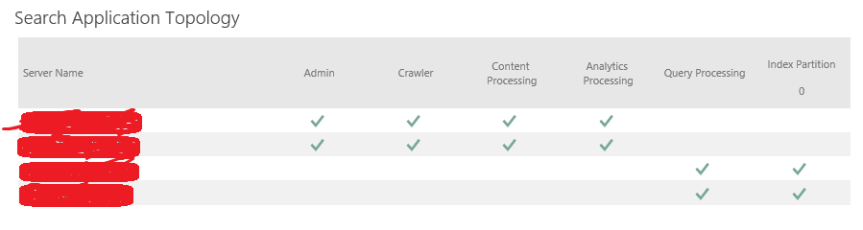
2. Once you’re in the “Search Administration “ page take a look at the Search Application topology section and make sure all the search components shows up green . Take a look at the screenshot below.
3. Once you confirmed that everything shows up green, now it’s time to take a look at the Crawl For this navigate to the “Diagnostics section” in the Search administration page as shown in the screenshot below and take a look at the “Crawl Logs “ .

4. The search crawl logs can help you identify the below mentioned three things ….
a) Whether crawled content was successfully added to the index
b) Whether it was excluded because of a crawl rule
c) Whether indexing failed because of an error.
5. Make sure you take a look at everything and ensure that the results are fine.
6. Also you get different views such as (Content Source, Host Name, Crawl History, Error Breakdown, Databases, URL View) for the Crawl logs in the diagnostics section. Take a look at all these sections and ensure that the results are fine .Check for Errors and see if the count is high, if yes take a look at what’s triggering the errors. I made a different post on working with Search crawl logs before, please click here to access it.
7. Once you’re done with that, take a look at the “Crawl Health reports “and check each and every section there. You get the reports on all the below mentioned areas.
- Crawl Latency
- Crawl Queue
- Crawl Freshness
- Content Processing Activity
- CPU and Memory Load
- Continuous Crawl

8. You also get to apply filters so that you can get a customized view.
9. Now let’s take a look at what information each and every criteria has under the Crawl health reports.
A) Crawl Rate
For a specified time interval, shows a graph and a summary of the following:
- Number of content items crawled per minute. This includes:
- Total content items
- Modified items. These are content items that were changed and re-crawled.
- Not modified items. These are content items that were not changed and were not crawled.
- Security items. These are content items for which the security attributes were changed.
- Deleted items. These are content items that were deleted from the content source and which must also be deleted from the index.
- Average number of other crawl actions that were performed per minute. This includes:
- Retries (crawl retries)
- Errors (crawl errors)
You can filter this report by:
- Start date/time
- End date/time
- Content sources (for example, Local SharePoint sites)
- Machine
B)Crawl Latency:
For a specified time, shows a graph of the number of items that form the crawl load, for each of the following:
- In Crawler Queue
- Waiting to submit to content processing
- Submitted to content processing
- Waiting to Commit (SQL)
You can filter this report by machine only.
For a specified time interval, also shows a graph and a summary of the crawl latency; the amount of time in milliseconds that each content item is in each of the following subsystems in the feeding pipeline:
- Crawler
- Protocol handler (PH)
- Repository
- SQL Time
You can filter this report by:
- Start date/time
- End date/time
- Content source (for example, Local SharePoint sites)
- Machine
10. Pay close attention to the “Latency “and “CPU and Memory Load” section and make sure the graph looks fine without any abnormal spikes. You also have an option to apply filters, if necessary apply filters and take a look at all the search components.
11. Finally navigate to the crawling section as shown in the figure below and take a look at the content sources.
C) Crawl Queue:
For a specified time interval, shows the number of items in the following two crawl queues:
- Links to process. This is the number of uncrawled URLs that are queued to be crawled.
- Transactions queued. This is the number of crawled URLs that are queued to be processed in the crawl pipeline.
You can filter this report by start date/time and end date/time.
D) Crawl Freshness:
For a specified time interval, shows the freshness of the content that was being indexed by the search system. The last modified time stamp of each document is compared with the time specified in the graph. You can view the freshness of the content as follows:
- Less than 1 month ago
- Less than 1 week ago
- Less than 1 day ago
- Less than 4 hours ago
E) Content Processing Activity:
For a specified time interval, shows the amount of time that was spent in content processing for:
- Content sources
- Machines
- Content processing components
- Content processing activity
The graph shows the amount of time that was spent in various content processing activities, such as:
- Linguistics processing
- Document parsing
- Document summary generation
- Indexing
You can filter this report by:
- Start date/time
- End date/time
- Content source
- Machine
- Content processing component name
- Processing activity
F) CPU and Memory Load:
For a specified time interval, shows the percentage of CPU used, the memory use in megabytes and the system overview for these processes:
- MSSDmn
- MSSearch
- NodeRunner
- Timer
You can filter this report by:
- Machine
- Start date/time
- End date/time
G) Continuous Crawl:
For a specified time interval, shows the time (in milliseconds) that the processes took with an overlay of discovery time (in minutes) for:
- Time In Links Table
- Time In Queue Table
- Crawler Time
- PH (Protocol Handler) Time
- Repository Time
- Content Pipeline Time
- SQL Time
You can filter this report by:
- Content sources
- Start date/time
- End date/time
- Once you’re done checking the “Crawl Health Reports” now it’s time to take a look at the “Query Health reports “.For this click on the “Query Health Reports “link under Diagnostics section as shown in the image below.

11. Here you will get reports based on the below mentioned criteria’s and you can filter them as well as per your need.
- Trend
- Overall
- Main Flow
- Federation
- SharePoint Search Provider
- People Search Provider
- Index Engine
A)Trend (Query Latency Trend):
For a specified time interval, shows the query latency (in milliseconds) by percentile. For example, five percent of all queries had lower latency than the latency indicated by the fifth percentile line in the graph.
The graph includes an overlay of query rate during the specified time interval, where query rate is the number of queries per minute for which the query object model (OM) returned results.
The graph also includes an overlay of the crawl rate and the partial update rate for analytics.
You can filter this report by:
- Start date/time
- End date/time
- Client type
- Result page (search results page), which only shows if verbose logging is enabled.
By default, the graph displays data for all result pages in the Search service application.
B)Overall (Overall Query Latency):
For a specified time interval, shows the query rate (number of queries per minute) with an overlay of query latency in milliseconds.
Shows the query latency in each of the following areas:
- Object model. This is the time it takes to communicate between the web server and the back-end.
- This is the time it takes to transform the query, perform index look up, process results (such as removing duplicates), and return results to the object model.
You can filter this report by:
- Start date/time
- End date/time
- Client Type
- Result page (search results page), which only shows if verbose logging is enabled.
By default, the graph shows data for all result pages in the Search service application.
C)Main Flow (Default SharePoint Flow Query Latency):
For a specified time interval, shows the query latency (in milliseconds) in the main flow for query and result processing. This indicates how fast the system processes a query and returns results to the web server. The graph shows the query latency for:
- Query rule condition matching
- Query transformation
- Query routing
- Result mixing
- Layout selection
- Query logging
- Other
The graph includes an overlay of query rate during the specified time interval.
You can filter this report by:
- Start date/time
- End date/time
- Client Type
D)Federation (Federation Query Latency):
For a specified time interval, shows the query latency in milliseconds for all result source types.
By default, the graph shows data for all result pages in the Search service application.
You can filter this report by:
- Start date/time
- End date/time
- Client type
- Result page (search results page), which only shows if verbose logging is enabled.
- Source type (result source type):
- Best Bet Provider
- Exchange Search Provider
- Local People Provider
- Local SharePoint Provider
- OpenSearch Provider
- Personal Favorites Provider
- Remote People Provider
E)SharePoint Search Provider (Local SharePoint Search Flow Query Latency):
For a specified time interval, shows the query latency (in milliseconds) for all queries that are processed by the local SharePoint search provider. The graph shows the query latency for:
- Keyword parsing
- Linguistics
- Recommendations Security Trimming
- Security token construction
- Index lookup
- Result type processing
- Custom security trimming
- Summary generation
- Other
The graph includes an overlay of query rate during the specified time interval.
You can filter this report by:
- Start date/time
- End date/time
- Client type
F)People Search Provider (People Search Flow Query Latency):
For a specified time interval, shows the query latency (in milliseconds) for all queries that are processed by the local people search provider. The graph shows the query latency in each of the following areas:
- Keyword parsing
- Linguistics
- People pre-processing
- Security token construction
- Index lookup
- Result type processing
- Custom security trimming
- Summary generation
- Other
The graph includes an overlay of query rate during the specified time interval.
You can filter this report by:
- Start date/time
- End date/time
- Client type
G)Index Engine (Index Engine Query Latency:
For a specified time interval, shows the query latency in milliseconds for each index server that you filter on. By default, the graph shows data for all result pages in the Search service application. You can filter this report by:
- Start date/time
- End date/time
- Index server (a computer that hosts at least one index partition)
- Result page (search results page), which only shows if verbose logging is enabled.
The graph includes an overlay of the index lookup time for the specified time interval in the past. Index lookup time is the average amount of time during a given minute that it took the index engine to return results. The index lookup time applies only to queries for which the index engine returned results.
13. Once you’re done with the “Query Health Reports “, now it’s time to take a look at the “Usage reports “in the diagnostics section. Similarly as the other reports, you can also filter these reports based on different criteria’s.
Note: The “Query Health” Reports can also be useful if you want to do some analysis on how your users are using search? What do they search for? What is the mostly searched content? etc. …This report can also be useful for you to enhance search as per your user’s search queries. Also if your users yell at you saying, “Search is really awful, I’m not able to find what exactly I need “…Then in those scenarios you probably need to do some tweaking with the Query Health reports. You can also consider implementing “Query Rules” if necessary based on the reports.
A) Number of Queries:
This report shows the number of search queries performed. Use this report to identify search query volume trends and to determine times of high and low search activity.
B) Top Queries by Day:
This report shows the most popular search queries. Use this report to understand what types of information visitors are seeking.
C) Top Queries by Month:
This report shows the most popular search queries. Use this report to understand what types of information visitors are seeking.
D) Abandoned Queries by Day:
This report shows popular search queries that received low click-through. Use this report to identify search queries that might create user dissatisfaction and to improve the discoverability of content. Then, consider using query rules to improve the query’s results.
E) Abandoned Queries by Month:
This report shows popular search queries that received low click-through. Use this report to identify search queries that might create user dissatisfaction and to improve the discoverability of content. Then, consider using query rules to improve the query’s results.
F) No Result Queries by Day:
This report shows popular search queries that returned no results. Use this report to identify search queries that might create user dissatisfaction and to improve the discoverability of content. Then, consider using query rules to improve the query’s results.
G) No Result Queries by Month:
This report shows popular search queries that returned no results. Use this report to identify search queries that might create user dissatisfaction and to improve the discoverability of content. Then, consider using query rules to improve the query’s results.
H)Query Rule Usage by Day:
This report shows how often query rules trigger, how many dictionary terms they use, and how often users click their promoted results. Use this report to see how useful your query rules and promoted results are to users.
I)Query Rule Usage by Month:
This report shows how often query rules trigger, how many dictionary terms they use, and how often users click their promoted results. Use this report to see how useful your query rules and promoted results are to users.
14. Finally as a best practice it would also make sense to take a look at the search content sources and ensure that the crawls are running fine (This step goes without saying and I guess you would be doing this in the initial phase of troubleshooting/monitoring SharePoint search).

15. Ensure that all the crawls are running fine and make sure the time difference between the previous and the next crawl is running on equal time intervals .If you see some abnormal time difference between the previous and the next consecutive crawl then obviously something is wrong and it would be really worthwhile to take a look at the crawl logs.
Thanks for reading this post .Happy SharePointing!!!

Vignesh,
Good insights..
Thx Neel
http://neelb.wordpress.com
LikeLike