User guide to enroll your iOS Device with Microsoft Intune and to configure your Outlook mobile app

31.png

If your company or school uses Microsoft Intune for Mobile Device Management and Mobile application management, you can enroll your iOS device to get access to company email, files, and other resources. When you enroll your devices, your IT department can manage the resources, keep them secure, and give you the freedom to use your preferred device to get your work done.

The steps mentioned below should be followed by all users who hold an Apple device to enroll their iPhone/iPad with Microsoft Intune so that your device can be managed by Microsoft Intune.

Note:

  • Please make sure that your device has a good Wi-Fi connectivity or a good 3G/4G connection before doing the below mentioned steps.
  • Please ensure that your iOS version is not less than 8.0

Detailed steps:

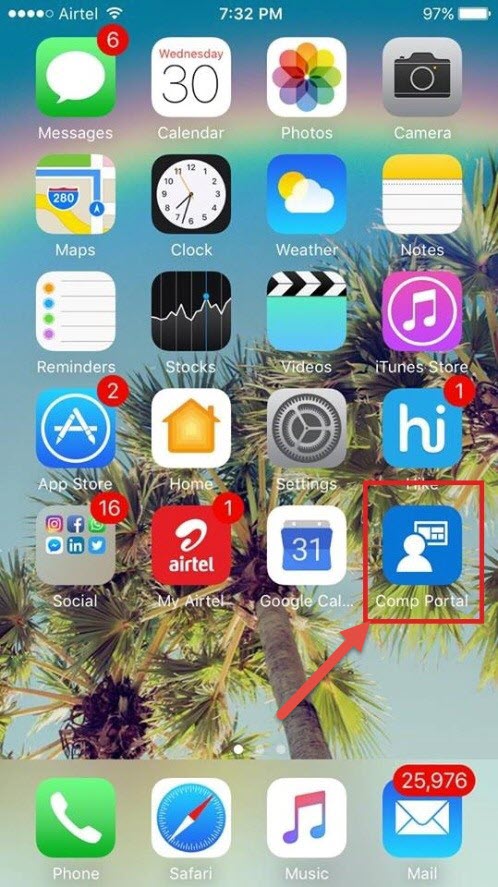
  1. Open the App Store and search for Microsoft Intune company portal app as shown in the image below.

1

  1. Download and install the Microsoft Intune Company Portal app. Once done you should be able to see it in your Apple device home screen as shown in the image below.

2.jpg

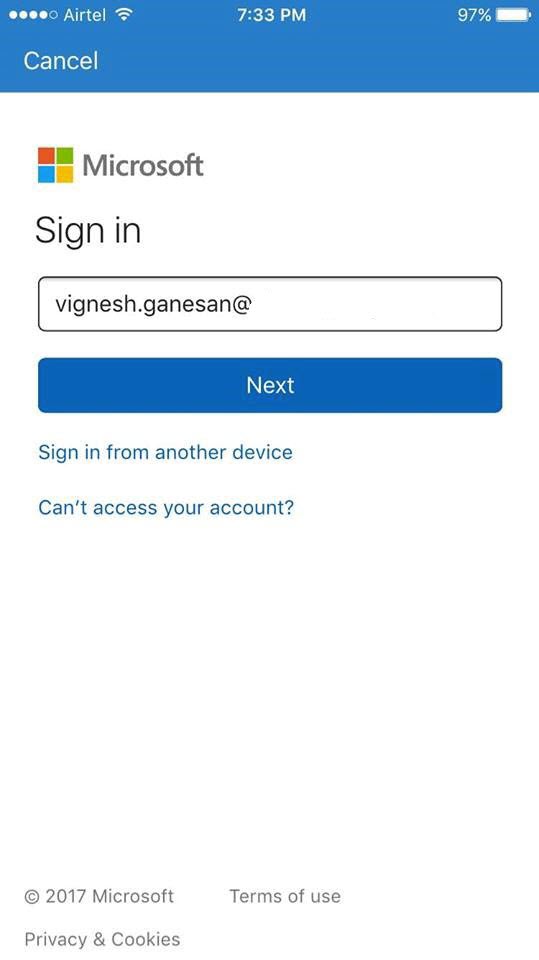
3. Open the Intune company portal app and sign in with your Office 365 UPN address as shown in the image below.

3

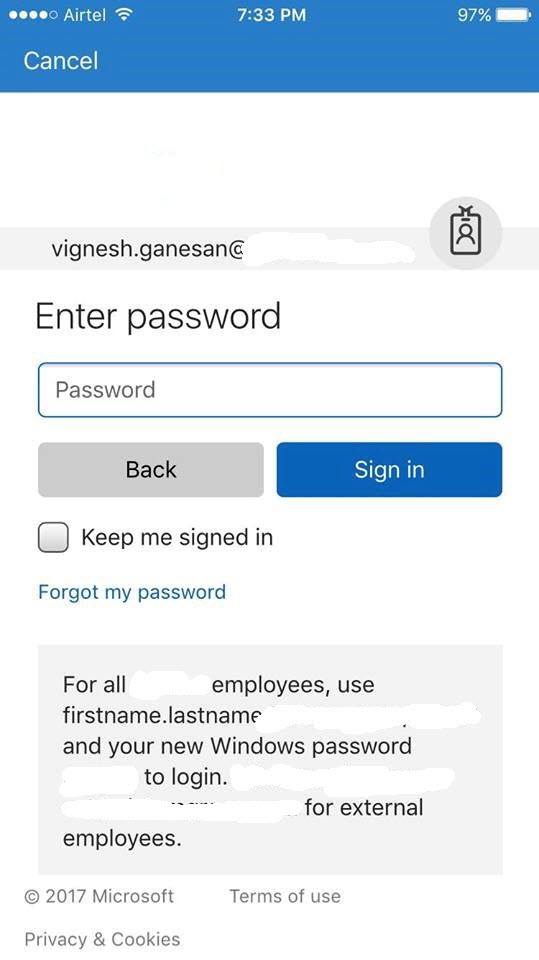
  1. Enter your Office 365 UPN password as well as shown in the image below.

4

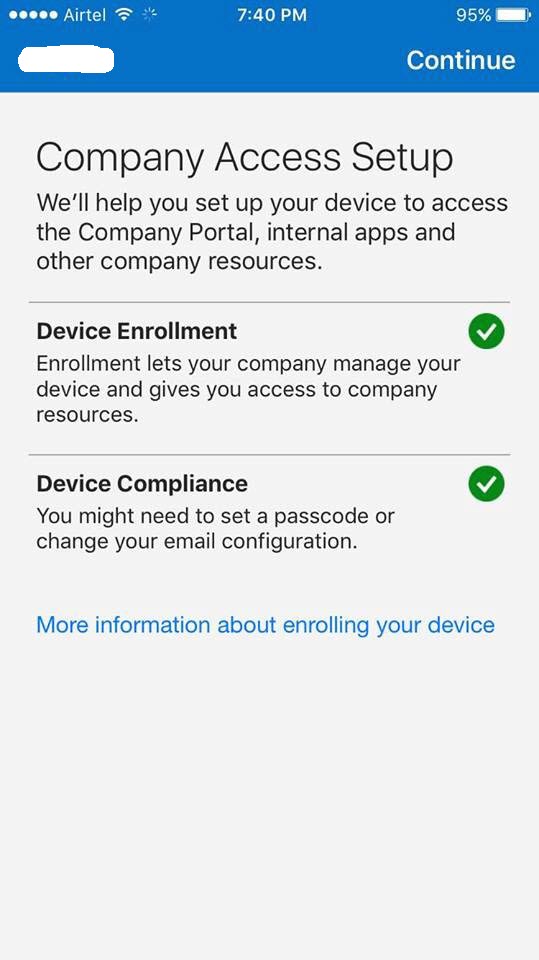
5. Once done you would be redirected to the Company Access setup page as shown in the image below.

5

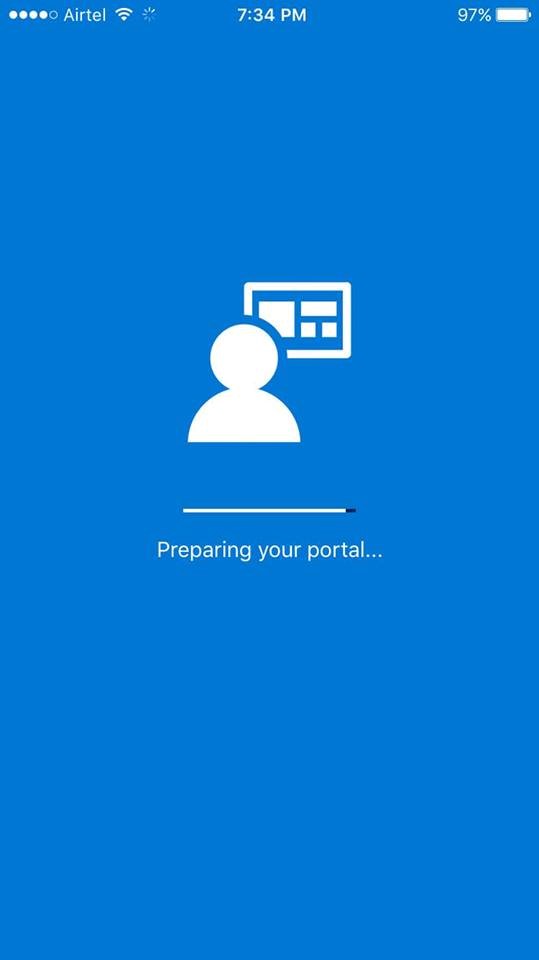
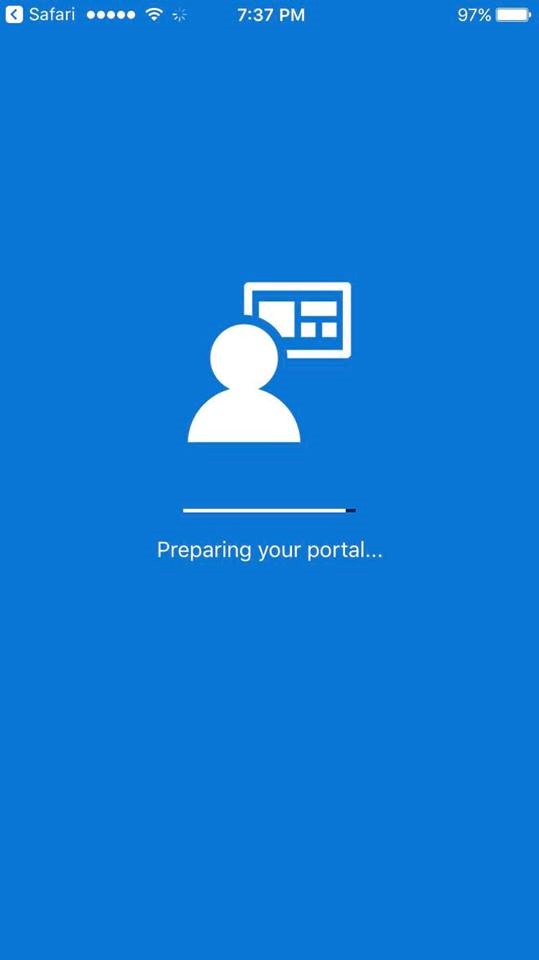
6. Click on Begin on the top right corner of the screen and this will start preparing your portal as shown in the image below.

6

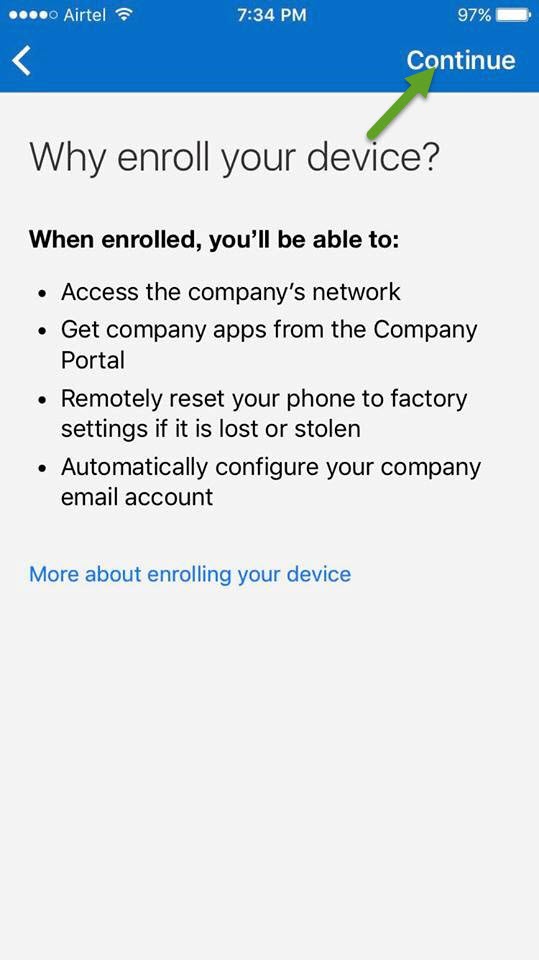
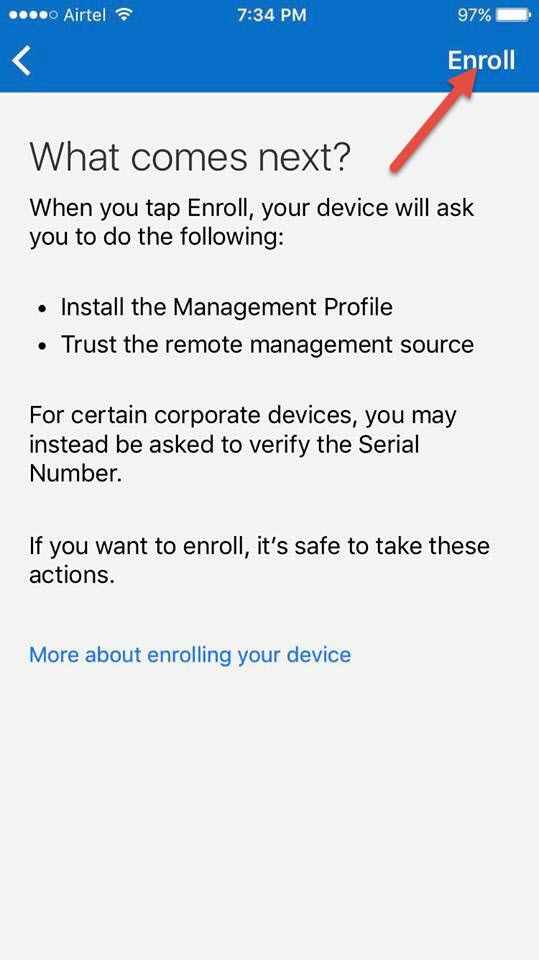
7. You would be taken to a screen which describes why you need to enroll your device , you can go through the guidelines if required and click on continue as shown in the image below.

7

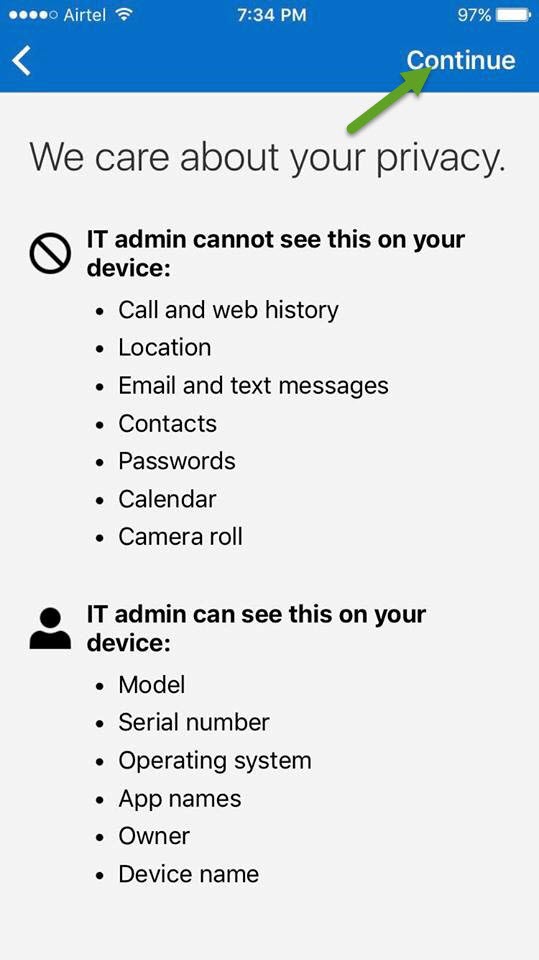
8.The next screen will tell you what can be viewed by your IT Admin once the device has been enrolled with Intune and what cannot be viewed by the IT Admin. You can go through all the details if you’re concerned about your privacy and click on continue.

8

9. Now the next screen will ask you to click on “Enroll” to enroll your device with Intune, please go ahead and click on Enroll.

9.jpg

  1. Once done the next screen will prompt your for Multi-Factor Authentication which is nothing but an extra layer of security just to ensure that your connection is legitimate.

10.jpg

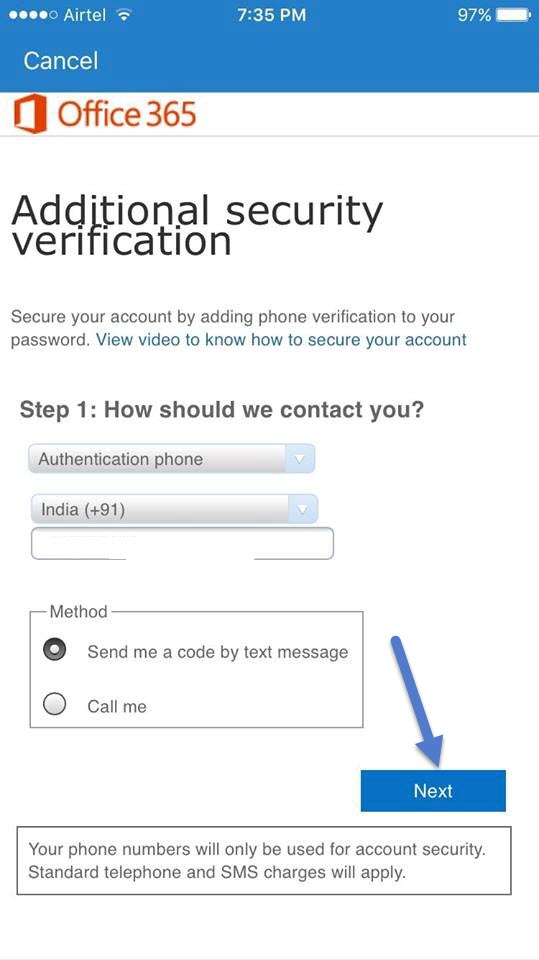
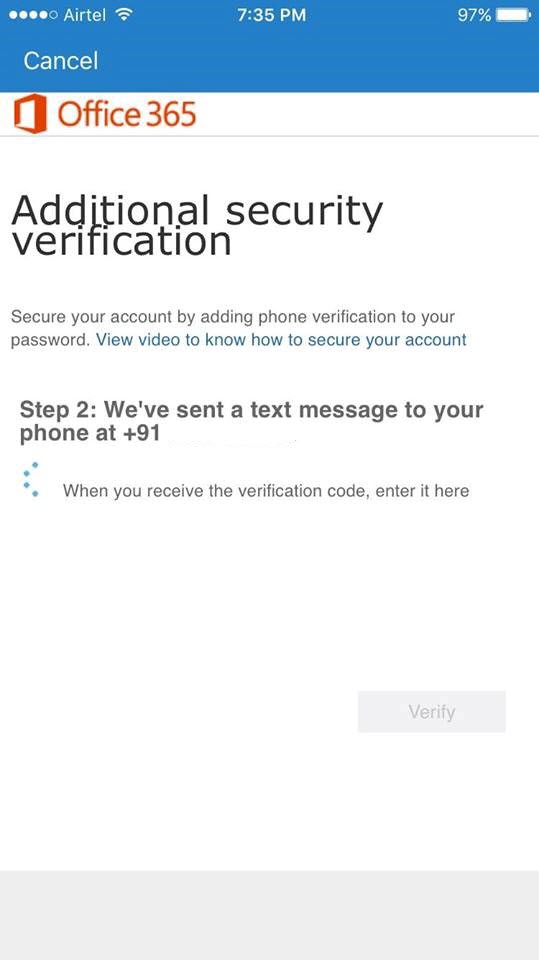
11. Based on which option you chose above you would either get a text message or a phone call with a passcode, please go ahead and enter the code correctly and click on next as shown in the image below.

11.jpg

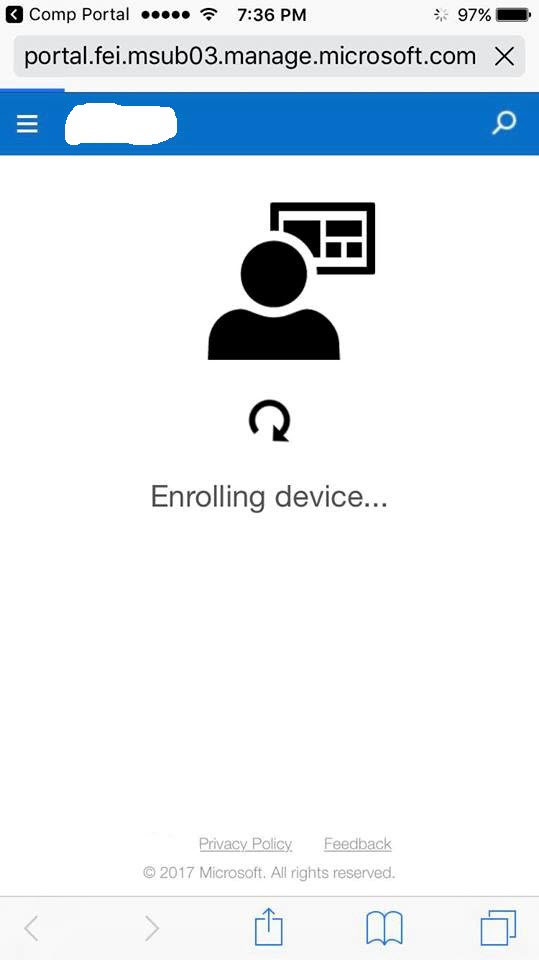
12. Once done the device enrollment process will start and you would see the below mentioned screen.

12.jpg

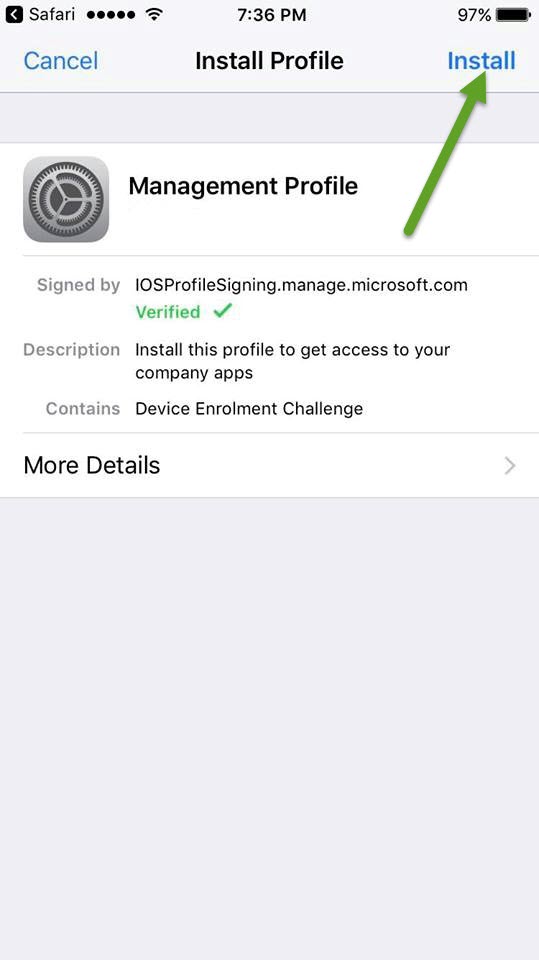
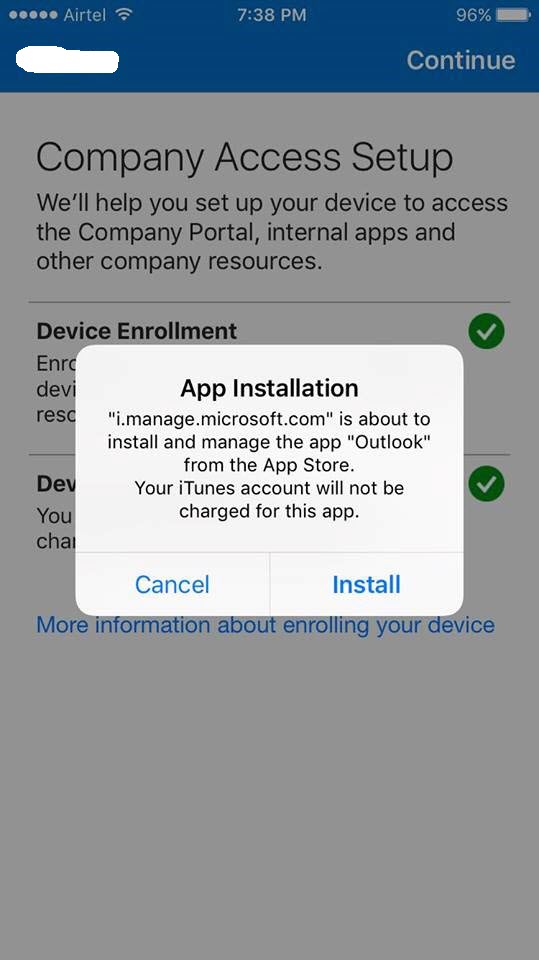
13. After that would get the below mentioned screen asking you to install the profile for Mobile Device management, please go ahead and click on install as shown in the image below .

13.jpg

14. You would also get the installation prompt in the next few screens, please go ahead and click on install on the next screens. Once done if you already have a passcode for your device it would prompt for that, please key-in that passcode as shown in the image below .

30.jpg

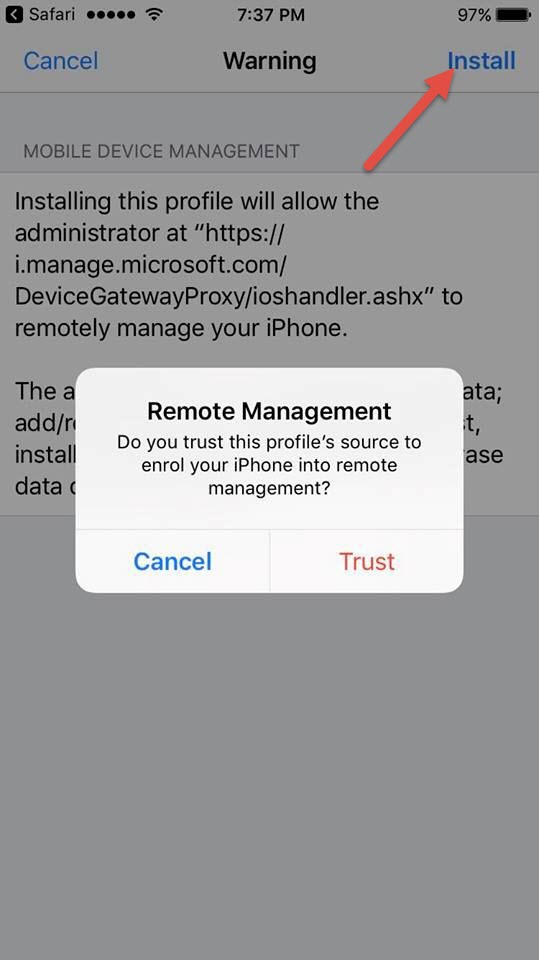
15. On the next screen you would be asked if you trust this profile for Mobile device management, please go ahead and click on Trust as shown in the image below.

14

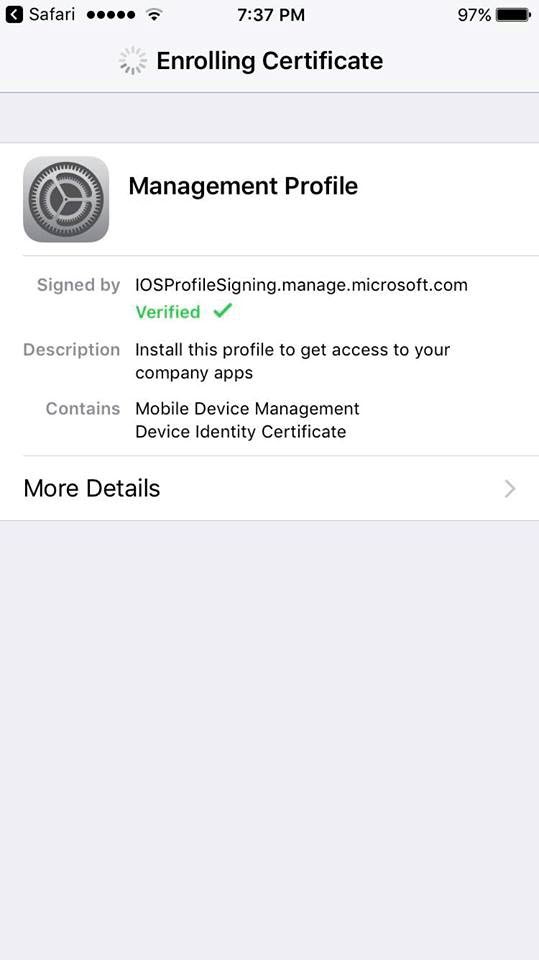
16. You would be taken to the certificate enrollment process in the next screen as shown in the image below.

15.jpg

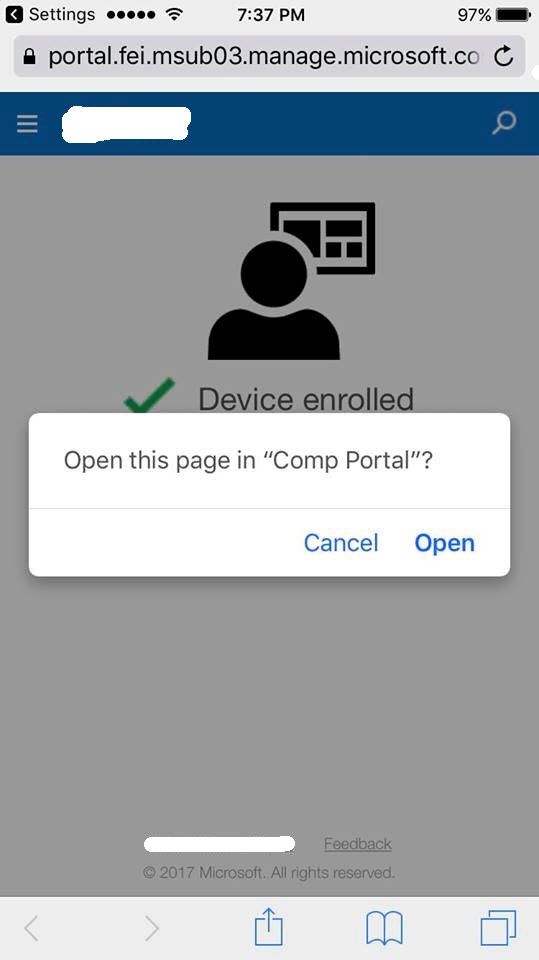
17. Once done you would be taken to the below mentioned screen asking you to open the Company portal app as shown in the image below. Please go ahead and click on open.

16

18. After that’s completed you would get the below screen where you can notice that the portal is getting prepared.

17

19. You would get the below mentioned screen post that, please go ahead and click on install as shown in the image below.

18.jpg

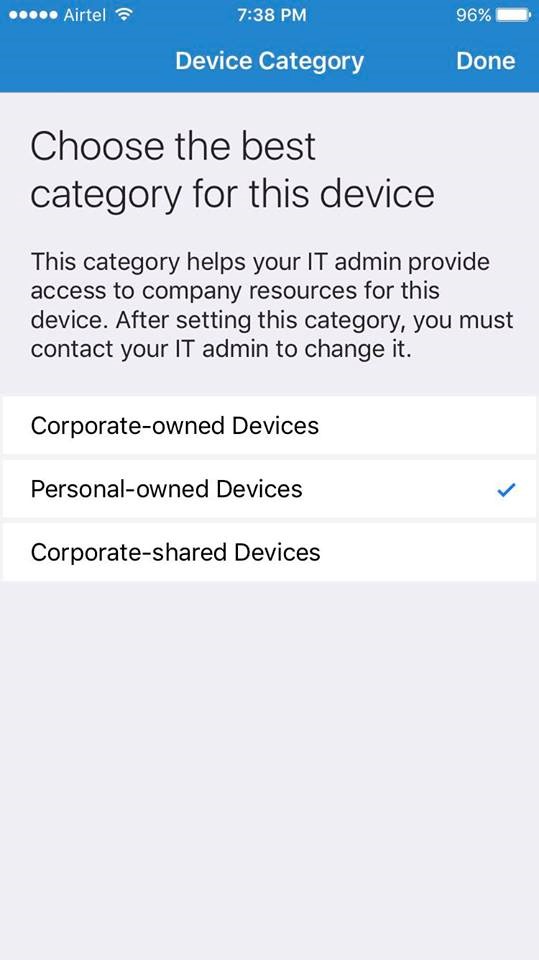
20. The next screen will ask you to choose your device category, please go ahead and choose the correct option. In my case I’ve chosen “personal-owned device “ as I’m enrolling my personal iPhone with Intune .

19

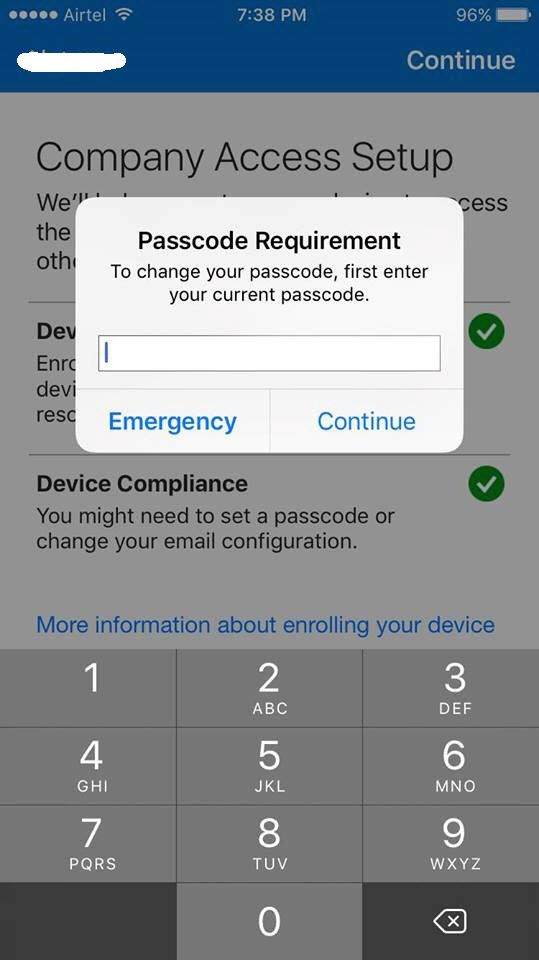
21. Once done you would be prompted to change your passcode as shown in the image below, please go ahead and change it and confirm it once again as shown in the image below.


Note: Please make sure that you don’t forgot your passcode

20.jpg

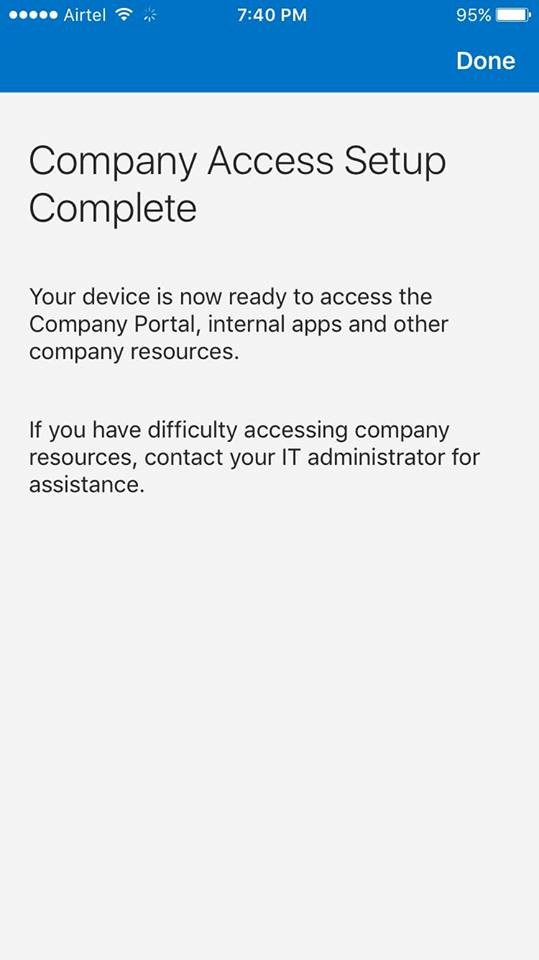
22. After confirming the passcode, you would be taken to the below mentioned screen which confirms that your device has been successfully enrolled with Intune.

21.jpg

22.jpg

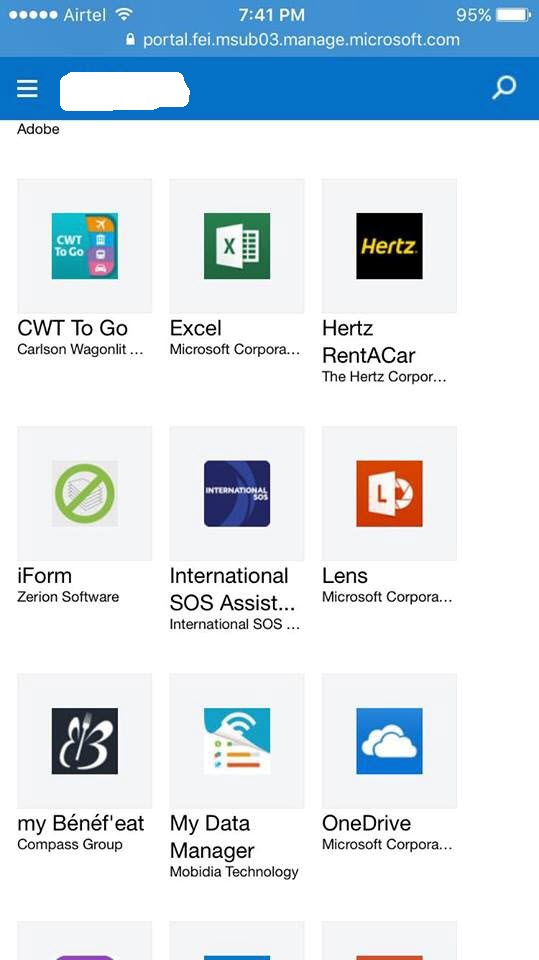
23.  Now go back to home screen in your iPhone and open the Intune company portal app .You can check the list of apps which are available for download from company portal app as shown in the image below.

23

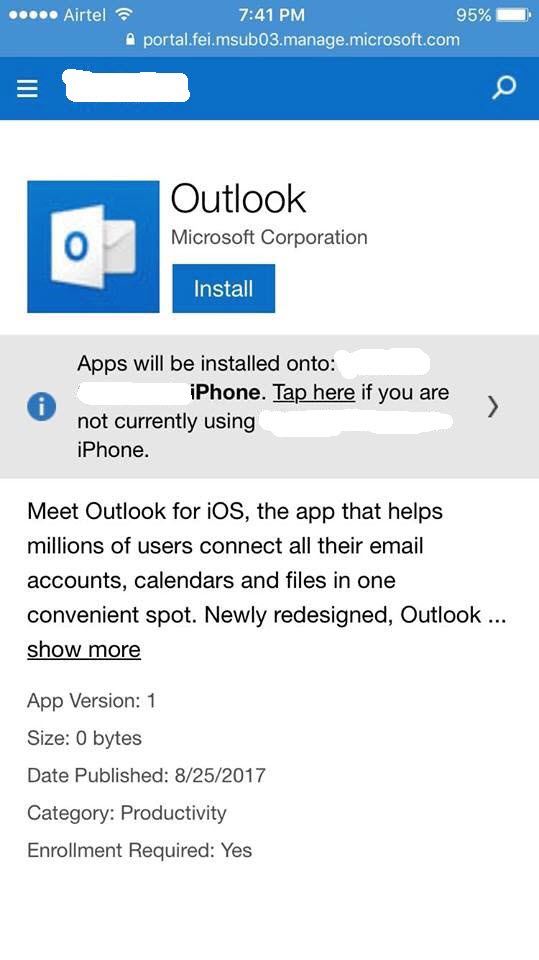
24. Now you can search for the “Outlook” mobile app in the portal and install it as shown in the image below.

Note: If you’re IT admin has configured a policy in Intune such that you should only be using the Outlook mobile app that’s available in the Intune Company portal to configure your emails, then you won’t be able to download and use the Outlook mobile app that’s available in the App store. This is part of Mobile application management in Intune. In addition to that you won’t be able to do the below mentioned things based on the policies which your IT admin has enforced.

  1. A user tries to copy the content from his Office 365 mailbox and tries to paste it in his personal email account (i.e. Gmail, Hotmail etc..) and Intune restricts it.
  2. ii) A user tries to download an attachment from his Office 365 mailbox and tries to save it to his Drop box or personal OneDrive and Intune restricts it.

Please go through the link below to know more about the MAM policies in Intune :_ https://docs.microsoft.com/en-us/intune-classic/deploy-use/configure-and-deploy-mobile-application-management-policies-in-the-microsoft-intune-console

24.jpg

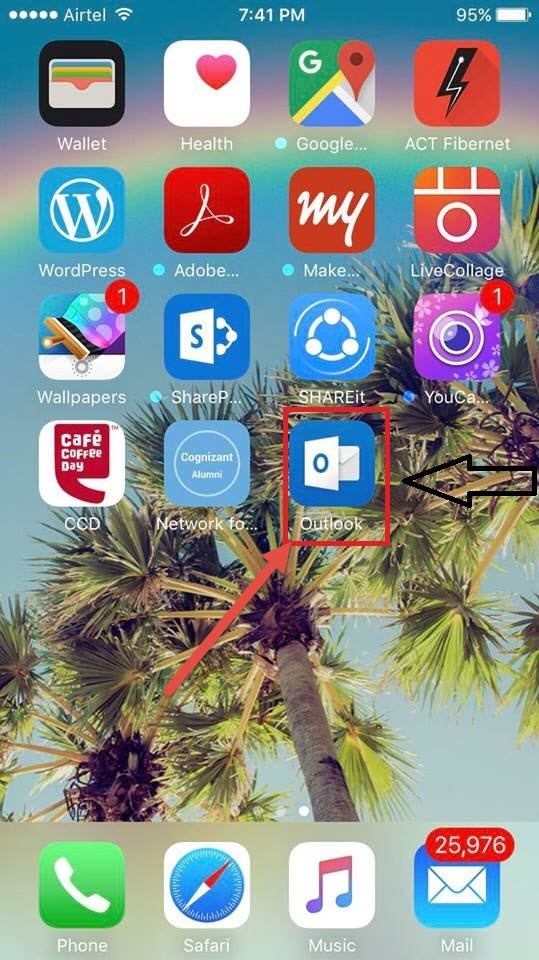
25. Once you’re done installing the “Outlook” mobile app from the Intune company portal, please go back to the home screen and open the “Outlook” app as shown in the image below.

25.jpg

26. Open the Outlook mobile app, you would be prompted to choose the email account which you want to setup. In my case it prompts to either add both my Office 365 email account as well as my Hotmail account. I’ve chosen to configure Office 365 email account only as shown in the image below. In your case you might only see your Office 365 email account.

Note: Even if you have added your Hotmail account , Intune will take care of only your Office 365 mail address and not your Hotmail account .

26.jpg

  1. Once you’ve chosen your Office 365 email account, please give it some time and your mailbox will start downloading all the emails, contacts and meetings etc. as shown in the image below.

28.jpg

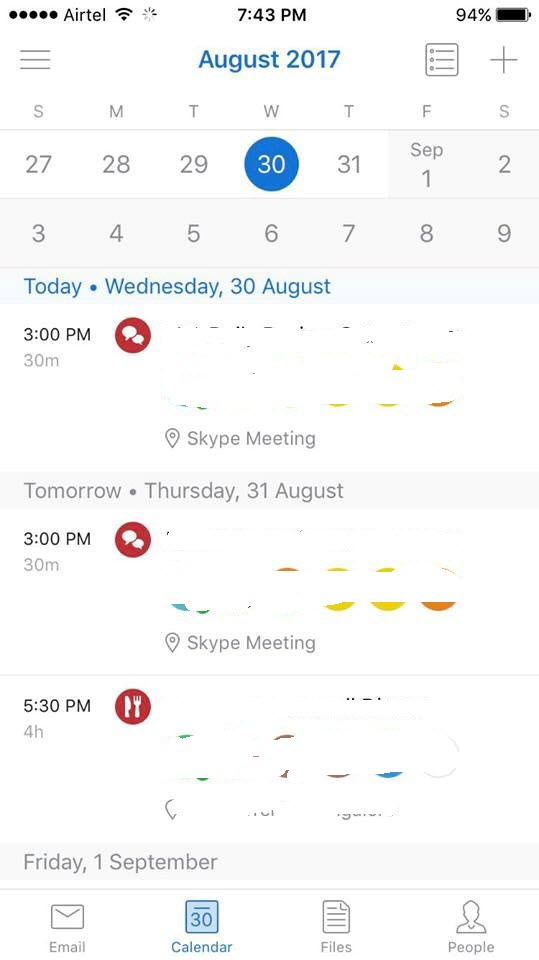
28. You can also use some cool features like @mentions and focused inbox in Office 365 as shown in the image below.

29.jpg

29. In addition to this you can also remotely manage your mobile device from your laptop or PC once it’s enrolled with Intune by accessing the Intune Company portal site. In order to do that, please login to the below mentioned URL using your Office 365 UPN address and password.

https://portal.manage.microsoft.com/

30 .Once done you should be able to see your Apple device which has been enrolled with Intune as shown in the image below.

30.png

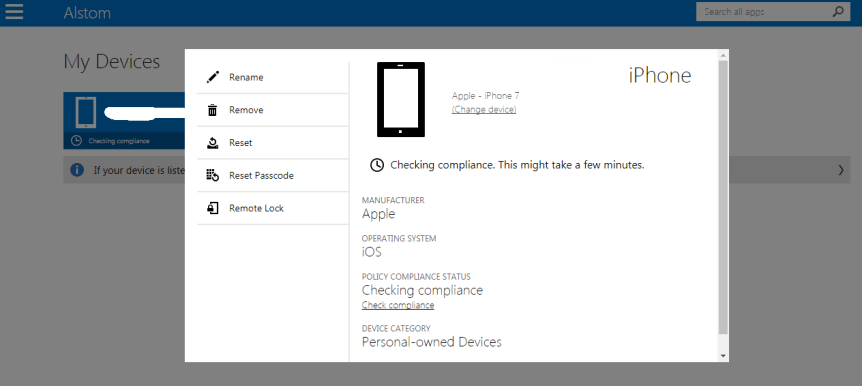
31. You can rename, remove, reset the passcode as well as remotely lock your device from your laptop/PC from here. So if you ever encounter a scenario where your device has been lost/stolen you can remotely wipe if from here.

Thanks for reading this post!!!  Good luck with Intune.


Advertisement

Recording of my Webinar on SharePoint Online Communication Sites:

Webinar logo

Webinar Recording :_ https://youtu.be/rmpdFA0XiAg

Link to the PPT Slides :_ https://www.slideshare.net/VigneshGanesanMCPMCI/overview-of-communication-sites-in-sharepoint-online

Please keep checking my blog site for more webinars and useful articles .

Webinar on SharePoint Online Communication Sites

Hi All,

Please join us for a webinar on August 12th,2017 at 6:00 pm IST on ” Overview of Communication Sites in SharePoint Online” .

WEBINAR

Agenda:

  1. Introduction to Communication sites in SharePoint Online​

2. Different designs and what’s inside a communication site?​

3. Demo on creating Communication sites​

4. Demo on Customizing Communication sites​

5. Benefits of using Communication sites​

6. What’s lacking in Communication sites?

We’ll be discussing in detail about SharePoint Online Communication Sites and all it’s new features and functionalities.

Webinar details : http://www.c-sharpcorner.com/events/overview-of-communication-sites-in-sharepoint-online

Get to know Microsoft 365:

e1.pngYep you read it correctly, it’s not Microsoft Office 365 and its Microsoft 365. Well by saying so I didn’t mean that Microsoft Office 365 is going away or it’s getting renamed as Microsoft 365. This is a new service which was introduced by Satya Nadella 2 days back on Microsoft Inspire which brings together Office 365, Windows 10 and Enterprise Mobility + Security, delivering a complete, intelligent and secure solution to empower employees. I’m sure most of you would have already read about this today and if not please take a moment in reading this article where I’ve explained in detail about Microsoft 365 and what are the services it delivers and how it can enhance your business.

  1. What is Microsoft 365?

Well as I already mentioned above this is a new service which was introduced by Microsoft two days back which brings together Office 365, Windows 10 and Enterprise Mobility + Security.

  1. Is this something new or was this service already present?

To be very precise, this isn’t something new and in fact this is the successor of the most successful service , “Secure Productive Enterprise” which was introduced by Microsoft on October 2016 .

e2.png

  1. What happens to Secure Productive Service now?

Moving further, Secure Productive Service would be replaced by Microsoft 365.

  1. Do we have different flavors in Microsoft 365 as well like Secure Productive Enterprise?

Yes, we have two flavors in Microsoft 365, 1. Microsoft 365 Business which is meant for small organizations and 2. Microsoft 365 Enterprise which is meant for large organizations

  1. What are these two flavors meant for and how can they enhance my business?

Microsoft 365 Enterprise:

  1. Unlocks creativity by enabling people to work naturally with ink, voice and touch, all backed by tools that utilize AI and machine learning.
  2. Provides the broadest and deepest set of apps and services with a universal toolkit for teamwork, giving people flexibility and choice in how they connect, share and communicate.
  3. Simplifies IT by unifying management across users, devices, apps and services.
  4. Helps safeguard customer data, company data and intellectual property with built-in, intelligent security.

Microsoft 365 Business:

  1. Helps companies achieve more together by better connecting employees, customers and suppliers.
  2. Empowers employees to get work done from anywhere, on any device.
  3. Protects company data across devices with always-on security.
  4. Simplifies the set-up and management of employee devices and services with a single IT console.
  5. How about the plans for Microsoft 365?

Microsoft 365 Enterprise is available in two plans, E3 and E5

  1. When would Microsoft 365 be made available for the public?

Microsoft 365 Enterprise will be available for purchase from August 1st, 2017 onwards. You get to purchase both the plans (E3 & E5)

Microsoft 365 Business will be available in public preview on August 2nd, 2017. It will become generally available on a worldwide basis in the fall of 2017, priced at US $20 per user, per month.

  1. How do I get to know more about the services and features available in both the flavors of Microsoft 365 ?

        Please go through the links below to know more about the features and services available in both the flavors.

For Business: _ https://www.microsoft.com/en-us/microsoft-365/business

For Enterprise: _ https://www.microsoft.com/en-us/microsoft-365/enterprise

Thanks for reading the post. Good luck with Microsoft 365.


PowerShell to on-board list of users to Office 365 and assign them Office 365 licenses:

1.jpg
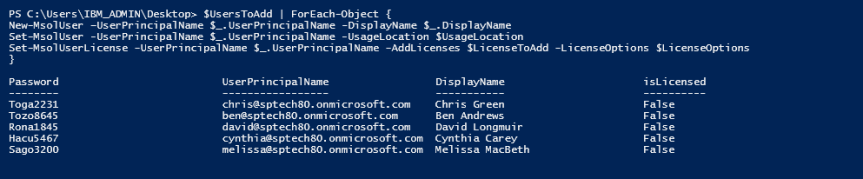
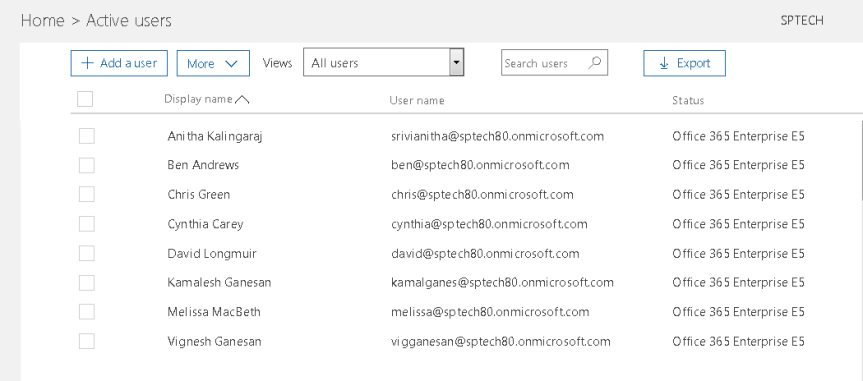
Office 365 is a SaaS platform which is  being used by many organizations these days and it becomes quite hard for IT administrators to on-board their users to Office 365 manually .Of course , this may not be the case when your user identities gets synced to Azure AD from on-premises AD using AAD connect tool .However, if you’re one of the organizations who totally buried all your IT infrastructure implementation and decided to go with a Cloud implementation completely then possibilities are such that you as an IT administrator should take care of on-boarding your users to Azure AD .As we all know , this is indeed quite a time consuming task if we have to do it manually and then assign the appropriate licenses to all the users . So, to surpass all those manual effort, I’ve put together this PowerShell script which will do the magic for you. Alright, let’s get into the details ….
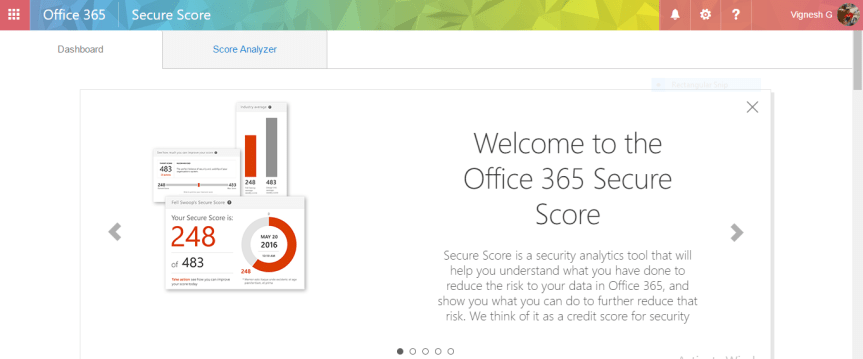
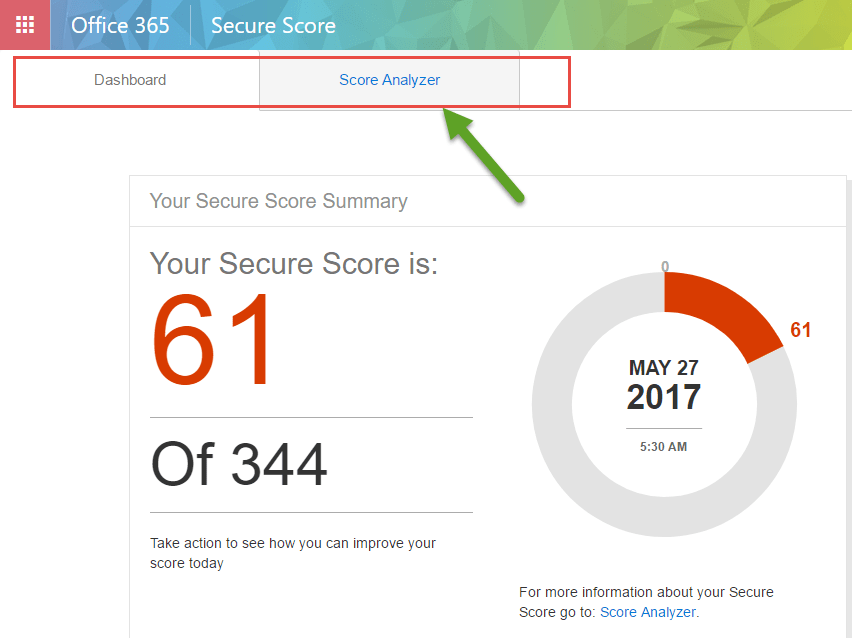
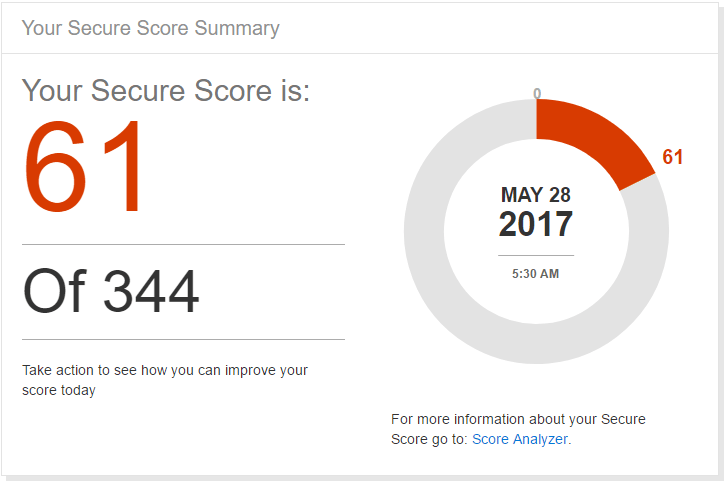
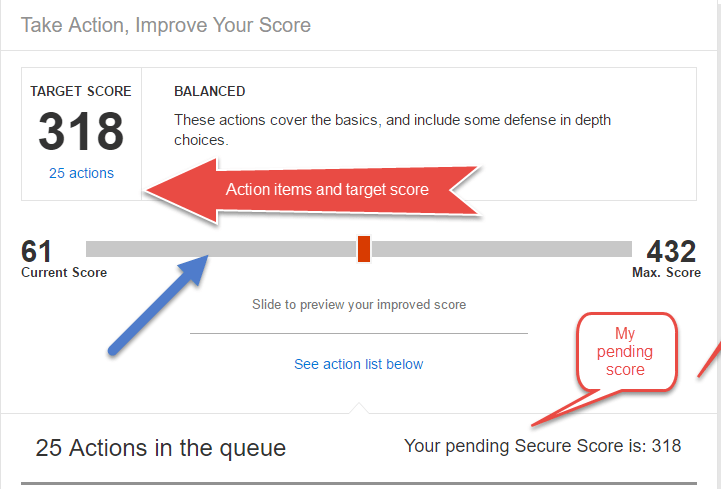
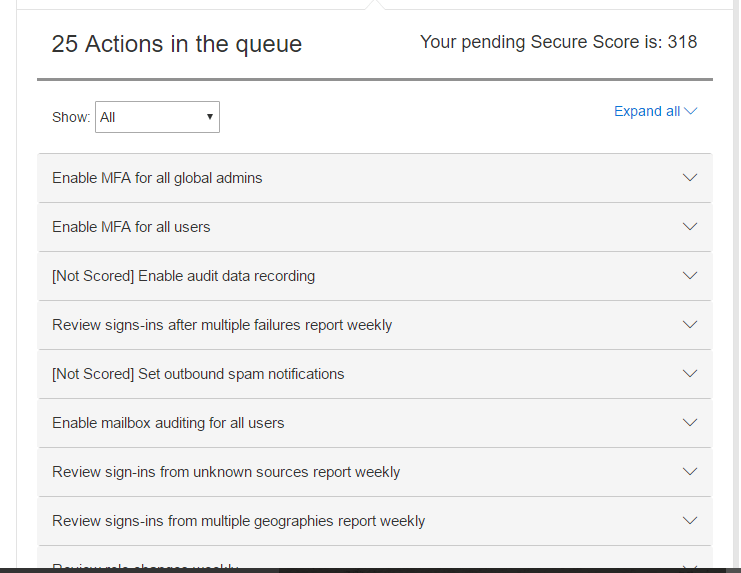
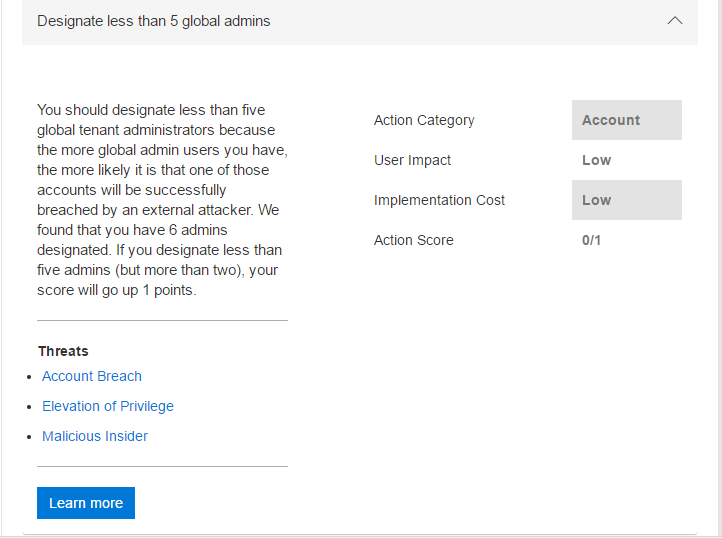
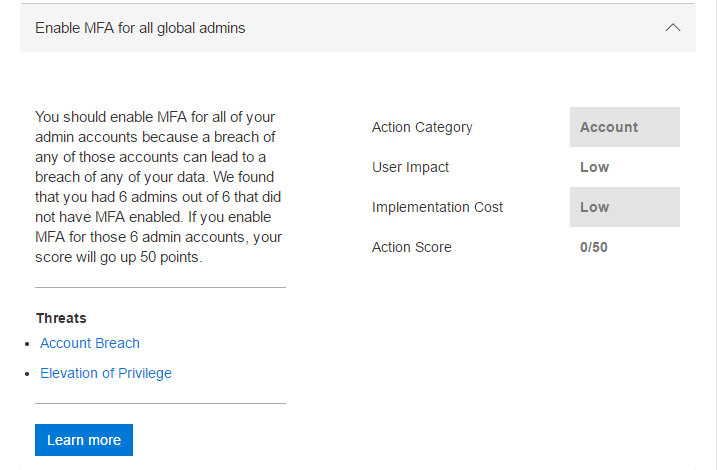
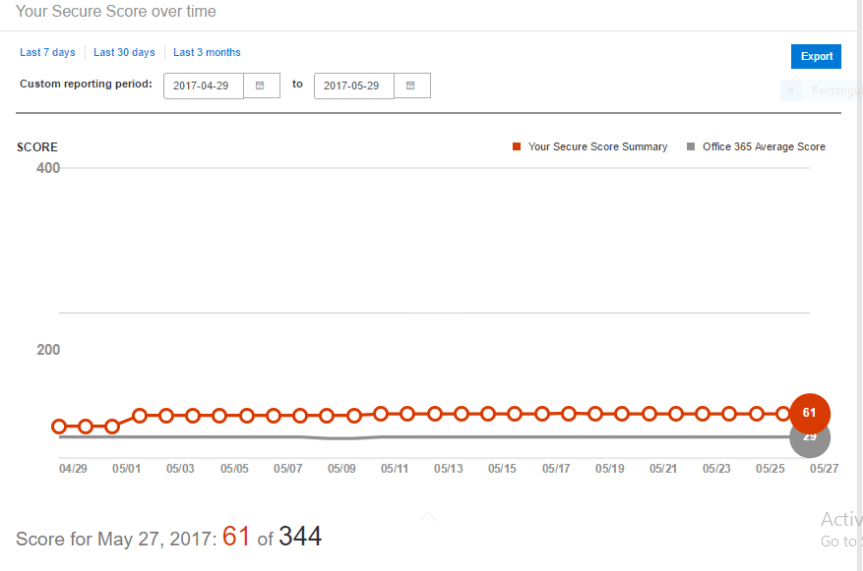
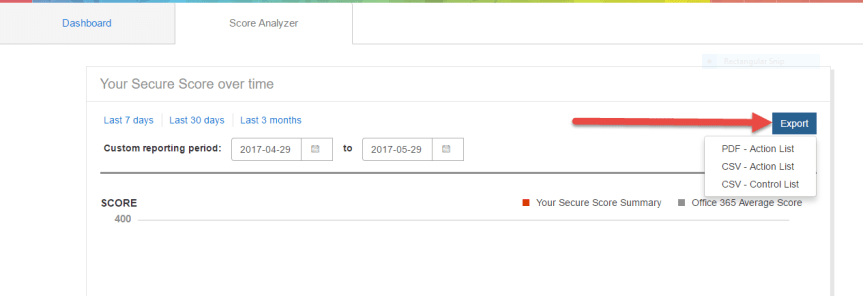
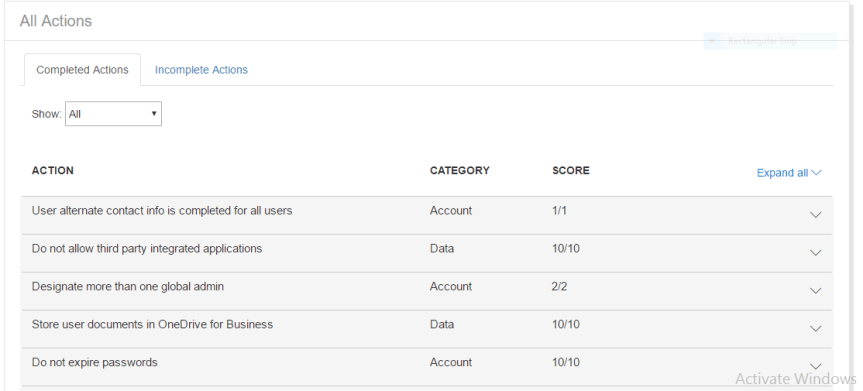
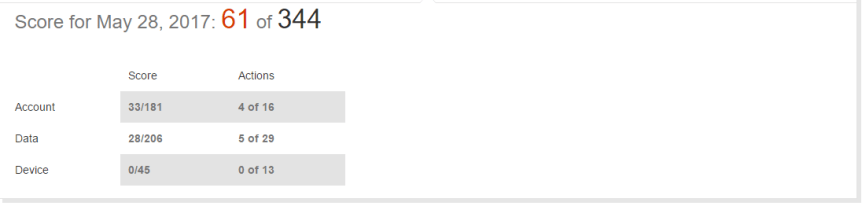
1.Sign-in to your Office 365 admin center using your global admin account and navigate to the “Active users” section as shown in the image below.

2.png

2.At this moment, you might see only the user account which was used to set-up the Office 365 tenant.

Note: In my case, you might see 3 users as I manually created them using the “Add a user “option.

3.Create a CSV file which has the details of all your users by following the guidelines mentioned in this article. The below mentioned screenshot depicts the CSV file which I’ve prepared which has the list of all my users.

3.png

4. Once done, please login to the PowerShell window and type the below mentioned command as shown in the image below. This will tell you the type of license that your tenant is using and how many licenses have been utilized till now.

4

Note : In my case you can notice that my tenant is on  Office 365 E5 Enterprise E5 plan +EMS  (Enterprise Mobility ) and it also displays how many licenses have been consumed till now .

5. Prior to running the above command, please ensure that you’re connected to your Office 365 tenant via PowerShell, if not please follow the below article to do that first.

https://technet.microsoft.com/library/dn975125.aspx

6. Now, let’s specify the required variables for the PowerShell script.

$UsersToAdd = Import-Csv C:\Users\Vignesh\Documents\Import_User_Sample_en.csv

$LicenseToAdd = “sptech80:ENTERPRISEPREMIUM” à This information can be grabbed from the Get-MsolAccountSKU command which we ran in the above step.

$UsageLocation = “US”

$LicenseOptions = New-MsolLicenseOptions -AccountSkuId $LicenseToAdd

5

7.Once you’re done specifying the required variables, please go ahead and run the below mentioned PowerShell command as shown in the image.

$UsersToAdd | ForEach-Object {

New-MsolUser –UserPrincipalName $_.UserPrincipalName -DisplayName $_.DisplayName

Set-MsolUser -UserPrincipalName $_.UserPrincipalName -UsageLocation $UsageLocation

Set-MsolUserLicense -UserPrincipalName $_.UserPrincipalName -AddLicenses $LicenseToAdd -LicenseOptions $LicenseOptions

}

6.png

8.You may notice that your users are getting created after running the script as shown in the image above and the licensing tab might display the status as “False”. That’s due to the time taken for the script to reflect the licensing details as it first creates the user and then assigns the license to the user’s account. This is quite normal and hence you don’t need to panic about the “isLicensed” column

9. You can verify the status of the users as well as the licenses assigned to them by running the “Get-MsolUser” command. This time it should display the licensing details correctly.

10. Additionally, you can also navigate to the “Active users” section to verify the same.

8.png

Thanks for reading this post ….Good luck with Office 365 !!!

What is Secure Score in Office 365?

Secure-Keyboard-Hero

This post is on a new service which was introduced by Microsoft couple of months back called as “Office 365 Secure Score “. If you’ve ever wondered how secure your Office 365 tenant really is, then it’s time about time now to stop wondering because we have “Secure Score “now to take care of that. So, what’s this new service called as Office 365 secure score? What does it do? How do I make use of it? …. Well, I’m going to answer all those questions that you have in your mind about Office 365 secure score in this article and you will also learn about how to make use of this service to enhance your business with Office 365. Alright, let’s get started …. Shall we?

What is Office 365 secure score?

This is how Microsoft defines Office 365 secure score … “The Secure Score is a security analytics tool that will help you understand what you have done to reduce the risk to your data in Office 365, and show you what you can do to further reduce that risk “. To put it in very simple words, it’s a tool that runs on the background and checks the security standards of all the service used by you as an organization (i.e. SharePoint Online, Exchange Online, Skype for Business Online, Azure AD etc. …) and assigns a credit score.

What’ the idea behind Office 365 secure score?

The approach by Microsoft to this experience was very simple. First, they created a full inventory of all the security configurations and behaviors that customers can do to mitigate risks to their data in Office 365 (there are about 77 such things in total). Then, they evaluated the extent to which each of those controls mitigated a specific set of risks and awarded the control some points. More points means a more effective control for that risk. Lastly, they measured the extent to which the service has adopted the recommended controls, add up the points, and present it as a single score.

How to use Office 365 secure score?  

  1. The first thing you would notice once you login to the secure score portal is the welcome screen (check the screenshot below) which gives you a small definition about Office 365 secure score. In the below mentioned screenshot I’ve logged into the secure score portal of my Office 365 tenant by accessing this URL (i.e. https://securescore.office.com/ ) and I get this screen which gives me a welcome message about Office 365 secure score.

1.PNG

Note: If you already logged into your tenant you can directly access the Secure Score URL which I mentioned above and it will allow you inside the portal without prompting for your credentials once again.

2. Once you read all the welcome messages about Secure score you will get two different tabs as shown in the image below.

                    i)Dashboard.

                   ii )Score Analyzer.

2

3. The first tab which says “Dashboard” is where you get to see the secure score summary. This panel gives you your current Secure Score, and the total number of points that are available to you, given your subscription level, the date that your score was measured, as well as a simple pie chart of your score. The denominator of your score is not intended to be a goal number to achieve. The full set of controls includes several that are very aggressive and will potentially have an adverse impact on your users’ productivity. Your goal should be to optimize your action to take every possible risk mitigating action while preserving your users’ productivity. The below mentioned screenshot depicts the secure score summary of my Office 365 tenant where I’ve scored 61 out of 344 as on May 27, 2017.

14.PNG

4. The next section on the “Dashboard” tab after the “Secure score summary” section would be the section which tells how to improve your score. It gives you the targeted score that you can achieve for your tenant and lists out the action items to improve your score. You can make use of the slider to preview your improved score as shown in the image below.

15.PNG

5. The next section will list out all the pending action items that I’m supposed to complete to achieve the maximum score.

4

6. Now, let’s look at few pending action items to see what it means and how it would impact my Secure score in Office 365.

i) Designate less than 5 global admins:

16.PNG

This one says that I should designate less than 5 global administrators for Office 365 tenant and in my case, I’ve breached it by making it as 6. Hence, it’ asking me to correct it and it also gives me an overview about the score I would get by doing so.

ii) Enable MFA for all global admins:

17.PNG

This one says that I have to enable Multi factor authentication for all my 6 global admin accounts as none of accounts have that enabled and this is considered to be a security breach. It also tells me that I can achieve a score of 50 by doing so.

7) The next section under the “Dashboard” tab is the “Risk Assessment “section which gives me an overview about the top threats in my tenant. It is very important that Office 365 global administrators should read this and understand the risks they are mitigating every time they take an action.

18.PNG

Let’s look at the “Account breach” scenario here and see the details about the risk.

19Compare your score:

The Office 365 Average Secure Score is calculated from every Office 365 customer’s Secure Score. You can use this section to understand how your score stacks up against the average score.

Note: The Average Secure Score only includes the numerator of the score, not the denominator. So, the average points may be higher than you can achieve because there are points in controls associated with services that you have not purchased (meaning , you might be using a different plan such as E3 whereas other customers might be using E5 or other plans) .

5


Alright, now let’s look at the “Score Analyzer” tab in the Secure Score portal.

Score Analyzer:

As of now, it’s only the global administrators who have access to the “Secure Score “portal and in the future, it would be made available to other administrators as well such as SharePoint Online administrator, Exchange Online administrator & Skype for Business administrator. However, in the interim you can use the “Score Analyzer “tab to export the secure score results and share it with your executives or stakeholders or other administrators (i.e. SharePoint Online, Exchange Online etc.)  so that they’re aware of the progress that’s made on risk mitigation in Office 365. The Score Analyzer experience allows you to review a line graph of your score over time, to export the audit of your control measurements for the selected day to either a PDF or a CSV, and to review what controls you have earned points for, and which ones you could act on.

  1. The below mentioned image depicts the “Score Analyzer” tab of my secure score portal.

6.PNG

2. I can make use of the “Export “button on the top right corner to export these results in PDF & CSV format.

7.PNG

3. It also gives you an overview of all the “Complete “and “Incomplete” actions and the scores associated to those action items as shown in the image below.

10.PNG

4 .The “Complete “and “Incomplete” actions are classified based on three different categories as you see below (i.e. Account, Data & Device)

20.PNG

5. Finally, I can make use of the “Export “button which I mentioned above to export the results to a PDF/CSV Please check the image below to see a sample report.

8.PNG

So finally, to conclude, the Secure Score is indeed a great tool to keep your Office 365 tenant as secure as possible and at the same time you need to be aware that the Secure Score does not express an absolute measure of how likely you are to get breached. It expresses the extent to which you have adopted controls which can offset the risk of being breached. No service can guarantee that you will not be breached, and the Secure Score should not be interpreted as a guarantee in any way.

Resources to know in detail about Secure Score in Office 365:

Microsoft Mechanics video on Office 365 Secure Score: https://youtu.be/h__nxWlm5Nc

Office 365 Secure Score API:  https://blogs.technet.microsoft.com/office365security/using-the-office-365-secure-score-api/

You can also check my Webinar recording on Office 365 where I’ve shown a small demo on Office 365 secure score. Here’s the link to that: https://youtu.be/HYcfXWN30O0

Thanks for reading this post …. Good luck with Secure Score in Office 365!!!


Webcast of SharePoint Virtual Summit:

sharepoint-virtual-summit-2017.jpg

For those who missed to attend the SharePoint Virtual Summit session which was held on May 16th , please make use of the link below to watch the webcast on demand

https://event.microsoft.com/events/2017/1705/SharepointSummit/

Watch the webcast to learn how to create a connected workplace in Office 365 with OneDrive and SharePoint, integrated with Yammer, Microsoft Teams, Windows, PowerApps and Microsoft Flow.

In this webcast , Microsoft has unveiled the latest innovations and roadmap, and you’ll learn how industry-leading customers are leveraging these technologies as part of their digital transformation. Discover how Office 365, connected with Windows and Azure, is reinventing productivity for you, your teams and your organization.

Happy SharePointing !!!

Recording of my Webinar on Getting started with Microsoft Office 365 :

Thumbnail.PNG

Webinar Recording :_ https://youtu.be/HYcfXWN30O0

Link to the PPT Slides :_https://www.slideshare.net/VigneshGanesanMCPMCI/getting-started-with-microsoft-office-365-by-vignesh-ganesan

Please keep checking my blog site for more webinars and useful articles .


What is Customer Lock box in Office 365?

1.png
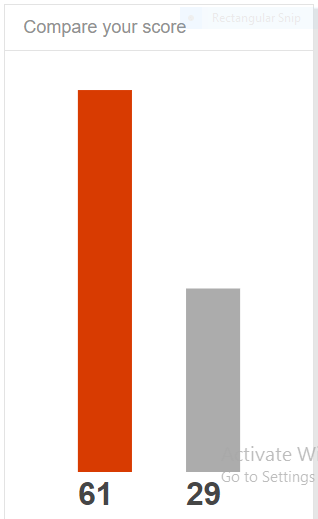
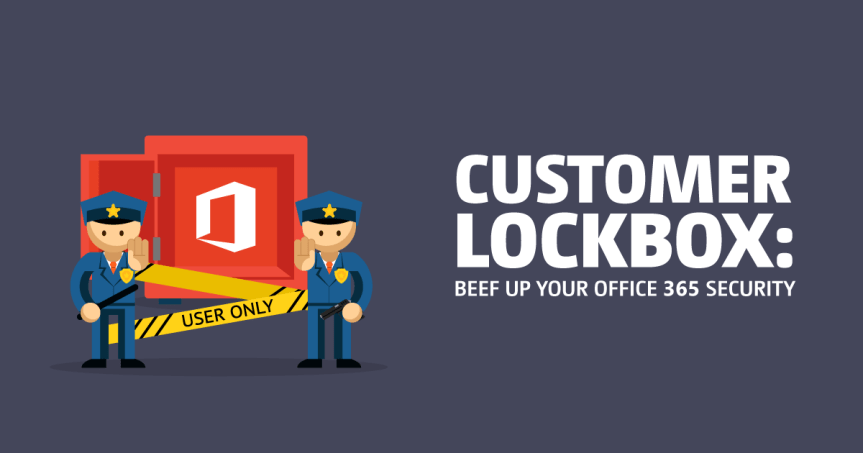
“Customer Lock box” –This terminology was something new to me until I heard it at Microsoft Tech Summit this year .There was one of these sessions which I was attending on Office 365 and the speaker was talking about this feature .Sadly only few folks in the room were aware of it and I was one among those folks who haven’t heard that terminology before.

Anyways, now that I’m aware of it I decided to write an article on it so that my readers get to understand about this cool feature in Office 365 and they can start using it in their Office 365 tenants.

So what is Customer Lockbox? To put it in simple words, it’s a feature that’s available in Office 365 to ensure that there’s zero interaction by Microsoft on your contents that’s saved in Office 365(i.e. SharePoint Online, Exchange Online, Skype for Business Online etc…)

Roughly around couple of years back Microsoft has come up with this feature to maximize the data security and privacy for Office 365 customers by ensuring that there’s zero interaction with the customer’s content by Microsoft engineers.

Almost all the service operations performed by Microsoft are either fully automated so there is no human interaction, or the human involvement is abstracted away from the customer’s content that’s stored in Office 365.

Only during some circumstances where something is broken in your tenant and you raised a support case for that , Microsoft engineers will access your content to fix it .So with this feature  Microsoft enforces access control through multiple levels of approval, providing just-in-time access with limited and time-bound authorization. In addition to that all access control activities performed by the Microsoft engineer does gets logged and audited.

The below mentioned image depicts the complete approval process:

2.png

So with this feature Microsoft has given their assurance to its customers that their content will not be accessed by Microsoft employees without their explicit approval. It brings customers into the access approval process, requiring the customer to provide explicit approval of access to their content by a Microsoft employee for service operations.

Now that we have understood about this feature lets take a look on how this complete process works ….

3.png

Let’s consider a scenario where-in something is broken in SharePoint Online or Exchange Online and you raised a support case for that. The engineer upon reviewing your request feels that he/she might need access to your Exchange/SharePoint Online content to fix it .So this is how the process flows when you have Customer Lock box turned on in your tenant.

  1. Administrators in the customer’s Office 365 environment are notified via email that there is a request for access as shown in the image below.

4.png

2. In addition to this the Office 365 Admin Center portal will also display requests that have been submitted to the customer for approval as shown in the image below.

5.png

3. You as an Office 365 administrator can approve or reject Customer Lock box requests. Check the image below where you get the option to approve or reject a request.

6.png

4. Microsoft can only proceed following approval of a Customer Lock box request. See the image below where the customer has approved a request by the engineer.

7.png

5. If a customer rejects a Customer Lock box request, no access to customer content will occur.

Note: Customer Lock box requests have a default lifetime of 12 hours; after which they expire. Expired requests do not result in access to customer content.

Enabling Customer Lockbox in the Office 365 admin center:

  1. Sign in to Office 365 admin center
  2. Go to the Office 365 admin center.
  3. Navigate to Settings > Security & privacy and scroll to locate Customer Lock box

8.png

4. Click Edit and move the toggle on or off to turn lock box requests on or off.

9.png
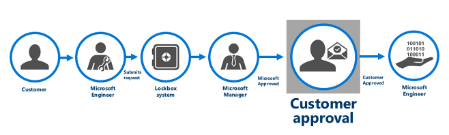
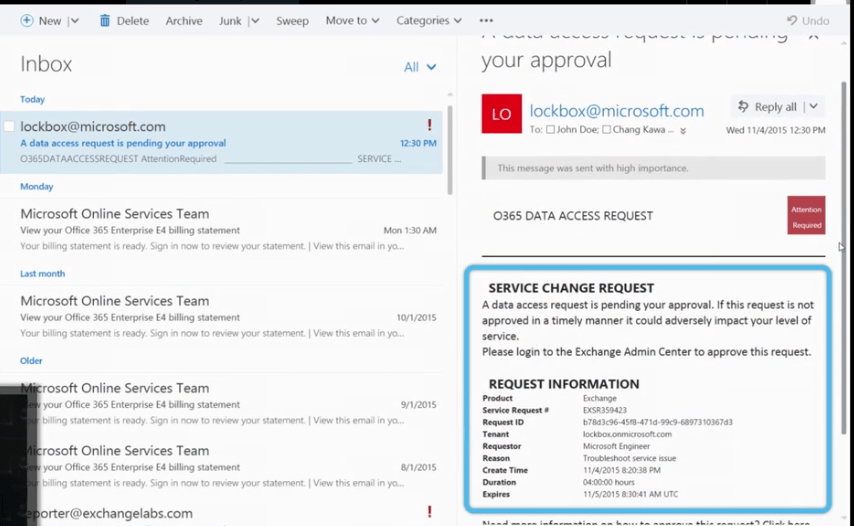
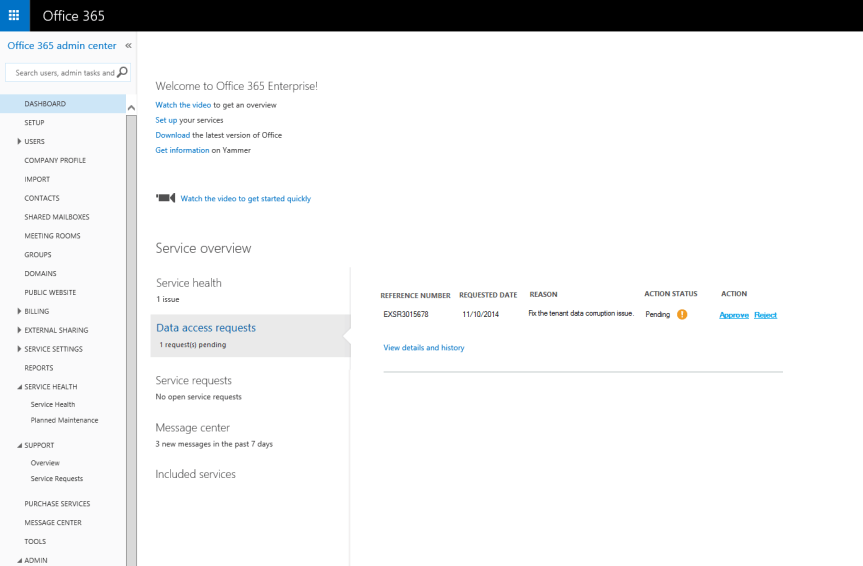
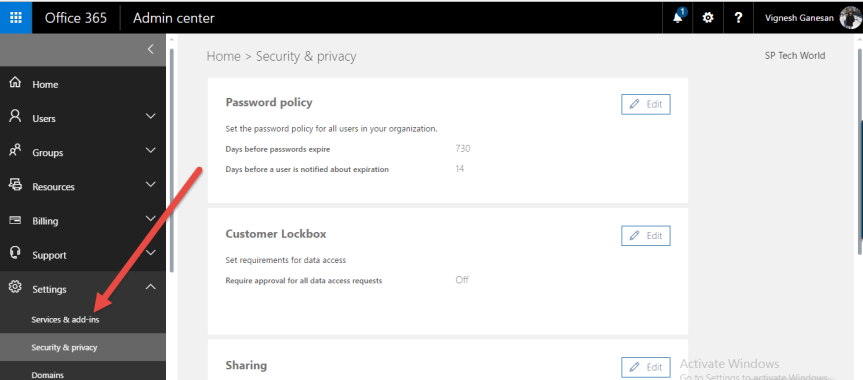
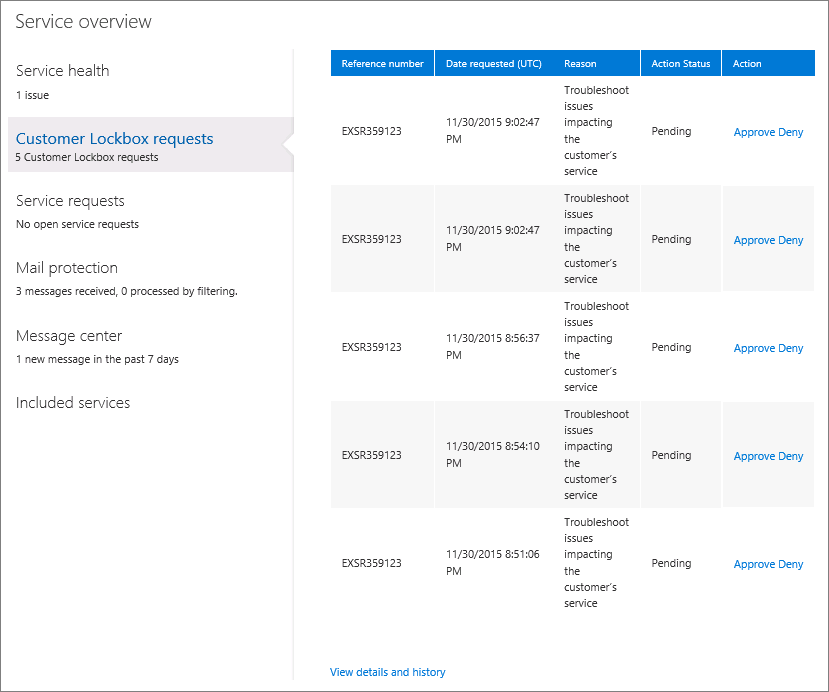
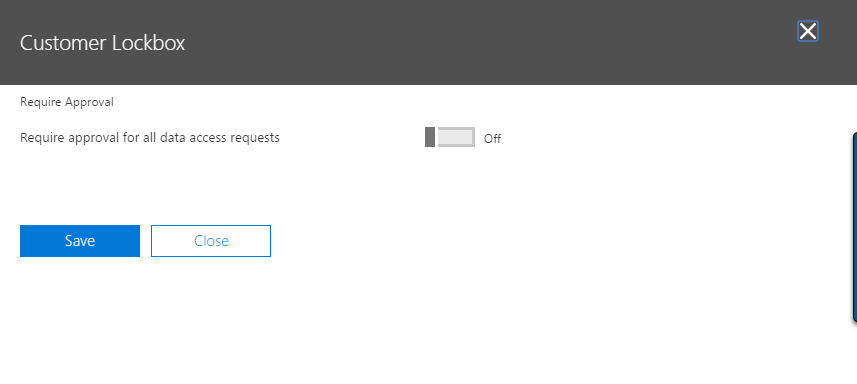
Approve or deny a Customer Lock box request in the Office 365 admin center:

  1. Sign in to Office 365 admin center
  2. Go to the office 365 admin center
  3. Navigate to Settings > Support > Service requests.

10.png

4. Select a customer lock box request, and then select Approve or Reject.

5. This is how the view looks in the new Office 365 admin center .Check the image below.

11.png

12.png

How to avail Customer Lock box for Office 365?

Customer Lock box for Office 365 will be available as part of a new premium Office 365 Enterprise Suite called E5

Thanks for reading this post ….I hope you will enable this feature in your Office 365 admin center which gives an extra layer of security to your contents in Office 365.

Webinar on Getting started with Office 365 :


Office 365 pic 2.png

Hi All ,

On behalf of C Sharp corner Chennai chapter I’ll be delivering a session on “Getting started with Microsoft Office 365 “ . The details about the session as well as the registration link can be found below . Please make yourself available for the session and try to gain some insights on Office 365 .

Registration link :_ http://www.c-sharpcorner.com/events/getting-started-with-microsoft-office-365

Agenda:
  • Introduction to Office 365
  • Understanding the Office 365 features and services.
  • Touring the Office 365 Admin center
  • What’s new in Office 365?
  • Recap
  • Conclusion