Issues with Minimal Download Strategy feature in SharePoint 2013:

Well like every other SharePoint lover out there I always used to admire SharePoint for its cool features and for also being the best Enterprise Content Management platform ever for the business .However, there are certain features which really sound so cool when we read about it but they really fail to excite us when we work on it .So one among such feature is the “Minimal Download Strategy feature “  and this post is about the issues which you would face when you have this feature activated on your SharePoint site .

Now, if you’re someone who hears about this feature for the first time, here’s my link to an article on Minimal Download strategy which was published on my site couple of days back.

I’ve indeed read couple of articles which speaks about the issues with MDS but this was the first time I ever happened to experience one  .Alright now let’s take a look at this ….

To activate MDS in your site:

Go to Site settings–>Manage site features –> Activate Minimal download Strategy.

ERROR

To repro the error:

Go to a document library in a team site which has the MDS feature activated ( remember this feature will be activated by default in a SharePoint Team site ) and try to delete a document from a document library by clicking on the “ellipsis” –>“ Delete document “ BUTTON , you will see an error as shown below without any correlation ID . However, the document would still get deleted from the document library.

ERROR 3

Now, this error is not because of any bad configuration in your SharePoint Farm or due to any feature dependency for the MDS feature to work seamlessly .This seems to be a problem with the product itself and looks like this hasn’t been fixed it.

Troubleshooting steps and Fix:

I tried to capture the uls logs by turning on verbose logging but it didn’t find any valuable information pertaining to this error. After researching about this in the internet this seems to be a problem with the MDS feature itself that came up in SharePoint 2013.

Fix:

  1. This error doesn’t show up when you try to delete the document using the “delete document” button in the top ribbon interface which is really weird .I have no idea how this is different from the former option which we tried .

ERROR 2

2. Also if you try to by-pass your load balancer by changing the host file of your PC to point a specific WFE, this error won’t show up.

Now, given these scenarios I try to dig a bit deeper about this issue by capturing the fiddler logs as suggested in this blog article and it turns out that the problem is with the response headers. The below mentioned article can give a deeper insight on how to get this fixed.

https://finarne.wordpress.com/2014/12/10/sharepoint-2013-error-after-creating-a-view/

Other errors related to this feature:

Upon reading couple of other blogs it looks like turning on the MDS feature will introduce few more issues like   the “1.Connect to outlook button” not working and “2. “Not able to create a list view “

http://corypeters.net/2013/08/issues-with-minimal-download-strategy/

The above mentioned article was published quite a while back and hence I’m not sure whether the content discussed on that article is still valid.

However ,in my tests I was able to successfully make use of the “Connect to outlook button “ and it didn’t create any problem .I’m yet to try creating a new list view and see if that works and will let you know about that once I’m done testing .

Happy SharePointing!!!! Thanks for reading this post …..


Powershell script to find and delete orphaned users in SharePoint

[System.Reflection.Assembly]::LoadWithPartialName("Microsoft.SharePoint")

#Functions to Imitate SharePoint 2010 Cmdlets in MOSS 2007
function global:Get-SPWebApplication($WebAppURL)
 {
  return [Microsoft.SharePoint.Administration.SPWebApplication]::Lookup($WebAppURL)
 }
function global:Get-SPSite($url)
 {
    return new-Object Microsoft.SharePoint.SPSite($url)
 }
function global:Get-SPWeb($url)
{
  $site= New-Object Microsoft.SharePoint.SPSite($url)
        if($site -ne $null)
            {
               $web=$site.OpenWeb();      
            }
    return $web
}
#Function to Check if an User exists in AD
function CheckUserExistsInAD()
   {
   Param( [Parameter(Mandatory=$true)] [string]$UserLoginID )
 
  #Search the User in AD
  $forest = [System.DirectoryServices.ActiveDirectory.Forest]::GetCurrentForest()
  foreach ($Domain in $forest.Domains)
  {
   $context = new-object System.DirectoryServices.ActiveDirectory.DirectoryContext("Domain", $Domain.Name)
         $domain = [System.DirectoryServices.ActiveDirectory.Domain]::GetDomain($context)
   
   $root = $domain.GetDirectoryEntry()
         $search = [System.DirectoryServices.DirectorySearcher]$root
         $search.Filter = "(&(objectCategory=User)(samAccountName=$UserLoginID))"
         $result = $search.FindOne()
         if ($result -ne $null)
         {
           return $true
         }
  }
  return $false
 }
 
 $WebAppURL="<a class="vglnk" href="https://sharepoint.crescent.com" rel="nofollow"><span>https</span><span>://</span><span>sharepoint</span><span>.</span><span>crescent</span><span>.</span><span>com</span></a>"
 #Get all Site Collections of the web application
 $WebApp = Get-SPWebApplication $WebAppURL
 #Iterate through all Site Collections
 foreach($site in $WebApp.Sites) 
    {
 #Get all Webs with Unique Permissions - Which includes Root Webs
 $WebsColl = $site.AllWebs | Where {$_.HasUniqueRoleAssignments -eq $True} | ForEach-Object {
        
        $OrphanedUsers = @()
        
  #Iterate through the users collection
  foreach($User in $_.SiteUsers)
  {
      #Exclude Built-in User Accounts , Security Groups & an external domain "corporate"
   if(($User.LoginName.ToLower() -ne "nt authority\authenticated users") -and
                ($User.LoginName.ToLower() -ne "sharepoint\system") -and
                  ($User.LoginName.ToLower() -ne "nt authority\local service"-and
                      ($user.IsDomainGroup -eq $false ) -and
                          ($User.LoginName.ToLower().StartsWith("corporate") -ne $true) )
                   {
                    $UserName = $User.LoginName.split("\")  #Domain\UserName
                    $AccountName = $UserName[1]    #UserName
                    if ( ( CheckUserExistsInAD $AccountName) -eq $false )
                    {
                         Write-Host "$($User.Name)($($User.LoginName)) from $($_.URL) doesn't Exists in AD!"
                                    
                                    #Make a note of the Orphaned user
                                    $OrphanedUsers+=$User.LoginName
                    }
                   }
  }
        
        # ****  Remove Users ****#
        # Remove the Orphaned Users from the site
        # foreach($OrpUser in $OrphanedUsers)
        #   {
        #        $_.SiteUsers.Remove($OrpUser)
        #        Write-host "Removed the Orphaned user $($OrpUser) from $($_.URL) "
        #   }
        
 }
}


Solution for the list view issue with MS16-004 (January 2016 PU) for SharePoint 2013

Please refer to Stefan Gobner’s blog link below where he talks about the fix for the list view issue that was introduced with (MS 16-004) Jan 12,2016 security patch update .

https://blogs.technet.microsoft.com/stefan_gossner/2016/01/15/solution-for-the-list-view-issue-with-ms16-004-january-2016-pu-for-sharepoint-2013/


Security Patch (MS 16-004 )Breaks SharePoint 2013 lists

This post is to give you a quick heads up about the recent security patch (MS 16-004 ) that was released by Microsoft on Jan 12 ,2016 for SharePoint Server 2013 .It has been observed that installing this patch will break all the list functionality in your SharePoint 2013 farm . I happened to notice many discussions about this in few Technet forums and thought of bringing this to your attention . So whomever is reading this post , please be aware that there is a problem with this patch and Microsoft is currently working on this .

If you have any plans of installing this security patch it would be great if you check with your Microsoft PFE before doing so . Please pass this word to your fellow SharePoint folks working in other firms.

More info on this issue , please see the links below ….

http://www.toddklindt.com/blog/Lists/Posts/Post.aspx?ID=616

MS16-004 Causes a TypeError on SharePoint Lists


Minimal Download Strategy feature in SharePoint 2013

This is a new feature that came up in SharePoint 2013 that is used to optimize page rendering. It reduces the page loading time by sending only the differences that were made to the page when users try to access a new page.

So in detailed words, Minimal download strategy takes care reducing the amount of data that the client browser has to download when users navigate from one page to another page within a SharePoint site. When a user browses a site that has the MDS feature enabled on it, the user will see only the differences (or delta change) between the current page and the requested page.

Methods to activate Minimal Download Strategy:

The Minimal Download Strategy feature (MDS) can be enabled in a SharePoint site using the below mentioned methods.

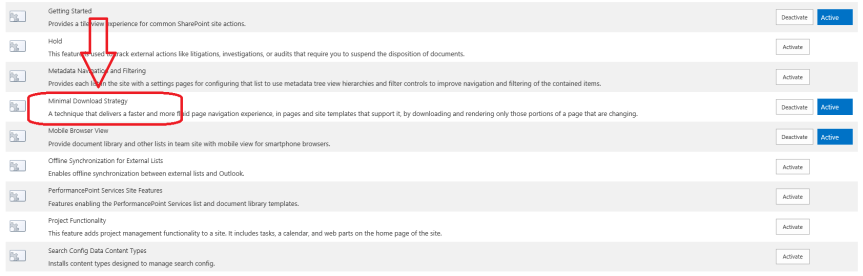
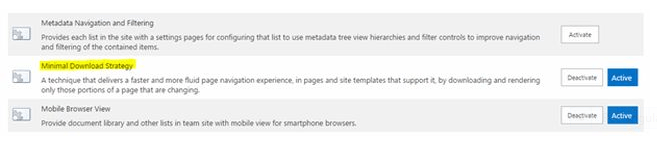
  1. Activate the MDS feature using the site settings UI.
  2. Using PowerShell Command
  3. Using Server Object Model
  4. Using Client Object Model

Now, let’s take a look at the first two methods….

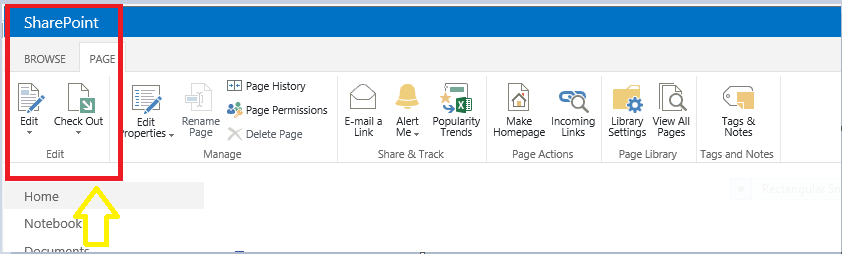
Using the site settings UI:

Go to site –> Site settings –>Manage site features–> Activate Minimal Download Strategy

1

Using Power Shell command:

Use the below mentioned Power Shell command to activate the MDS feature in a site.

$web=Get-SPWeb “http://sharepoint.com&#8221;

$web.EnableMinimalDownload=$true;

$web.Update();

To disable the feature, use the below command:

$web=Get-SPWeb “http://sharepoint.com&#8221;

$web.EnableMinimalDownload=$false;

$web.Update();

Enable/Disable MDS through PowerShell:

You can use the “Disable-SPFeature / Enable-SPFeature” commands to enable or disable the MDS feature.

The following command will disable the MDS for a particular site.

Disable-spfeature –url http://SharepointSite –identity “MDSFeature”

Power Shell Command Enable/Disable MDS across all web applications:

foreach($webApp in Get-SPWebApplication)

{

    foreach ($SPsite in $webApp.Sites)

    {

       foreach($SPweb in $SPsite.AllWebs)

        {

             Disable-SPFeature –identity “MDSFeature” -URL $spweb.URL -confirm:$false

        }

    }

  }

Identifying whether MDS is working on your site:

Once you’re done activating the MDS feature in your SharePoint site you can confirm its functionality by taking a look at the site url …

2

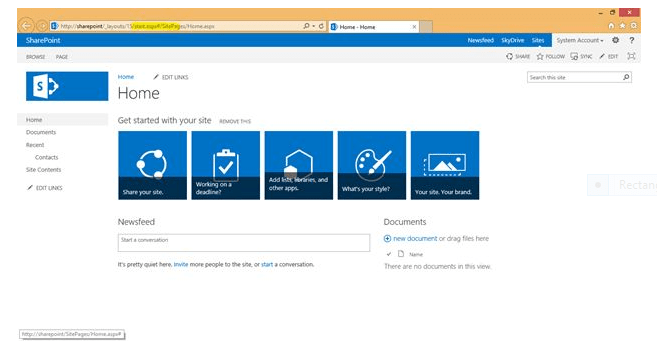
You can notice all the pages having “start.aspx” for rendering.

The requested new page url will have a prefix of “#” before it.

URL’s formatted in MDS mode:

Non-MDS URL MDS URL
http://server/SitePages/ http://server/_layouts/15/start.aspx#/SitePages/
http://server/subsite/SitePages/home.aspx http://server/subsite/_layouts/15/start.aspx#/SitePages/home.aspx
http://server/_layouts/15/viewlsts.aspx?BaseType=0 http://server/_layouts/15/start.aspx#/_layouts/viewlsts.aspx?BaseType=0

So how this works:

There are 2 components that enable MDS:

  1. Server-side
  2. Client-side

Each page will be divided into multiple sections.

When a client requests a new page, the server calculates the delta (changes). Only the changed sections will be sent to the client. The client will be smart enough to patch the received sections to appropriate sections.

Let’s take a look at the below mentioned example from TechNet:

3

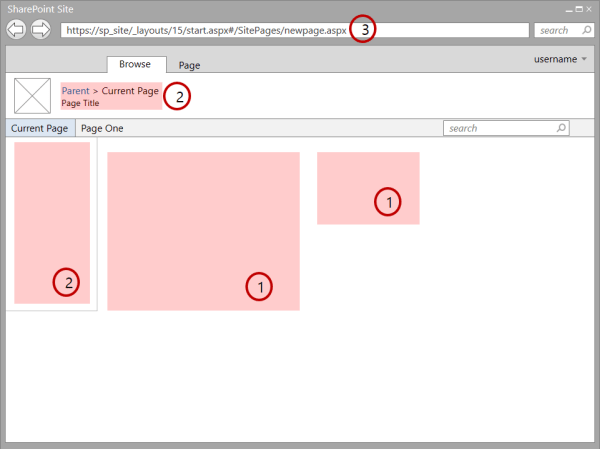
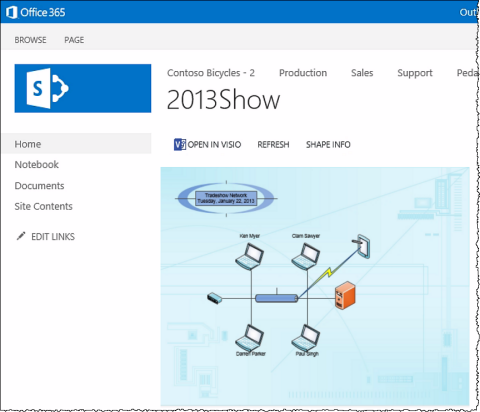
Figure 1 shows the sections that change from page to page and therefore require an update. The delta usually includes the data in the (1) content areas, as well as other components such as (2) navigation controls.

We can identify a site that has MDS enabled by taking a look at the URL. An MDS-enabled site has the (3) _layouts/15/start.aspx page in the URL followed by a hash mark (#) and the relative URL of the requested resource, as shown in

Figure 1. For example, the following is the MDS-formatted URL for the page newpage.aspx:

https://sp_site/_layouts/15/start.aspx#/SitePages/newpage.aspx

This is equivalent to the below mentioned non–MDS-formatted URL:

https://sp_site/SitePages/newpage.aspx

MDS Flow Mechanism:

4

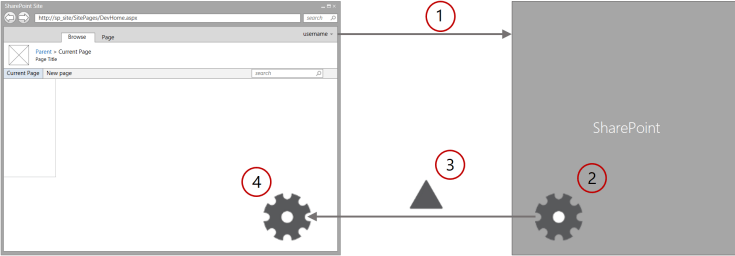
  1. The browser requests the changes between the current page and a new one in the SharePoint site.
  2. The MDS engine in the server calculates the delta between the current and the new pages.
  3. The MDS engine in the server sends the delta to the MDS engine in the client.
  4. The MDS engine in the client replaces the changed areas on the current page with the new page content.

Benefits of Minimal Download Strategy :

  • Speed:This is the main objective of using MDS in your SharePoint site. When you are using MDS, the browser doesn’t have to reprocess the chrome user interface (UI). MDS also reduces the payload compared to a full page load.
  • Smooth transitions:By updating only the areas that change, you draw the user’s eye toward these areas, as opposed to a full page load where the whole page “flashes.” When the whole page is updated, the user must parse it in its entirety to detect what is new. Users have an easier time navigating a site that only updates the areas that changed from the previous page.
  • Browser navigation controls:Other AJAX-based systems confuse the previous and next buttons in browsers. Because MDS updates the URL in the browser window, the previous and next buttons work just as they are supposed to.
  • Backward compatibility:The MDS engine either provides MDS navigation immediately or detects when it isn’t possible. In the case where MDS navigation isn’t possible, a full page load occurs instead. This process is called failover, and it ensures that all pages render properly regardless of whether they contain MDS-compliant components. MDS also works nicely with search engines because the href attribute of anchor tags uses the regular, non MDS-formatted URLs. Instead, the MDS engine in the client captures the onclick event and uses it to communicate with the server.

Note: The Minimal Download Strategy is enabled by default and can be disabled if necessary .You can disable it on a per Web application basis /Site basis using the UI or PowerShell command.

So in a nutshell, the MDS (Minimal Download Strategy) is a new feature that came up in SharePoint 2013 that helps in page optimization by only loading the changes made to a page when an end user tries to access a new page in a SharePoint site.

Happy SharePointing !!!  Thanks for reading this post.


Working with Search Crawl Logs in SharePoint 2013

The crawl logs in the search service application page can help you track the status of the crawled content in your SharePoint farm. Now, in this article I would be briefly discussing about what search crawl log is and how to make use of it.

The Search crawl logs in SharePoint Search service application can help you to identify the below mentioned three things ……

  1. Whether crawled content was successfully added to the index
  2. Whether it was excluded because of a crawl rule
  3. Whether indexing failed because of an error.

It can also give you some additional information about the crawled content, when was the last time a successful crawl ran, the content sources and if there is any crawl rules in place. In addition to that if you’re troubleshooting any error related to “enterprise search”, then crawl log is the right tool to rely upon.

Steps to access the search crawl log in SharePoint 2013:

  1. Verify whether you’re an administrator for the Search service application.
  2. In Central Administration, in the Quick Launch, click Application Management.
  3. On the Application Management page, under Service Applications, click Manage service applications.
  4. On the Service Applications page, in the list of service applications, click the Search service application that you want.
  5. On the Search Administration page, in the Quick Launch, under Crawling, click Crawl Log.
  6. On the Crawl Log – Content Source page, click the view that you want.

Now if you take a closer look at the “crawl log” page you will see different views such as ….

  1. Content source.
  2. Host Name.
  3. Crawl History
  4. Error Breakdown
  5. Databases
  6. URL View

Search Crawl log page.jpg

Let’s discuss in brief about what these Crawl log views are all about and what information do they provide.

View Name 1: Content Source:

Summarizes items crawled per content source. Shows successes, warnings, errors, top-level errors, and deletes. The data in this view represent the current status of items that are already present in the index per content source. The Object Model provides the data for this view.

View Name 2: Host Name:

Summarizes items crawled per host. Shows successes, warnings, errors, deletes, top-level errors, and total. The data in this view represent the current status of items that are already present in the index per host. If your environment has multiple crawl databases, the data is shown per crawl database. The Search Administration database provides the data for this view. You can filter the results by typing a URL in the Find URLs that begin with the following hostname/path: box.

View Name 3: URL:

Let’s you search the crawl logs by content source or URL or host name and view details of all items that are present in the index. The MSSCrawlURLReport table in the crawl database provides the data for this view. You can filter the results by setting the StatusMessageStart Time, and End Time fields.

View Name 4: Crawl History:

Summarizes crawl transactions that were completed during a crawl. There can be multiple crawl transactions per item in a single crawl, so the number of transactions can be larger than the total number of items. This view shows data for three kinds of crawls:

  • Full. Crawls all items in a content source.
  • Incremental. Crawls items that have been changed since the last full or incremental crawl. This kind of crawl only runs if it is scheduled.
  • Delete. If start addresses are removed from a content source, a delete crawl removes items associated with the deleted start address from the index before a full or incremental crawl runs. This kind of crawl cannot be scheduled.

The Search Administration database provides the data for this view. You can filter the results by content source.

View Name 5: Error Message:

Provides aggregates of errors per content source or host name. The MSSCrawlURLReport table in the crawl database provides the data for this view. You can filter by content source or host.

Note: The filter drop-down box only shows content sources that contain errors. If there is an error against an item that does not appear in the index, the error does not appear in this view.

Now since we have talked about the different crawl log views in Search, let’s discuss on how the data is surfaced in these views.

The data in the search crawl page is displayed in the following columns:

  • Successes–>Items that were successfully crawled, added to the index and searchable.
  • Warnings–>Items that might not have been successfully crawled and might not be searchable.
  • Errors–>Items that were not successfully crawled and might not be searchable.
  • Deletes–>Items that were removed from the index and are no longer searchable.
  • Top Level Errors–>Errors in top-level documents, including start addresses, virtual servers, and content databases. Every top-level error is counted as an error, but not all errors are counted as top-level errors. Because the Errors column includes the count from the Top Level Errors column, top-level-errors are not counted again in the Host Name view.
  • Not Modified–>Items that were not modified between crawls.
  • Security Update–>Items whose security settings were crawled because they were modified.

The Search Crawl log Timer job plays and important role here and its really very crucial and important that you check that often and make sure its running properly.

Search Crawl Log Timer Job:

By default, the data for each crawl log view in the crawl log is refreshed every five minutes by the timer job “Crawl Log Report for Search Application <Your Search Service Application name>”. This can be changed as per your need if required, but the best practice is to leave it as it is.

To check the status of the crawl log timer job:

  1. Make sure you’re a Farm Administrator
  2. In Central Administration, in the Monitoring section, click Check job status.
  3. On the Timer Job Status page, click Job History.
  4. On the Job History page, find Crawl Log Report for Search Application <Search Service Application name> for the Search service application that you want and review the status.

To change the refresh rate for the crawl log timer job:

  1. Make sure you’re a Farm Administrator
  2. In Central Administration, in the Monitoring section, click Check job status.
  3. On the Timer Job Status page, click Job History.
  4. On the Job History page, click Crawl Log Report for Search Application <Search Service Application name> for the Search service application that you want.
  5. On the Edit Timer Job page, in the Recurring Schedule section, change the timer job schedule to the interval that you want.
  6. Click OK.

I’ll be discussing about how to troubleshoot the search crawl problems in a different article .Thanks for reading this post!!!!

SharePoint Host Name site collection creator

Alright,I’m not trying to do some marketing stuff for this product now .I just came across this tool in the internet and just thought it would be wise to let my fellow SharePoint folks know about this if they haven’t heard about this yet .

It’s a known fact that there are so many cool tools like this in CodePlex but however this one caught my attention a lot and I wanted to blog about this .

Now ,What’s this  tools for ? 

This tool allows SharePoint Admins to create HNSC Via a GUI instead of PowerShell. This project has two ways to be used. One of them is a Windows Forms application that needs no installation, and the second one is a SharePoint 2013 farm solution that plugs in the Central Admin for a native SharePoint experience.

Now since I’ve given an overview of what’s  this tool about ,please take a look at this link below to understand about this tool and how to use it and what it can do for SharePoint IT Pros to make their life easy . Also , do remember that I haven’t tried this tool yet and I’m planning to explore this in my lab .

https://hnsc.codeplex.com/

Happy SharePointing!!!!!!


What to expect from Visio Service in SharePoint 2013?

VisiodrawingInSP480x412

Alright ,I happened to work on a small project where I was supposed to configure the “Visio Services” in SharePoint Server 2013 for my customers  and I’m writing this article to share my experience on  that . Now , I’m not going to talk about how to configure “Visio Services” in SharePoint 2013 as I guess that’s a pretty straight forward process unless you’re gonna deal with configuring external data sources .

I’m just gonna talk about what to expect from Visio services in SharePoint 2013 , once again this article is only gonna discuss about the bare minimum features in Visio Services and I’m not gonna take a deep dive into it and talk about stuff like  external data sources in this post .I’m saving that topic for a different post ….

1.What is Visio Service in SharePoint Server 2013?

Visio Service in SharePoint Server 2013 can let users share and view Visio diagrams.

2.What’s the use and benefits of Visio Service?

Visio diagrams can be rendered by Visio Services and viewed in a Web browser. This lets users view Visio documents without having Visio or the Visio Viewer installed on the local computer. This also allows diagrams to be viewed on mobile devices. Basic exploration and navigation of these rendered diagrams are supported within the “Visio Web Access” Web Part. Page designers can configure the user interface and functionality of the Web Part.

3.What are the supported Visio file formats in SharePoint Server 2013?

Visio Services in SharePoint Server 2013 can render diagrams created in Visio 2010 or Visio 2013.

For Visio 2010,

Visio diagrams created in Visio 2010 must be created using Visio 2010 Professional or Visio 2010 Premium and must be published to a SharePoint site as a Visio Web drawing (*.vdw) file

For Visio 2013,

Visio diagrams created in Visio 2013 must be created by using Visio Professional 2013. The new standard diagram format in Visio Professional 2013 (*.vsdx files) can be rendered by Visio Services, along with the Web drawing (.vdw) format

4.Which file format is not supported by Visio service in SharePoint Server 2013?

(.vsd files) are not rendered by Visio Services and require Visio 2010 client app to be viewed. Similarly you won’t be able to open a Visio file with (.vsdx) file format using Visio 2010 client app and in order to open it you need to have the Service pack 2 for Visio 2010 installed in your PC.

5. Where can I upload a Visio file to view it?

Like any other Microsoft office files you can upload a Visio file to a document library in SharePoint for your users to view it and to share it with others.

6.What can’t be done using Visio services?

As already mention above “Visio services” in SharePoint can only allow users to view Visio files and hence you can’t edit a Visio file using Visio services. In order to edit a Visio file that is stored within SharePoint you should have the Visio client application installed in your PC.

7.What happens when I click on the “OPEN IN VISIO “button on a Visio file?

Visio 1

Clicking on this button will check whether you have the supported Visio client application installed in your PC and will open the Visio file using the Visio client app. You can edit the file if you want and save it back to SharePoint.

8.How to use the Visio Web Access Web Part to display a Visio file in SharePoint?

Please follow the steps below to make use of the “Visio Web Access web part”:

1.Make sure you have the “SharePoint Server Enterprise Site collection feature” activated under Site collection features. If you don’t have access to do this, please ask your Site collection administrator to this.

2.Make sure you have edit/design rights on the SharePoint site and click on the top ribbon on the SharePoint page and hit the “edit” button as shown in the image below.

Visio 2

3.Once done, click on the “insert” button and try to add the “Visio Web Access web part” by clicking on “Web part” .Please check the screenshot below.

Visio 1

4.Choose the “Visio Web access” web part from the Business data category as shown in the image below.

Visio 3

5.Once done clicking on the “Visio web access “web part, please choose where exactly you want the web part to be displayed in the page.

6.After adding the web part to your site, please click on the drop-down on the top right corner and choose the edit web part option as shown in the image below.

Visio 4

7. Choose the path of the Visio file by clicking on the “Web drawing url “ option on the tool pane .Make sure you have the Visio file already saved in a document library beforehand .

Visio 5

8. Once you’re done adding the “Visio file” go to the “Appearance” section below and choose “None” under “Chrome Type” as shown in the image below.

Visio 6

9. That’s it, you’re all done now. You should be able to see the Visio file being displayed on the SharePoint site.


2015 in review

The WordPress.com stats helper monkeys prepared a 2015 annual report for this blog.

Here’s an excerpt:

A New York City subway train holds 1,200 people. This blog was viewed about 4,600 times in 2015. If it were a NYC subway train, it would take about 4 trips to carry that many people.

Click here to see the complete report.